TeamDrive Web Portal Administration
Disabling the Apache Access Log
In the default setup, Apache is used as a reverse proxy to route all calls
from the TeamDrive browser App to the TeamDrive Agent of the user. This can
generate a large number of requests so there is no point in keeping the
normal access log activated. We therefore recommend deactivating it in
a production environment. Only the error log should be left
enabled. To facilitate this, comment out the following line in the default
httpd.conf:
# CustomLog logs/access_log combined
If problems occur, logging can be activated for a specific user (see http://httpd.apache.org/docs/2.4/mod/mod_log_config.html). e.g. all access to TeamDrive Agent using port 49153 will be logged (the required Apache logging module needs to be enabled again):
SetEnvIf Request_URI 49153 agent-49153
CustomLog logs/agent-49153-requests.log common env=agent-49153
Restart the Apache instance and check the log files for errors.
You can discover the port used by an agent by using the command:
[root@webportal ~]# systemctl status webportal*
The port used is visible in the command line parameter http-api-port.
Changing an Admin User’s Password
The Web Portal Administration Console can be accessed by all Admin Users by entering the correct username and password.
An existing user with administrative privileges can change his password directly via the Administration Console’s login page or via the Admin Users page of the Administration Console.
On the login page, click on Change Password... to enable two input fields New Password and Repeat Password that allow you to enter the new password twice (to ensure you did not mistype it by accident). You also need to enter your username in the Username field and the current password in the Password: field above. Click Login and Change Password to apply the new password and log in.
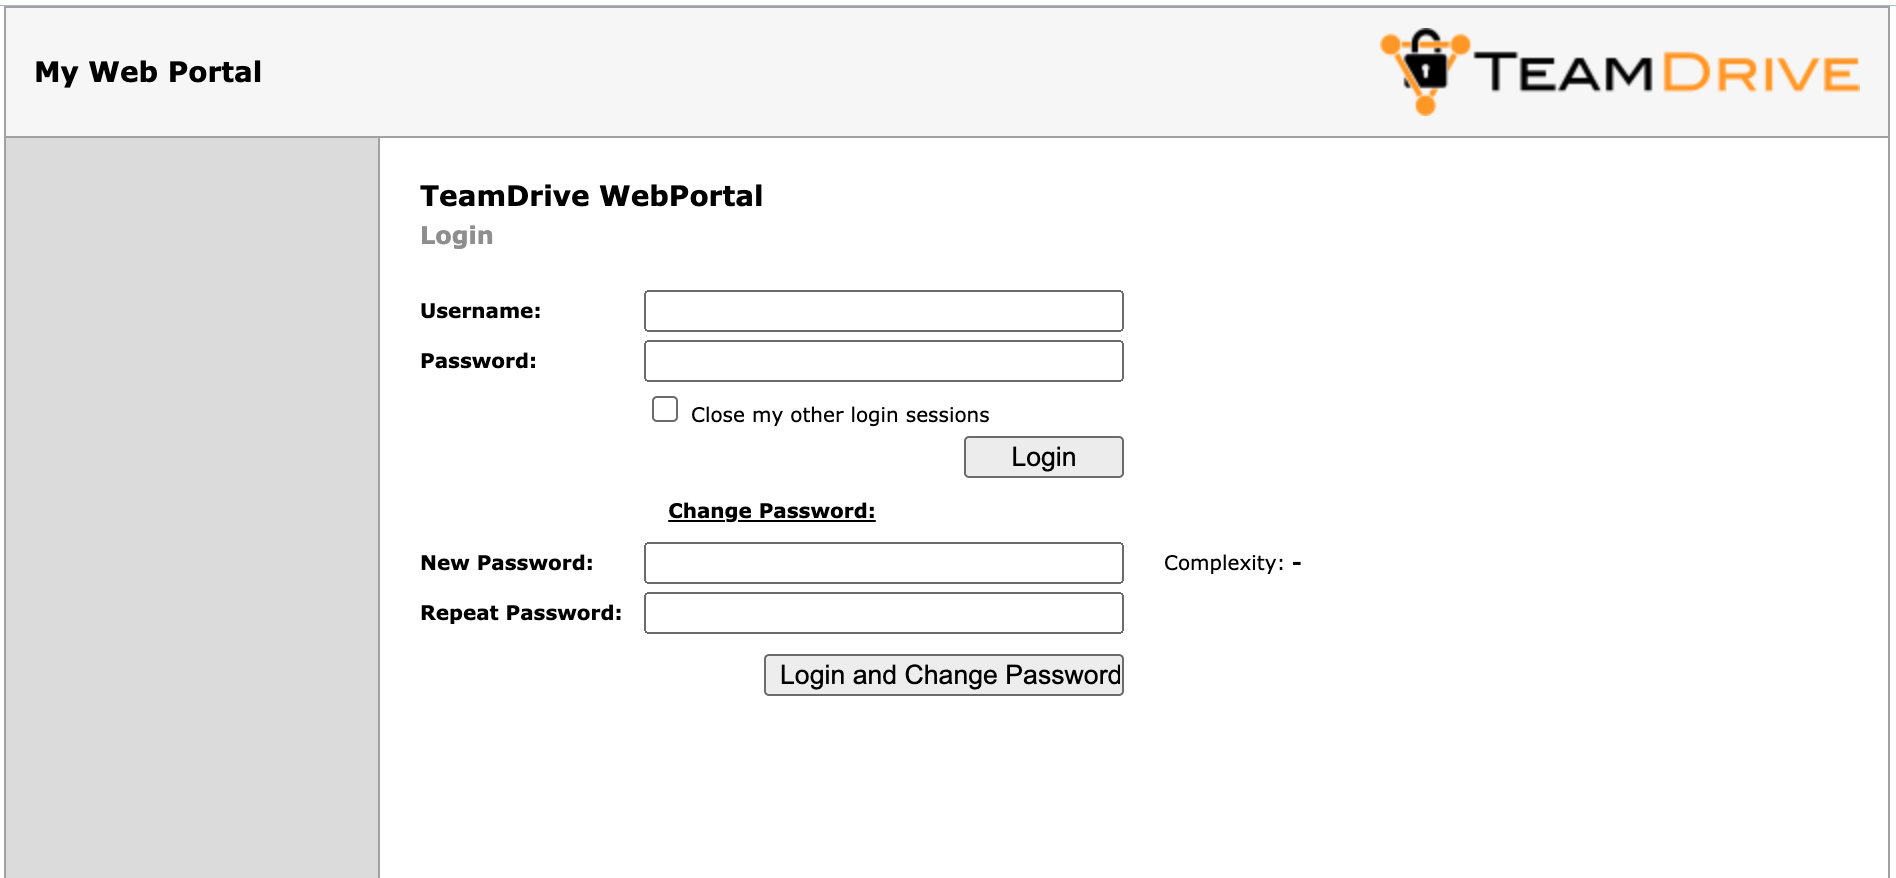
Web Portal Administration Console: Change Password
You can also change your password while being logged into the Administration Console. If your user account has “Superuser” privileges, you can change the password of any admin user, not just your own one.
Click User List to open the user administration page.
The page will list all existing user accounts and their details.
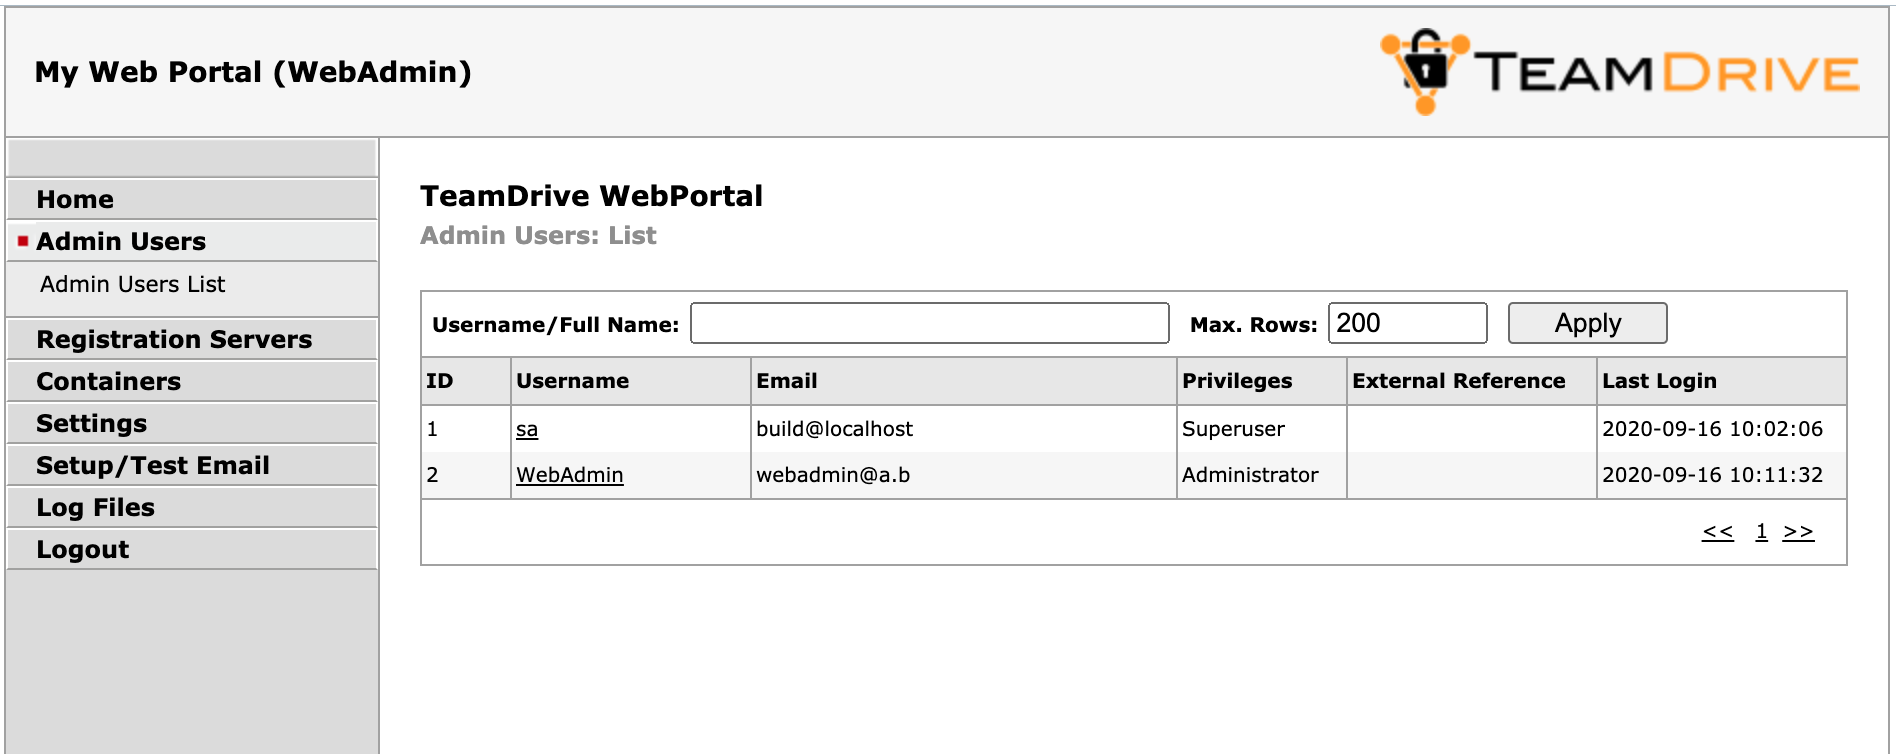
Web Portal Administration Console: Admin Users List
Click the username of the account you want to modify. This will bring up the user’s details page.
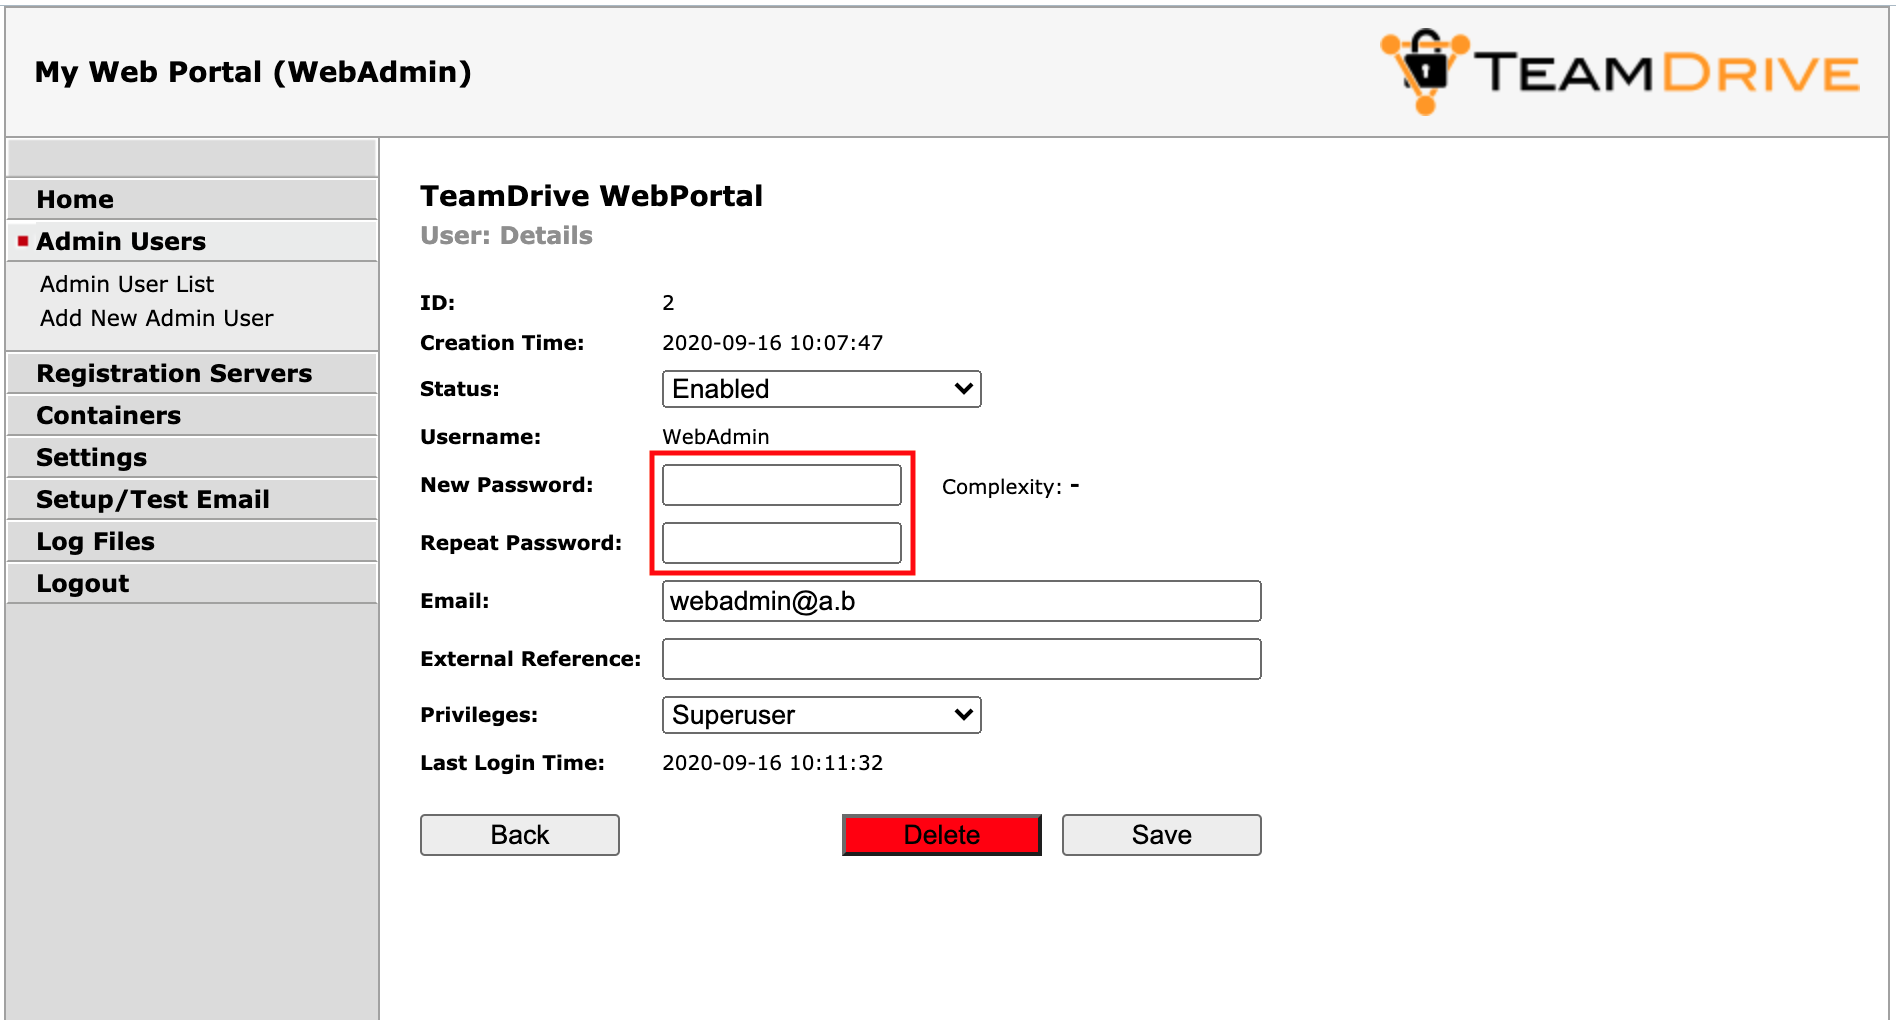
Web Portal Administration Console: User Details
To change the password, enter the new password into the input fields New Password and Repeat Password and click Save to commit the change.
The new password will be required the next time this user logs into the Administration Console.
In case you lost or forgot the password for the last user with Superuser
privileges (e.g. the default HostAdmin user), you need to reset the
password by removing the current hashed password stored in the MySQL Database
(Column Password, located in Table webportal.WP_Admin). This can be
performed using the following SQL query.
Log into the MySQL database using the teamdrive user and the corresponding
database password:
[root@webportal ~]# mysql -u teamdrive -p
Enter password:

[...]

mysql> use webportal;
Database changed

mysql> SELECT * FROM WP_Admin WHERE UserName='WebAdmin'\G
*************************** 1. row ***************************
           ID: 1
       Status: 0
     UserName: WebAdmin
        Email: root@localhost
     Password: $2y$10$JIhziNetygYCeIXU3gXveue2BTqwCs4vwA6LHNUKZVt8V.U8jtkcW
 ExtReference: NULL
   Privileges: Superuser
 CreationTime: 2015-08-10 11:26:10
LastLoginTime: 2015-08-10 11:53:06
1 row in set (0.00 sec)

mysql> UPDATE WP_Admin SET Password='' WHERE UserName='HostAdmin';
Query OK, 1 row affected (0.01 sec)
Rows matched: 1  Changed: 1  Warnings: 0

mysql> quit
Bye
Now you can enter a new password for the HostAdmin user via the login page
as outlined above, by clicking the Change Password link, but leaving the
Password field empty and only entering the new password twice, followed by
clicking the Login and Change Password button.
Configure proxy for outgoing connections for the TeamDrive Agent
To use a proxy for outgoing connections add the following option to
the ClientSettings setting (teamdrive agent 4.6.11 build 2640 or
newer required):
http-proxy=http://proxy.example.com:80/
The change only takes effect once a running agent has been restarted.
How to Enable Two-Factor Authentication
Two-factor authentication (2FA) can be enabled at two different areas:
- 2FA for the Web Portal Administrators
- 2FA for the users of the Web Portal
How to enable two-factor authentication for administrators is described in the section below (Enabling Two-Factor Authentication for Administrators).
Two-factor authentication (2FA) for the Web Portal users requires the Registration Server version 3.6 or later. 2FA is implemented by the Registration Server using a One-Time-Pin send by mail or the Google Authenticator App (https://support.google.com/accounts/answer/1066447?hl=en).
2FA for users can be enabled by the user in the TeamDrive UI.
As described in Web Portal Settings, these settings default to login and registration pages provided by the Web Portal. The Web Portal pages redirect to the associated pages provided by the Registration Server.
On the Registration Server the pages, can be optionally customised using the
template system. The templates to be modified are: portal-login,
portal-lost-pwd, portal-register, portal-activate, portal-login-ok,
portal-goog-auth-setup, portal-goog-auth-login, and
portal-goog-auth-login-ok.
If you would like to allow users to register directly via the Web Portal, then
set RegistrationEnabled to True.
Note
Please check the apache ssl.conf for the additional RewriteRule in case you updated from WebPortal 1.0.5 to a newer version:
RewriteRule ^/portal(.*)$ /yvva/portal$1 [PT]
See Configure mod_ssl for details.
On the Registration Server you must add the domain name of the Web Portal (as
specified by WebPortalDomain) to Provider setting API_WEB_PORTAL_IP.
Modify this setting by adding the domain name on a line beneath the IP Address
of the Web Portal which you have already set (as described in
Associating the Web Portal with a Provider).
If the Web Portal is used by several Providers, only modify the
API_WEB_PORTAL_IP setting of one of the Providers. This will be the
default Provider for users that register directly via the Web Portal.
Enabling Two-Factor Authentication for Administrators
The Web Portal Administration Console supports two-factor authentication via email. In this mode, an administrator with “Superuser” privileges that logs-in with his username and password must provide an additional authentication code that will be sent to him via email during the login process. This feature is disabled by default.
The TeamDrive Web Portal needs to be configured to send out these authentication email messages via SMTP. The Web Portal is only capable of sending out email using plain SMTP via TCP port 25 to a local or remote MTA.
If your remote MTA requires some form of encryption or authentication, you need to set up a local MTA that acts as a relay. See chapter Installing the Postfix MTA in the TeamDrive Web Portal Installation Guide for details.
Before you can enable two-factor authentication, you need to set up and verify the Web Portal’s email configuration. This can be accomplished via the Host Server’s Administration Console. You need to log in with a user account having “Superuser” privileges in order to conclude this step.
Click Setup / Test Email to open the server’s email configuration page.
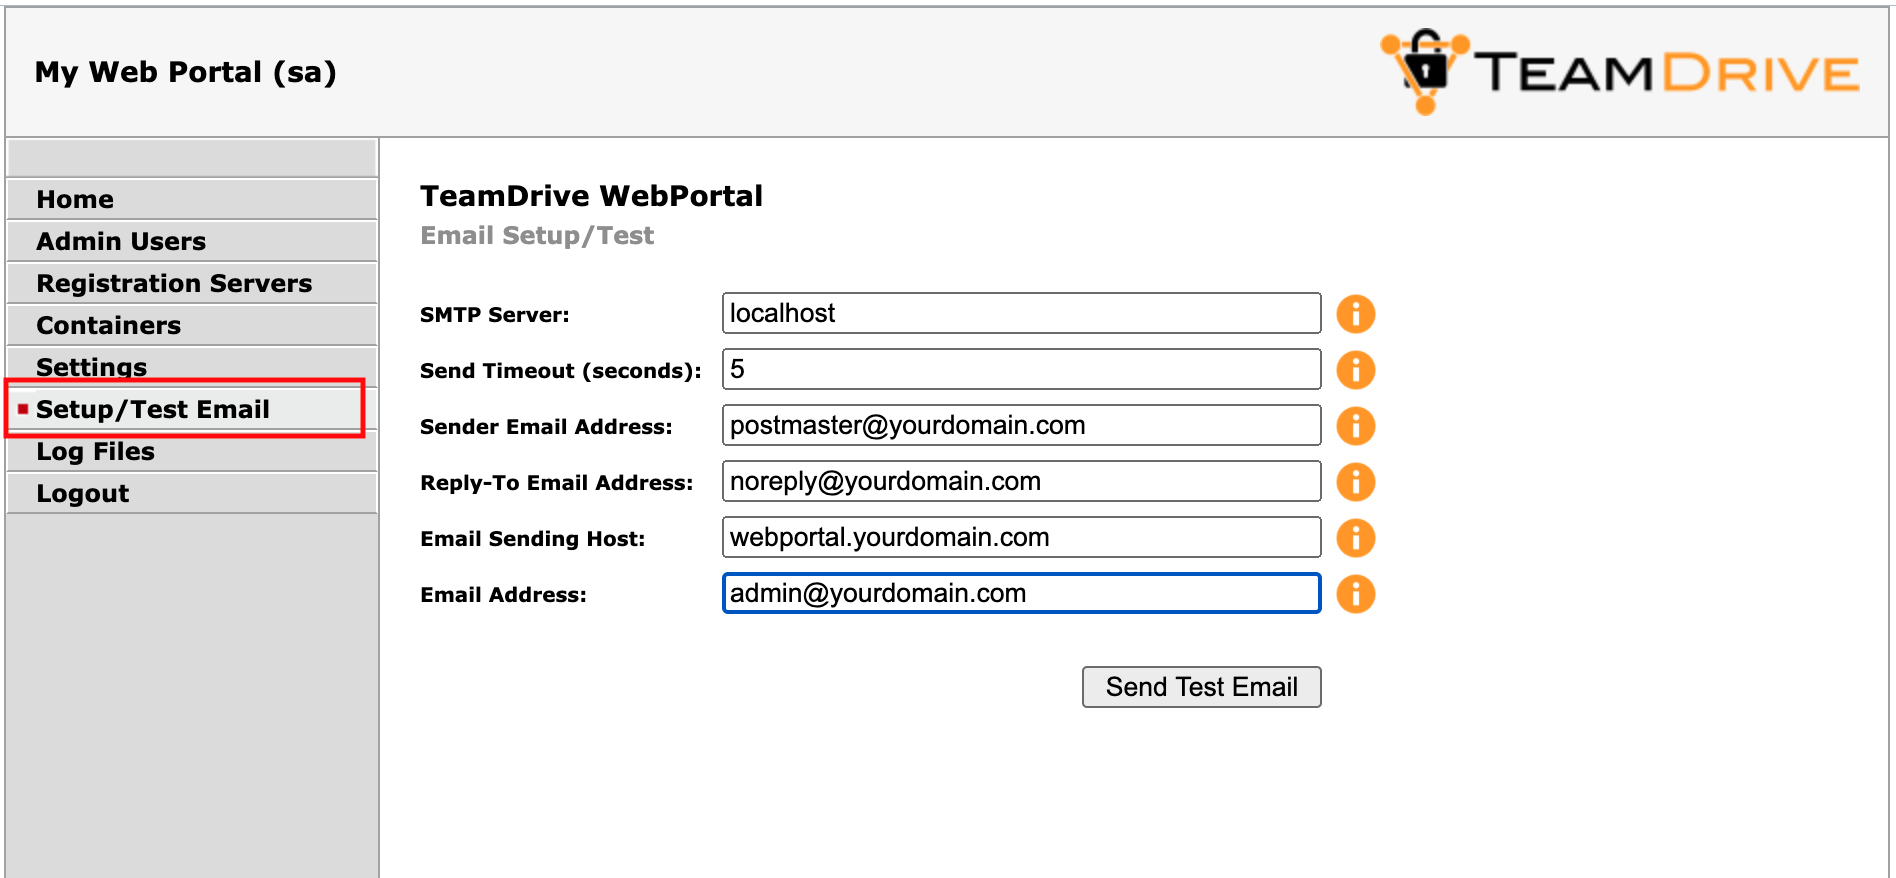
Web Portal Admin Console: Email Setup / Test
Fill out the fields to match your local environment:
- SMTP Server:
- The host name of the SMTP server accepting outgoing email via plain SMTP.
Choose
localhostif you have set up a local relay server. - Send Timout:
- The timeout (in seconds) that the mail sending code should wait for a delivery confirmation from the remote MTA.
- Sender Email Address:
- The email address used as the Sender email address during the SMTP delivery,
e.g.
postmaster@yourdomain.com. This address is also known as the “envelope address” and must be a valid email address that can accept SMTP-related messages (e.g. bounce messages). - Reply-To Email Address:
- The email address used as the “From:” header in outgoing email messages.
Depending on your requirements, this can simply be a “noreply” address, or
an email address for your ticket system, e.g.
support@yourdomain.com. - Email Sending Host:
- The host name used in the HELO SMTP command, usually your Web Portal’s fully qualified domain name.
- Email Address:
- The primary administrator’s email address. This address is the default recipient for all emails that don’t have an explicit receiving address. During the email setup process, a confirmation email will be sent to this address.
After you’ve entered the appropriate values, click Send Test Email to
verify the email setup. If there is any communication error with the
configured MTA, an error message will be printed. Check your configuration and
the MTA’s log files (e.g. /var/log/maillog of the local Postfix instance)
for hints.
If the configuration is correct and functional, a confirmation email will be delivered to the email address you provided. It contains an URL that you need to click in order to commit your configuration changes. After clicking the URL, you will see a web page that confirms your changes.
This concludes the basic email configuration of the Web Portal. Now you can
enable the two-factor authentication by clicking Settings ->
UseTwoFactorAuth. Change the setting’s value from False to True
and click Save to apply the modification.

Web Portal Admin Console: Use Two-Factor Authentication
Now two-factor authentication for the Administration Console has been enabled.
The next time you log in as a user with “Superuser” privileges, entering the username and password will ask you to enter a random secret code, which will be sent to you via email to the email address associated with your administrator account. Enter the code provdided into the input field Authentication Code to conclude the login process.
Changing the MySQL Database Connection Information
The Web Portal Apache module mod_yvva as well as the
yvvad daemon that performs the td-webportal background tasks need to
be able to communicate with the MySQL management database of the Web Portal.
If you want to change the password of the teamdrive user or move the MySQL
database to a different host, the following changes need to be performed.
To change the MySQL login credentials, edit the file
/etc/td-webportal.my.cnf. The password for the teamdrive MySQL user
in the [tdweb] option group must match the one you defined earlier:
[tdweb]
database=webportal
user=teamdrive
password=<password>
host=127.0.0.1
If the MySQL database is located on a different host, make sure to modify the
host variable as well, providing the host name or IP address of the host
that provides the MySQL service. If required, the TCP port can be changed from
the default port (3306) to any other value by adding a port=<port> option.
Configuring Active Directory / LDAP Authentication Services
The Web Portal supports login using an External Authentication Service, for example Microsoft AD or LDAP.
Note
This section refers to the login of the TeamDrive users as apposed to the administrators of the Web Portal, which is described in the section: Administrator Login using External Authentication below.
Whether to use such a service is automatically determined depending on the username or email address entered during login. This is assuming you are using the TeamDrive Agent version 4.6.11.2656 or later.
Unlike the TeamDrive client, or standalone TeamDrive Agent, you cannot login
to the Web Portal without an existing user account. Registration is possible
if you provide a “registration URL”, by setting RegistrationURL.
External authentication is used if a user belongs to a Registration Server
provider that has enabled external authentication by setting USE_AUTH_SERVICE
to True, and by specifying AUTH_LOGIN_URL and VERIFY_AUTH_TOKEN_URL
URLs. Alternatively the email of the user is associated with named external
authentication service. This is explained in how to manager domains and
services on the Registration Server 4.5.
Please refer to Configuring External Authentication using Microsoft Active Directory / LDAP in the TeamDrive Registration Server Administration Guide for details of how to setup an External authentication service. In this document we describe only the aspects that are relevant to the Web Portal.
Exclusive use of a particular external authentication service is still
supported by the Web Portal. This is activated by setting AuthServiceEnabled
to True. When set to True, the Web Portal will immediately redirect
users to the the external service login page as specified by the
AuthLoginPageURL setting (see also AuthTokenVerifyURL). This
limits the Web Portal login to only users of this external service, and is
mostly supported for backwards compatibility with versions of the Web Portal
before version 2.0.5.
In order for for a Web Portal to access a external authentication service
you must register the domain of the Web Portal with the external service.
This is done by adding the domain of the portal domain to the $allowed_origins
configuration parameter of the external service. For example:
$allowed_origins = array(
  "localhost:45454",
  "127.0.0.1:45454",
  "shop.domain.com",
  "webportal.domain.com");
Where webportal.domain.com is the domain of the Web Portal, as specified
by the WebPortalDomain setting.
Note that in older versions of the external authentication service
(Registration Server 3.6), the configuration parameter $webportal_domain
was used in place of $allowed_origins. This implementation was restricted
to the support of one login origin (for example one Web Portal), and should
by upgraded to support multiple sources.
Note that the external login page can no longer be embedded in the TeamDrive
Agent GUI as of Web Portal version 3.1.2. This is because most external
authentication services do not support embedding in a iFrame for security reasons
(for example Microsoft Azure). As a result, the UseEmbeddedLogin setting was
removed in version 3.1.2.
Administrator Login using External Authentication
The Administration Console of the Web Portal may use External Authentication such as LDAP or Active Directory. If the administrators of the Web Portal are stored and managed by such a service then it is possible to have the user credentials checked by the server, rather than stored and checked by the Web Portal database.
There are two system settings that control this behaviour: ExtAuthEnabled
and ExtAuthURL. ExtAuthEnabled must be set to True. ExtAuthURL
specifies a URL that will verify the external authentication.
On login, if external authentication is enabled, the Web Portal will
perform a HTTP POST to the URL specified by ExtAuthURL, passing two
parameters: username and password. The page is expected to return
an XML reply of the following form:
<?xml version='1.0' encoding='UTF-8'?>
<teamdrive>
<user>
<id>unique-user-id</id>
<email>users-email-address</email>
</user>
</teamdrive>
If an error occurs, for example an “Incorrect login”, then the ExtAuthURL page must return:
<?xml version='1.0' encoding='UTF-8'?>
<teamdrive>
<error>
<message>error-message-here</message>
</error>
</teamdrive>
Such a page can be easily implemented in PHP, for instance. An example
implementation of the ExtAuthURL page for LDAP and Active Directory
is available upon request from TeamDrive Systems (please contact
sales@teamdrive.com).
Web Portal Backup Considerations
The extent to which backup and failover is performed depends entirely on the service level you wish to provide.
In order to secure the configuration of the Web Portal, you must
make a backup of the webportal MySQL database. Loss of the
database will require a complete re-install of the Web Portal.
Quick recovery from failure of the Web Portal can be provided
by replicating the webportal database to a standby machine.
You should also ensure that you have a backup of all the configuration files describe here: List of relevant configuration files. However, these files are rarely changed after the initial setup.
A standby host is also recommended if a high level of
availability is required. If the contents of the ContainerRoot
is lost due to disk failure, or failure of the host,
users will have to re-enter their Spaces after they log
into the Web Portal again. The only data that will be lost
in this case are files that were being uploaded when the
failure occurred, All other Space data is stored by the
TeamDrive Hosting Service, and can be recovered from there.
In order to ensure a high level of availability, a standby host may
be used, and the contents of the ContainerRoot path can be
copied to the standby system using rsync. Alternatives depend
on the type of volume mounted at ContainerRoot. If the file
system has sufficient redundancy and can be mounted by the standby
system at any time, then no further consideration are required.
Setting up Server Monitoring
It’s highly recommended to set up some kind of system monitoring, to receive notifications in case of any critical conditions or failures.
Since the TeamDrive Web Portal is based on standard Linux components like the Apache HTTP Server and the MySQL database, almost any system monitoring solution can be used to monitor the health of these services.
We recommend using Nagios or a derivative like Icinga or Centreon. Other well-established monitoring systems like Zabbix or Munin will also work. Most of these offer standard checks to monitor CPU usage, memory utilization, disk space and other critical server parameters.
In addition to these basic system parameters, the existence and operational status of the following services/processes should be monitored:
- The MySQL Server (system process
mysqld) is up and running and answering to SQL queries - The Apache HTTP Server (
httpd) is up and running and answering to http requests (this can be verified by accessing https://webportal.yourdomain.com/index.html and https://webportal.yourdomain.com/admin/index.html) - The
td-webportalservice is up and running (process nameyvvad)
Scaling a TeamDrive Web Portal Setup
When scaling the TeamDrive Web Portal we consider each component individually. There are three components that are relevant to this discussion: the Apache Web Server, the MySQL Database and the Load Balancer.
The simplest configuration places all components on one machine. This is the case which is largely described in this document. In this case, the Apache Web Server also fulfills the function of the Load Balancer. This is done by re-write rules which direct calls from the Web client to The associated TeamDrive Agent.
Apache Web Server
The Apache Web Server host is responsible for the management of the Web Portal. This includes: the Login page, the Administration Console and the background tasks.
The scaling requirements of this component are relatively limited as the task do not require much resources in terms of CPU, memory or disk space.
This means that a “scale-up” of the Apache Web Server host is probably quite sufficient to cope with a growing number of users.
Nevertheless, if the Web Portal access patterns require it, or simply to add redundancy it is possible to scale-out the Apache Web Server, by adding additional machines that run the identical Web Portal software.
In this case a Load Balancer is required to distribute requests to the various Apache hosts. This can be done on a simple round-robin basis or according to current load since the connections are stateless.
The Web Portal service which runs the various background task should be started on all Apache hosts.
The MySQL Database must also be moved to a separate system. See below for more details.
MySQL Database
Load on the database, and the volume of data is minimal on the Web Portal. For this reason, it should suffice to place the MySQL database on a dedicated server as the load increases on the Web Portal. Additional CPU’s and memory can then be added to this system as required.
As mentioned above, if the Apache Web Server is scaled out, then it is necessary to place the MySQL database on a separate system even if this is not required for load reasons. If this is not done then the MySQL database can remain on the same system as The Apache Web Server.
Upgrading from a Docker based to a Docker less Web Portal
To update a Web Portal Virtual Appliance Installation with CentOS 7 and Docker to a Docker less CentOS 8 version a few prepartions steps are necessary:
1. Remove all Docker Container and Images
2. Uninstall Docker and clean up the filesystem
3. Remove Docker Volume and use the free space to extend the var-Partition
4. Upgrade from CentOS 7 to 8
5. Follow the instruction to update the Web Portal
Stop the Apache to make sure, that now user can use the web portal during the upgrade:
service httpd stop
Remove all Docker Container and Images:
docker stop $(docker ps -aq)
docker rm $(docker ps -aq)
docker rmi $(docker images -q)
Uninstall Docker (without the td-webportal package) and clean up the filesystem:
yum remove docker docker-client docker-client-latest docker-common docker-latest docker-latest-logrotate docker-logrotate docker-engine docker-ce docker-ce-cli containerd.io -- -td-webportal
/bin/rm /var/lib/docker/ -R
Remove Docker Volume and extend the free space to the Logical Volume lv_var
volume which is to small for the CentOS 8 upgrade step:
vgchange -a n vg_docker
vgremove vg_docker
pvremove /dev/sda3
vgextend vg_centos7 /dev/sda3
lvextend -l +100%FREE /dev/mapper/vg_centos7-lv_var
xfs_growfs /dev/mapper/vg_centos7-lv_var
reboot
Follow the instruction (only the first chapter for Upgrade CentOS 7 to CentOS 8) and start with step 2 (step 1 can be skipped):
https://techviewleo.com/how-to-migrate-from-centos-7-to-rocky-linux-8/
Step 4 can be skipped and at step 7 use:
dnf install --allowerasing http://mirrors.advancedhosters.com/centos/8-stream/BaseOS/x86_64/os/Packages/{centos-stream-repos-8-3.el8.noarch.rpm,centos-stream-release-8.6-1.el8.noarch.rpm,centos-gpg-keys-8-3.el8.noarch.rpm}
because the vault.centos.org repo for CentOS 8 is not longer active.
The first action at Step 8 “Update CentOS 8 repositories” can be skipped. Proceed with “Remove the current CentOS Kernel” and before starting the CentOS 8 system upgrade, remove the following conflicting packages:
dnf remove NetworkManager
dnf remove dracut-network
dnf remove python36-rpmconf
and disbale the old td-webportal-repos which are not available for CentOS 8:
dnf install dnf-plugins-core --disablerepo=td-webportal*
dnf config-manager --set-disabled td-webportal-1.0
dnf config-manager --set-disabled td-webportal-1.1
dnf config-manager --set-disabled td-webportal-1.2
dnf config-manager --set-disabled td-webportal-2.0
After the upgrade check the system info:
less /etc/centos-release
which should be now CentOS Stream release 8. Proceed with the following
chapter to update the TeamDrive Web Portal itself.
Upgrading the TeamDrive Web Portal
There are a number of aspects to upgrading the TeamDrive software used by the Web Portal: the Web Portal software, the structure of the MySQL database and the TeamDrive agent used by the Web Portal.
There is a dependency between two TeamDrive agent and the Web Portal
because the Web Portal services the Web application that makes calls
to the TeamDrive Agent. The Web Portal requires a MinimumAgentVersion
and will make sure that you are running the required version of the TeamDrive Agent.
Since the TeamDrive agent is always backwards compatible with the Web application, you are free to use a more recent version than required. How to upgrade the TeamDrive agent is described in the following section: Upgrading the Database Structure and TeamDrive Agent.
Upgrading the TeamDrive Web Portal by first downloading the updated repository:
[root@webportal ~]# wget -O /etc/yum.repos.d/td-webportal.repo \
https://repo.teamdrive.net/td-webportal.repo
Update the Web Portal packages using the RPM package manager:
[root@webportal ~]# dnf update td-webportal yvva
An update simply replaces the existing packages while the service is
running, and the services (httpd and td-webportal)
are automatically restarted afterwards.
Please add the new configuration line:
Set flock mutex
in the apache httpd.conf file as described here Update httpd.conf and welcome.conf and make sure, that the apache prefork mode will be used as described in this chapter Enable “Prefork” Mode
After the packages are updated proceed with the next section to update database structure and the TeamDrive Agent.
Check the chapter Release Notes - Version 5.0 for the changes introduced in each new version. The release notes may also contain important notes that effect the upgrade itself.
Upgrading the Database Structure and TeamDrive Agent
The upgrade_now command described below performs two functions:
it upgrades the MySQL database structure and updates the TeamDrive Agent
used by the Web Portal.
Users are prevented from accessing the Web Portal until upgrade is
completed, but running the upgrade_now command (see below).
In addition, some errors may occur in both the Web Portal API and the Admin Console until this command has been executed. As a result, it is recommended that this step is performed immediately after the upgrade of the Web Portal software.
The TeamDrive Agent image used is stored in the ContainerImage
setting and is set to the minimum required agent version by default
(see MinimumAgentVersion).
This means that the TeamDrive Agent image will automatically be updated
when you manually increase the ContainerImage version number or
the MinimumAgentVersion is greater than the version of the image
in use.
The upgrade of a TeamDrive Agent image cannot occur “in-place”. All running TeamDrive Agents will be stopped during the update and when the users login again, the new TeamDrive Agent image will be started.
After you have installed the Web Portal software for the first time
or after a sotfware upgrade start the yvva command line executable,
and enter upgrade_now;;.
This command first performs any necessary database changes and then automatically downloads and installs the requiered TeamDrive agent:
[root@webportal ~]# yvva
Welcome to yvva shell (version 1.5.18).
Enter "go" or end the line with ';;' to execute submitted code.
For a list of commands enter "help".

UPGRADE COMMANDS:
-----------------
To upgrade from the command line, execute:
yvva --call=upgrade_now --config-file="/etc/yvva.conf"

Database structure out of date, upgrade required.

upgrade_now;;
Upgrade the database structure and the Agent sandbox (this command cannot be undone).
After successfully updating the agent the value of ContainerImage will be set
accordingly, for example: teamdrive/agent:4.7.3.3054-TMDR.
Move /teamdrive to external volume
The user data for the TeamDrive agents is located in /teamdrive and this will be the largest part of the necessary storage for hosting the Web-Portal.
Upgrading a custom installation from Version 1.1 to 1.2
Note
This step is only necessary when updating from a version 1.1 or below
to version 1.2 (or later) to define your Build Image settings. Once you set
your build settings, the update process is identical to the normal
update process, just run: upgrade_now;; on the yvva command line.
The “White Label” GUI Web Portal RPM is no longer necessary and the existing package must be removed. Search for the old installed packages:
[root@webportal ~]# rpm -qa | grep "webportal-clientui"
and remove all listed packages using:
[root@webportal ~]# rpm -e <full package name>
Now download the updated repository:
[root@webportal ~]# wget -O /etc/yum.repos.d/td-webportal.repo \
https://repo.teamdrive.net/td-webportal.repo
and update the Web Portal packages using the RPM package manager:
[root@webportal ~]# yum update td-webportal yvva
The Web Portal version 1.2 or later is capable of builds the required agent image automatically. The description below assumes you are using a customised version of the TeamDrive Agent executable, or the Web-GUI.
Use the yvva command line (see below) or the Web Admin to fill in your
Build Image product information.
The following required values are necessary to build a customised agent image:
BuildProductName: The first part of the Agent archive (the tar.gz file). This value should be all lower-case. If not, please contact TeamDrive support.BuildProviderCode: Your 4 letter Provider code.
In addition to set these values, it may be necessary to modify the following settings:
AgentDownloadURL: By dafault this is the link to the TeamDrive download portal:https://download.teamdrive.net/{VERSIONSHORT}/{PROVIDERCODE}/linux-x86_64/{PRODUCTNAME}_agent_{VERSION}_el8.x86_64.tar.gz
See AgentDownloadURL for a detailed description of this value. If your Agent archive is not located on the TeamDrive portal, then you should set the URL accordingly.
The {PROVIDERCODE} placeholder will be replaced by the value you set for
BuildProductName.{VERSION} will be replaced by the highest version specified by the
ContainerImageandMinimumAgentVersionsettings.DISTRIBUTORFile: The content for the DISTRIBUTOR file for the agent. If left empty the DISTRIBUTOR file from the Agent archive (.tar.gz file) will be used.
To set your build settings using the yvva command line: Start yvva as root user
and replace the following placeholders <your-....> with your values:
AppSetting:setSetting("BuildProductName", "<your-product-name>");;
AppSetting:setSetting("BuildProviderCode", "<your-provider-code>");;
to verify your values execute:
print AppSetting:getSettingAsString("BuildProductName");;
print AppSetting:getSettingAsString("BuildProviderCode");;
The optional parameters, AgentDownloadURL and DISTRIBUTORFile
can be a set in a similar manner (line breaks are permitted in strings).
However, it is easier to change settings like DISTRIBUTORFile in the
Web Portal Admin Console.
After these values have been set correctly, you can build a new Docker images by
starting the yvva command line, and running the following command:
upgrade_now;;
The Web Portal will try to download the required Agent archive version and prepare the Agent image for execution. The individual steps will be logged to the console and an error messages displayed if the process fails.
In case that the download fails or if you want to skip the download step, place your
Agent archive in the “archives” directory in the ServerRoot folder. The update
process will then use this to create the Agent execution image. The image is then used
to retrieve and update the Web-GUI as required.
More information on the process is provided in the section Installing the TeamDrive Agent.