Backups and Monitoring
Host Server Backup Considerations
The two most important assets of a TeamDrive Host Server are the storage volumes that host the actual TeamDrive Spaces as well as the MySQL database that stores the related meta data.
The backup schedule depends on the amount of users, their activity and your recovery point objective. We recommend to run a backup at least once a day. The backups should be safely stored on another system.
Ideally, the time and frequency of the Host Server backup should be synchronized with the backup schedule used on the associated Registration Server — this ensures that the information about Users and their Space Depots is consistent across these systems.
In a virtualized environment, the usage of VM snapshots is highly recommended, as these provide atomic and instant full-system copies across multiple instances that can be backed up offline.
The backup of the Host Server’s Space Volume(s) can be performed by any given file system backup tool.
When planning a backup of the volume containing the TeamDrive Spaces, keep in
mind that the last.log files, located in each Space directory in the
directory protolog are frequently updated by the TeamDrive Clients. New
space data and events are constantly appended to the file. When the log files
reach a certain size (currently set to 8MB, but this value is not fixed and
could change in later versions of TeamDrive), they get renamed and new
last.log files will be created. This operation is initiated by the
Clients. The naming scheme is to rename last.log to <number>.log,
where <number> is the next free number, starting from 0. Previously
renamed log files are not modified anymore, but must remain available to the
clients since these logs must be read when a Space is joined.
To create a consistent backup, the best approach is to perform a snapshot of
the entire Space Volume file system, preferably after shutting down the Apache
http Server beforehand. If you are using an incremental backup method like
rsync, keep in mind that some Spaces may have been changed while the rsync
job is still running. For consistency, we suggest to perform a full rsync run
while the service is running (to sync the bulk of the changes), then briefly
change the volume’s status to Standby or shut down the Apache HTTP Server
and run rsync once more, to transfer the remaining changes that have occurred
in the meanwhile. Once the rsync job has finished, the Apache HTTP Server can
be started again.
The MySQL databases must also be backed up periodically, ideally at the same time the Space Volume(s) are being backed up. This ensures a consistent snapshot of the file system and the related meta data included in the MySQL database.
The Host Server’s MySQL databases that need to be backed up are named
pspace and (optionally) hostapilog. They use MySQL’s InnoDB storage
engine to provide transaction support, fast recovery and consistency.
Any of the ususal MySQL backup methods may be used, e.g. mysqldump. The
size of the Host Server’s MySQL Databases is usually quite small, if API
logging is not enabled.
The MySQL backup can be performed using any established MySQL backup method,
e.g. running a mysqldump via a cron job, or using more sophisticated tools
like Percona XtraBackup or Oracle’s MySQL Enterprise Backup. Other commercial
backup solutions usually offer MySQL-specific plugins or extensions as well.
An example MySQL backup job using mysqldump could look like as follows.
The SQL dump is piped through gzip for compression before it is written to
a directory /backup, using a time stamp for the file name:
[root@regserver ~]# mysqldump -u root -p --single-transaction \
--databases pspace hostapilog \
| gzip > /backup/td-hostserver-mysql-$(date +%Y-%m-%d_%H.%M).sql.gz
See the MySQL documentation at https://dev.mysql.com/doc/refman/5.1/en/backup-and-recovery.html for more details and hints on how to define a MySQL backup strategy.
If the I/O overhead introduced by running the backup job on the production database is a concern, we recommend setting up a MySQL replication slave on another host and use this one to perform the backup. This second MySQL instance can also function as a hot standby server for high-availability purposes.
More details about MySQL replication and high availability can be found in the MySQL reference manual at https://dev.mysql.com/doc/refman/5.1/en/replication.html and https://dev.mysql.com/doc/refman/5.1/en/ha-overview.html.
In addition to the Space Volumes and MySQL databases, we recommend to create backup copies of the Server’s configuration files. Please refer to the TeamDrive Host Server Installation Guide for details on the relevant configuration files.
These files should be backed up at least every time you changed them. These
backups can be performed using any file-based backup method, e.g. using
tar, rsync or more sophisticated backup tools, e.g. Amanda or Bacula.
Restoring individual Spaces or Volumes
Note
The Host Server 3.7 supports Snapshot Backups and Point-in-Time (PIT) Recovery. If snapshots are enabled the users are able to do a restore to a previous date of the space by themselves. A restore on the Hosting Server is only necessary if spaces were deleted or data got corrupted or lost for a space or a volume (for Snapshot Backups and Point-in-Time (PIT) Recovery see Snapshot Backup and Point-in-Time Recovery).
In case of corrupted or lost data of a single Space or complete Volume, is is possible to restore the Space or Volume data from a previously created backup.
An example scenario would be a Space that was entirely deleted by a user by accident, or the recovery of a file that was moved to the Space’s Trash Folder and the Trash was then emptied.
Note
Note that it is not possible to restore an individual file from a particular Space on the Host Server — due to the client-side encryption it’s impossible to determine the correct file on the server side. However it is possible to restore the entire state of a Space and all of its files to a previous version, which will allow the user to extract the missing file(s) on the client side.
An additional challenge is identifying the Space(s) you want to restore; by default, Space names are not stored on the Host Server and are only referenced by their ID. Take extra caution and double check you’re working on the correct Space.
The process of restoring a Space or Volume involves the following steps:
- Identify the ID of the Space or Volume you want to restore.
- Deactivate the Space or all Spaces of a Volume by setting the “Deactivated for restore” status, to prevent TeamDrive Clients from accessing the affected TeamDrive Spaces.
- Restore the Space(s) by restoring the necessary Space directory or entire volume directory from your backup to the corresponding location.
- Reactivate the Space(s) to make it/them available to the TeamDrive Clients again.
- The Clients will be notified that a Space recovery is required, which should be performed according to the procedure outlined in the TeamDrive Client documentation.
If a restore of a single Space is required, the task of (de-)activating it can be performed via the Host Server’s Administration Console. Open the Space Details page, check the Deactivated for restore checkbox and click Save to change the state.
After the restore has finished, click Complete Restore to re-enable the Space.
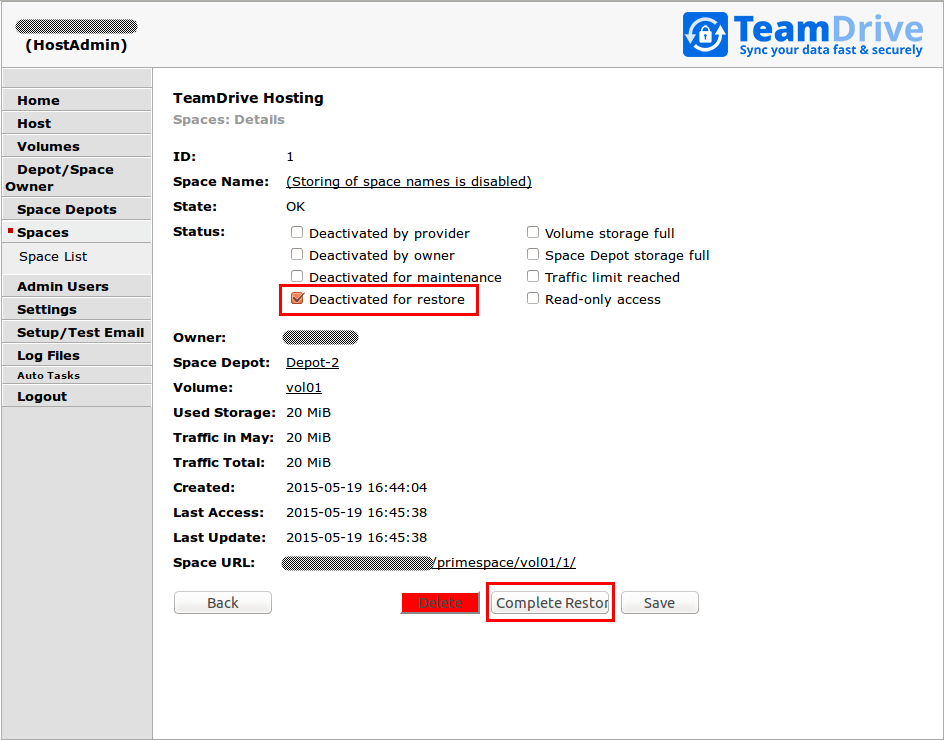
Host Server Administration Console: Restore Space
Alternatively, the Space deactivation and reactivation can be performed on the command line (see below).
If you need to restore an entire volume, all Spaces contained in this volume
need to be deactivated and reactivated. This done using commands provided by the
yvva runtime commandline tool, as described below.
In any case, the actual task of restoring the Space(s) from backup has to be performed manually by the administrator and the TeamDrive Clients will have to perform a local Space recovery to get the local Spaces back into a consistent state.
Using the Restore Commands
The Restore Commands are executed using the Yvva Runtime Environment’s
commandline shell yvva:
[root@hostserver ~] yvva
Welcome to yvva shell (version 1.4.1).
Enter "go" or end the line with ';;' to execute submitted code.
For a list of commands enter "help".

RESTORE COMMANDS:
-----------------
To get help on restore commands, enter:

restore_help;;

>
Enter restore_help;; to get a list of commands that can be run:
> restore_help;;

RESTORE COMMANDS:
-----------------
Before restoring a Volume or Space, you must run the deactivate function.
This ensures that the Spaces are not accessable during restore. Then
restore the Volume or Space, by copying your backup to the appropriate
location. Once this is done, reactivate the Volume or Space.

list_volumes;;
  Print a list of Volumes

list_spaces;;
  Print a list of Spaces.

deactivate_volume(vol_id);;
  Deactivates all Spaces on a Volume.

deactivate_space(space_id);;
  Deactivates a Space.

reactivate_volume(vol_id);;
  Reactivates all Spaces on a Volume.

reactivate_space(space_id);;
  Reactivates a Space.
vol_id and space_id are the ID’s of the Volumes and Spaces as
displayed by list_volumes and list_spaces or shown in the Admin Console.
These values must be placed in parenthesis as indicated. The functions are executed
by ending the command with two consecutive semicolons.
Note that when you activate or deactivate a Volume, deleted Spaces are not
affected. To reactivate a deleted Space, use reactivate_space.
Identify the Space you want to Restore
Usually, the ID of the Space to restore should be obtained from the TeamDrive Client. The Space Information displayed in the Client window for each Space contains a field Space ID that contains the ID used on the Host Server. The actual Space data will is stored in a subdirectory below the Space volume, using the Space ID as the directory name.
To list all available Spaces on the Hosting Service you can execute the
command list_spaces:
> list_spaces;;
.----------------------------------------------------------------------------.
| Spaces                                                                     |
|----------------------------------------------------------------------------|
| Volume | ID     | Title                         | ResID | Status           |
|--------|--------|-------------------------------|-------|------------------|
| vol01  | 3      |                               | 2     | 0                |
| vol01  | 4      |                               | 3     | 0                |
'----------------------------------------------------------------------------'
A list of all active Spaces will be displayed which should look similar to the list shown above. Identify the ID of the Space you want to restore.
Note that Spaces will only have titles if the setting StoreSpaceNames is
set to true.
Deactivate the Space to Restore
After identifying the Space you want to restore, you have to deactivate it
by providing the ID to the command deactivate_space(space_id):
> deactivate_space(3);;
160809 16:00:33 [Notice] Deactivate space [3]
160809 16:00:33 [Notice] Space: 3, deactivated
In the example above the Space with the ID ‘3’ has been deactivated. After a short while, the Client will notice this change and mark the Space accordingly on its side.
Restore Backup
After deactivating a Space, you can now restore its data by copying the backup
of that Space into the corresponding location on the Space volume, e.g.
/spacedata/vol01/3 in our case.
Reactivate Space
After copying the backup to the deactivated Space, you have to reactivate the
Space which makes it available to the TeamDrive Clients again. To reactivate a
certain Space you have to execute the command
reactivate_space(space_id):
> reactivate_space(3);;
160809 16:13:06 [Notice] Reactivate Space [3]
160809 16:13:06 [Notice] /spacedata/vol01/3
160809 16:13:06 [Notice] Space: 3, reactivation successful [Restore ID: 4, Log No: 3, Log Offset: 1419]
In the example above the Space with the ID ‘3’ has been reactivated.
The Client will now notify that the Space has been reactivated and a local Space recovery operation has to be performed, if necessary.
Identify the Volume you want to Restore
To identify all available volumes on the Hosting Service you have to execute
the command list_volumes:
> list_volumes;;
.--------------------------------------------------------.
| Volumes                                                |
|--------------------------------------------------------|
| ID    | Name  | Status                                 |
|-------|-------|----------------------------------------|
| 1     | vol01 | Operational                            |
| 2     | vol02 | Operational                            |
'--------------------------------------------------------'
A list with the volumes will be displayed which should look similar to the list shown above. Identify the ID of the volume you want to restore.
Deactivate the Volume to Restore
After identifying the volume you want to restore, you have to deactivate the
volume with all its Spaces. To deactivate a volume with a certain ID you have
to execute the command deactivate_volume(vol_id):
> deactivate_volume(1);;
160809 16:15:23 [Notice] Deactivate Volume [1]
160809 16:15:23 [Notice] Volume vol01: Spaces to deactivate: 3
160809 16:15:23 [Notice] Space: 62, deactivated
160809 16:15:23 [Notice] Space: 63, deactivated
160809 16:15:23 [Notice] Space: 64, deactivated
In the example above the volume with the ID ‘1’ and all the spaces within that volume will be deactivated.
Restore Backup
After deactivating a volume, you can now restore its data by copying the backup of that volume into the corresponding location.
Reactivate Volume
After copying the backup to the deactivated Volume, you have to reactivate the
Volume which makes the Spaces available to the TeamDrive Clients again. To
reactivate a certain Volume you have to execute the command
reactivate_volume(vol_id):
> reactivate_volume(1);;
160809 16:16:55 [Notice] Reactivate Volume [2]
160809 16:16:55 [Notice] Reactivate Space [62]
160809 16:16:55 [Notice] /spacedata/vol01/62
160809 16:16:55 [Notice] Space: 62, reactivation successful [Restore ID: 5, Log No: 0, Log Offset: 549]
160809 16:16:55 [Notice] Reactivate Space [63]
160809 16:16:55 [Notice] /spacedata/vol01/63
160809 16:16:55 [Notice] Space: 63, reactivation successful [Restore ID: 12, Log No: 2, Log Offset: 913]
160809 16:16:55 [Notice] Reactivate Space [64]
160809 16:16:55 [Notice] /spacedata/vol01/64
160809 16:16:55 [Notice] Space: 64, reactivation successful [Restore ID: 5, Log No: 5, Log Offset: 4252]
In the example above all Spaces on the Volume with the ID ‘1’ have been reactivated.
Exit the yvva session
You can close the yvva session by typing quit or pressing Ctrl+D on
the > prompt.
Setting up Server Monitoring
It’s highly recommended to set up some kind of system monitoring, to receive notifications in case of any critical conditions or failures.
Since the TeamDrive Host Server is based on standard Linux components like the Apache HTTP Server and the MySQL database, almost any system monitoring solution can be used to monitor the health of these services.
We recommend using Nagios or a derivative like Icinga or Centreon. Other well-established monitoring systems like Zabbix or Munin will also work. Most of these offer standard checks to monitor CPU usage, memory utilization, disk space (especially the file systems providing the TeamDrive Space Volumes) and other critical server parameters.
In addition to these basic system parameters, the existence and operational status of the following services/processes should be monitored:
- The MySQL Server (system process
mysqld) is up and running and answering to SQL queries - The Apache HTTP Server (
httpd) is up and running and answering to http requests (this can be verified by accessing the files http://hostserver.yourdomain.com/ping.xml and http://hostserver.yourdomain.com/admin/ping.xml) - The
td-hostserverservice is up and running (process nameyvvad) - For Host Servers using an compatible object store (see Setting up an Amazon S3/Azure BLOB Storage/Ceph Object Storage-Compatible Object Store
for details): the
s3dprocess is up and running - For Host Servers using TeamDrive Scalable Hosting Storage (TSHS, see
TeamDrive Scalable Hosting Storage for details): the
tshsprocess is up and running (and all related MySQL nodes are up and running, too)