TeamDrive Scalable Hosting Storage
If you require a scalable hosting system that grows with the number of users, then you have 2 alternatives:
- Use a scalable file system that allows multiple access points, or,
- Use TSHS, which stores the data in a cluster of MySQL databases.
The TeamDrive Scalable Hosting Storage, TSHS, is a scalable storage system for the TeamDrive Hosting Service based on the MySQL database. It is an alternative to the standard file system based TeamDrive Hosting Service.
If you are not sure of your requirements, you can begin with file system based storage. If your requirements outgrow a file system-based configuration, you can upgrade to TSHS at any time. How to do this is described in the section Upgrading to TSHS.
By default, TeamDrive Hosting Service stores files in the local file system. When TSHS is enabled, the Hosting Service stores files in a cluster of MySQL Servers (not to be confused with MySQL Cluster NDB). Each server in the cluster stores a partition (known as a “shard”) of the data. TSHS refers to such a database server as a “Storage Node”.
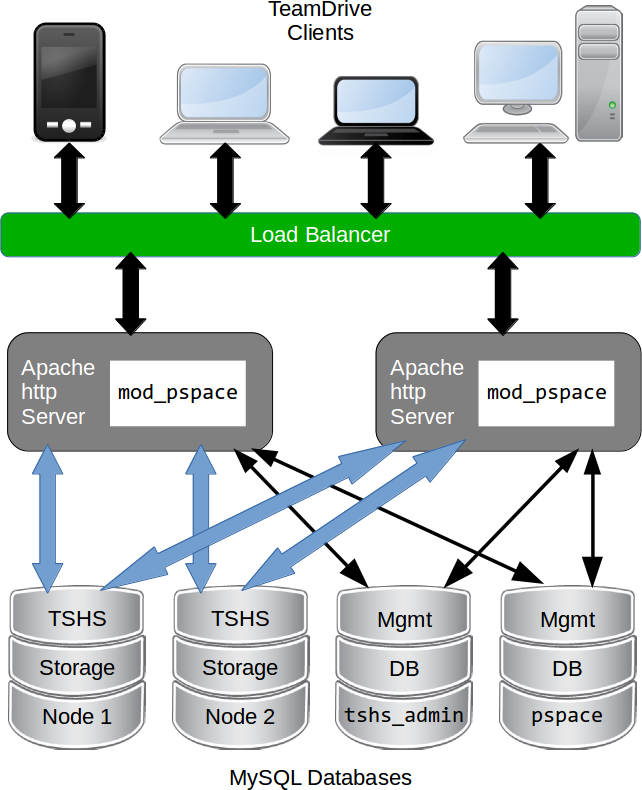
TeamDrive Scalable Hosting Storage (TSHS)
One of the databases in the cluster contains the administration data for the cluster, and this is known as the “Admin Node”. The Admin Node contains a list of Storage Nodes in the cluster, and is the starting point for connecting to the cluster.
Scale-out can be achieved by placing each database (Storage Node) in the cluster on a different machine. When a Storage Node exceeds its capacity (either in the terms of storage or computing power), the shard that it contains can be split, which creates a new Storage Node.
Whenever a Storage Node (or the Admin Node) is created, the system administrator must first create an empty MySQL database that will be used by the Node. In this way the administrator can control where the data for the Node will be stored, and how scale-out is achieved.
TSHS and S3 Compatible Object Storage
In general, the TeamDrive Hosting Service is capable of using an S3 compatible object store as secondary storage. This is also the case when using TSHS. An object store is used as secondary storage to provide unlimited capacity if this is not provided by the primary storage (the file system or TSHS database cluster).
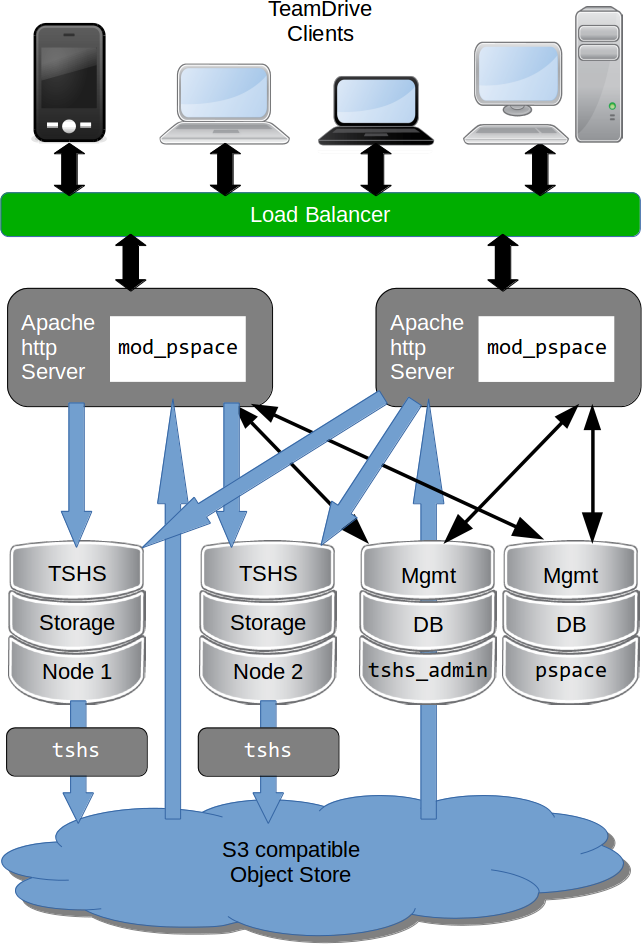
TeamDrive Scalable Hosting Storage (TSHS) with S3 object store
When using the file system for storage, s3d (the TeamDrive S3 Daemon) is
responsible for transferring files to the object store. This job is done by
the tshs command line tool when TSHS is enabled (see below).
The object store also serves as a backup for the data in the primary storage. If the primary storage is lost for some reason the data can be restored from the object store. The actuality of the restored data will depend on the frequency with which data is moved to the object store.
The frequency of this operation can be set by the administrator in the
configuration of the s3d or the tshs tool. Nevertheless, it is likely
that data is lost in the most active spaces upon restore. This eventuality is
handled by the TeamDrive Client if the correct restore procedure is followed,
as described before.
The tshs Command Line Tool
The TSHS cluster is managed using the tshs command line tool. The command
line tool is all you need to create, maintain and expand the TSHS cluster.
Alternatively, you can use the Host Server Administration Console, which calls
tshs in the background to perform the requested task.
The tshs command line tool can be used in 3 different modes:
- One off commands: Run
tshswith command line arguments to perform various once-off tasks, such as create a new Storage Node, split a Storage Node or add a reference to an S3 compatible object store. - Interactive “shell” mode: To introspect and perform a number of commands
on a cluster the easiest is to start
tshsin interactive mode, also know as shell mode. In this mode you can run all command line operations, in addition to a few shell only commands. - Background “daemon” mode: A number of tasks need to be started
regularly. These are basically TSHS commands that are run repeatedly by
tshsrunning in daemon mode. For example, if a Storage Node is split, then data must be copied from one node to the other. Thecopy-shardsmaintenance command does this.
All maintenance tasks can be run in parallel, and from any machine. This way,
it is possible to scale-out the maintenance operations. Additional tshs
commands can be run to increase the throughput of any task that needs to be
performed.
For example, when a node split occurs, a lot of data may need to be transferred
from the old to the new Storage Node. Each copy-shards command only
transfers one file at a time. So, starting (for example) 10 tshs instances
running the copy-shard command will transfer 10 files simultaneously.
Enter tshs help to get a full list of commands provided by the tshs
command line tool.
Creating a TSHS-based TeamDrive Hosting Service
The first step is to create a tshs_admin database, setup the [tshs]
MySQL group and enable TSHS in the Hosting Administration Console as described
in the section Initializing a TSHS Cluster below.
Following this, to the menu item Host -> TSHS and create a Storage Node as described in the section Creating a Storage Node.
After you have successfully created a storage node, you need to restart all
Apache instances. TSHS cluster usage should then begin immediately. Check the
Apache error log (e.g. /var/log/httpd/error_log) to ensure that the
module has loaded correctly, and that no errors occurred. You should see
something like this:
[notice] mod_pspace 1.5.04 Loaded; Build Jun 18 2014 18:15:23;
Crash-Reporting-Disabled
[notice] Admin API booted: TSHS Enabled; Importing Volumes; S3 n/a; Path:
/spacedata
You can confirm that the TeamDrive Apache module has connected to the TSHS cluster
by running the tshs list-access-points command:
$ tshs list-access-points
ID       Ack Access time         Description
-------- --- ------------------- -----------
205      1   2014-06-20 15:57:41 pspace module;host=www.teamdrive.com;pid=75744
206      1   2014-06-20 15:57:41 pspace module;host=www.teamdrive.com;pid=75742
207      1   2014-06-20 15:57:41 pspace module;host=www.teamdrive.com;pid=75741
208      1   2014-06-20 15:57:41 pspace module;host=www.teamdrive.com;pid=75743
209      1   2014-06-20 15:57:41 pspace module;host=www.teamdrive.com;pid=75745
210      1   2013-03-26 21:24:42 pspace module;host=www.teamdrive.com;pid=75746
211      1   2014-06-20 15:57:41 tshs shell;host=www.teamdrive.com;pid=75765
This command lists all processes connected to the TSHS cluster. In the example above, the “pspace module” is listed a number of times, once for each process started by Apache.
Initializing a TSHS Cluster
A TSHS Cluster is initialized by creating an “Admin Node”, which is simply a
MySQL database within the cluster with the name (by default) tshs_admin.
As mentioned above, a TSHS Cluster consists of a group of MySQL databases. The topology (i.e. the configuration of databases, MySQL servers and hardware) of the database cluster is determined by the administrator. However, it is obvious that maximum scalability is achieved by placing each database on its own hardware.
The databases used by TSHS must always be created by the administrator. The administrator determines the name of the user that will be used by TSHS to access the database, and grants the TSHS user the required rights. In order to create a node (Admin or Storage), TSHS requires the right to create its own tables in the database. After that point it only needs complete access to the tables it has created.
Observe the following steps to initialize a TSHS cluster:
Create the tshs_admin database: Start by creating a database called
tshs_admin. Add a user to the database (for the purpose of this documentation we will call the userteamdrive) and grant the user the right to create tables.Configure the MySQL connection: Create an options group called
[tshs]in your MySQL options file (/etc/td-hostserver.my.cnffile). The[tshs]group contains the MySQL connection parameters used to connect to the tshs_admin database:[tshs] database=tshs_admin user=<tshs-username> password=<thsh-password> host=localhost port=3306 socket=/var/lib/mysql/mysql.sock
How to setup a MySQL connection is explained in the MySQL documentation: http://dev.mysql.com/doc/refman/5.6/en/option-files.html . Use the
--mysql-cfg-fileoption to specify the location of the MySQL options file on thetshscommand line, if you are not using the default location (/etc/td-hostserver.my.cnf).Create the Admin tables: This is done by using the Hosting Administration Console (menu item Settings -> TSHSENabled) to set the configuration setting
TSHSENabledtoTrue.When TSHS is enabled, the Console will run the
tshs create-admin-nodecommand which creates and initializes the tables used by TSHS in thetshs_admindatabase. The command will succeed if TSHS is able to access thetshs_admindatabase you have already created. If the tables already exist, the command has no effect.
The [tshs] group described above is the entry point for accessing the
entire TSHS cluster. Connection information to other nodes is stored in the
tshs_admin database itself.
After TSHS has been enabled, the Administration Console will display an additional entry TSHS located below the Host section of the left navigation bar. Use this page to manage TSHS.
Creating a Storage Node
Before data can be stored in a TSHS cluster you need to create one or more Storage Nodes.
To create a Storage Node, you must first create an empty MySQL database. The location of the database depends in the topology of your cluster but, as mentioned before, the database must run on its own machine for maximum scalability.
The database may have any name you choose and must contain a user that has the
right to create tables. We will call this user teamdrive for the purpose of
this documentation.
Under the menu item Host -> TSHS, choose the create-storage-node
command, and enter the connection options for accessing the database you have
just created in the Parameters text field. The <connection-options> is
a list of MySQL connection options separated by a semicolon (‘;’ character).
For example:
user=teamdrive;password=<password>;host=127.0.0.1;database=tshs_storage_1
You can use any options that you would otherwise use in a MySQL options file. A complete list of options is provided in the table on this page:
http://dev.mysql.com/doc/refman/5.6/en/mysql-options.html
Now press the Execute button to run this command using tshs.
This will execute the command tshs create-storage-node
<connection-options> to create TSHS Storage Node.
This command may only be executed when all Storage Nodes are empty in the
cluster. As soon as the cluster contains data, you need to use the
split-shard command to create new Storage Nodes.
Under Host -> TSHS, the Hosting Administration Console displays a list of
Storage nodes you have created. The list all the Storage Nodes displayed by
the Console is obtained by using the tshs list-storage-nodes command:
$ tshs list-storage-nodes
ID  Phase        Boundary (size)         Connection options (totals)
--- ------------ ----------------------- ---------------------------
1   ACTIVE_SHARD 0 (2147483648)          user= td;port=3306;database=tshs_storage_1
(InDB=4558 OnS3=2677 R/O=3013 Bytes=4651260)
2   MIRROR_SHARD 2147483648 (2147483648) user=td;port=3306;database=tshs_storage_2
(InDB=5812 OnS3=3908 R/O=3102 Bytes=4523606)
Data can be stored in the cluster as soon as you have one Storage Node.
However, it is possible to start with several Storage Nodes if you are
expecting the cluster to grow large. This will save splitting shards later,
which is an expensive operation. Create additional Storage Nodes by calling
create-storage-node several, times. Each time you must provide a new empty
MySQL database. As long as the cluster is empty you can create and delete
Storage Nodes until you have the desired start configuration.
Ideally, you should not need to change the topology of your TSHS cluster (other than adding new Storage Nodes) once it is in use. Changing the topology effectively requires changing the connection options stored for a particular Storage Node, as a result of moving one of the storage databases to a different machine or MySQL server. Although this is possible, it currently requires the entire cluster to be shutdown before changing the connection options (shutting down the cluster is done by stopping all the Hosting Service Apache instances).
If the database needs to be copied, then the cluster must remain shut down during this time. You can shorten the downtime, by using MySQL replication to create a copy of a Storage Node database before changing the topology of the cluster.
Upgrading to TSHS
An existing file system based TeamDrive Hosting Service can be easily upgraded to use TSHS. This process is automatic, and runs while the system is online.
Note
If your existing Hosting Service uses an S3 object store you must stop and
disable the TeamDrive S3 Daemon background task (s3d) before you
enable TSHS:
[root@hostserver ~] service s3d stop
[root@hostserver ~] chkconfig s3d off
However, the setting S3SyncActive must remain set to True.
When you enable TSHS, the Hosting Administration Console will check to see
if file system storage is active. If so, it will automatically set the
configuration setting TSHSImportVolumes to True.
When TSHSImportVolumes is enabled, the data in the File System volumes
will be transfered in the background to the TSHS cluster. This transfer occurs
automatically, while the system is online.
The main work of importing the data into TSHS is done by the
tshs perform-import command. TSHS is configured to perform this command
by default.
The command checks to if an import job is active, and if so, executes the import.
You retrieve the status of an import jobs by listing all “jobs” in the system using
tshs list-jobs:
$ tshs list-jobs
ID     Job    Parameters
------ ------ ----------
236887 IMPORT path=/spacedata;s3-host-id=6
The example shows that an import job is in progress. If an S3 object store is
in use, then the job contains a reference to an S3 host (see tshs
list-s3-hosts above).
Although it can be run while the Hosting Storage is online, the
perform-import command places quite a load on the system. If necessary the
command can be run at non-peak times, for example, for a few hours every night
until the import is complete. Using the --time-limit option you can limit
the time a maintenance task will run.
As soon as the perform-import task has completed successfully, it is recommended
to disable TSHSImportVolumes (set the setting to False). The name of the job
is changed from IMPORT to IMPORTED when all data has been transfered from the
File System volumes to TSHS.
Disabling TSHSImportVolumes is an important optimisation because TSHS no longer
to search the File System (or S3 Storage if enabled) in order to find files requested
by the TeamDrive Client. When import is complete, all the required information on
the location of files is stored in the TSHS cluster.
Scaling Out the Cluster
When a Storage Node reaches its capacity, either in terms of storage or computing power, then the data shard on the node needs to be split.
The tshs split-storage-node <storage-id> <connection-options> operation
splits the shard on a given node, and creates a new Storage Node at the same
time. For example:
tshs split-storage-node 2
user=teamdrive;password=<password>;database=tshs_storage_3
The <storage-id> parameter is a reference an existing Storage Node which
you want to split. Approximately half the files that reside on the this Storage
Node will be moved to the new Storage Node (using copy and delete operations).
As described above, before you can create a new Storage Node, you must create
an empty MySQL database. The <connection-options> operation parameters
specify the MySQL options required to connect to the new empty MySQL database.
After you have split a Storage Node shard you need to run the tshs
copy-shards maintenance command. This command copies all files as required
from the old Storage Node to the new Storage Node. This operation can be sped
up by starting a number of tshs copy-shards commands in parallel. Of
course, the more copy operations running, the greater the load on the MySQL
databases involved. As a result it is recommended that you monitor the database
load during this time and start or stop copy operations as appropriate. The new
Storage Node remains in MIRROR_SHARD state until the copy operation is
complete.
Note that by default the tshs command is setup to run in daemon mode, and perform
all outstanding tasks. This incudes the copy-shards command.
A Storage Node shard can be split while the cluster is online. Neither the
split-storage-node or copy-shards command interrupt normal operation of the
cluster, other than causing increased load due to the copy operation.
The copy operation must be complete (i.e. the Storage Node must be in the ACTIVE_SHARD phase) before it can be split again.
Connecting TSHS to an S3 Compatible Object Store
When TSHS is connected to an S3 compatible Object Store, it periodically
transfers files from the Storage Node database(s) to the Object Store. This is
done by the tshs move-to-s3 maintenance command.
In order to enable the transfer of data to the object store, TSHS needs to be
configured for accessing it. This can done by taking the S3-specific setting
from the Host Server settings and adding the necessary access details to the
thsh_admin database using the command tshs add-s3-host.
Ensure that the settings S3Brand, S3Server, S3DataBucketName,
S3AccessKey and S3SecretKey contain the correct information to access
the S3 bucket that will be used to store the Hosting Service data. See chapter
Configuring s3d for details.
add-s3-host will ping the S3 service before actually adding the host
details.
The Hosting Administration Console will then take these settings to create the
TSHS-specific S3 host entry when you enable S3 by setting the configuration
setting S3SyncActive to True.
You can verify this by running tshs list-s3-hosts on the command line or
via the Hosting Administration Console.
If any of these setting are incorrect, enabling S3 will fail with an appropriate error message.
Note
You need to restart the Apache HTTP Server using service httpd restart
after enabling S3SyncActive. Check the log file
/var/log/httpd/error_log for the following notice:
[notice] Admin API booted: TSHS Enabled; S3 Enabled (s3d n/a)
The Hosting Administration Console sets up the S3 host in the cluster by executing the following command:
add-s3-host <brand> <server> <bucket> <access-key> <secret-key> [<options>]
For example:
tshs add-s3-host AMAZON s3.amazonaws.com my-bucket 022QF06E7MXBSAMPLE
kWcrlUX5JEDGM/SAMPLE/aVmYvHNif5zB+d9+ct
MaxAge=1;MinSize=1;MinBlockSize=5M;MaxUploadParts=1000;MaxUploadThreads=10
Currently, <brand> must be set to AMAZON or OPENSTACK. <server> is the
host name of the server (for amazon this is s3.amazonaws.com). <bucket>
is the name of the S3 bucket. <access-key> and <secret-key> are the keys
required to access the bucket.
The Hosting Administration Console takes these values from the associated configuration settings.
The <options> string has the form: <name>=<value>;<name>=<value>;...
Options are:
MinSize- The minimum size of a file that will be uploaded to S3. Use K=Kilobytes, M=Megabytes, etc.
UrlTimeout- The time in seconds that a redirect for reading is valid. The default is 10.
MinBlockSize- The minimum block size that can be used for multi-part upload. Default is 5MB. The valid range of this parameter will be determined by the implementation of the object store being used.
MaxUploadParts- The maximum number of parts a file can be divided into for upload. Default is 1000. The valid range of this parameter will be determined by the implementation of the object store being used.
MaxFileUploadSize- Files larger than this will not be transferred to S3. The default, 0, means all files are uploaded.
MaxUploadThreads- The thread pool size to use for multi-part uploads. The default, 0, means single threaded.
The options value used by Hosting Administration Console is stored in the
S3Options configuration settings.
When an S3 host is added it, becomes the current S3 host. All files uploaded
to S3 storage automatically go to the current S3 host. You can set the current
S3 host using the command tshs set-current-s3-host <host-id>.
You can list all S3 hosts with the list-s3-hosts command:
$ tshs list-s3-hosts
ID  Cur Server           Bucket               Public Key           Private Key
Options
--- --- ---------------- -------------------- --------------------
---------------------------------------- -------
6   yes s3.amazonaws.com mybucket  022QF06E7MXBSAMPLE
kWcrlUX5JEDGM/SAMPLE/aVmYvHNif5zB+d9+ct
MinSize=1;UrlTimeout=10;MinBlockSize=5K;MaxUploadParts=1000;MaxUploadThreads=2
To check the file transfer progress, you can use the command tshs
transfer-to-s3-info, which will display how many files and their total size
are ready to be transferred.
These commands can be executed from the command line, or by using the Host -> TSHS Hosting Administration Console page.
Note
If you wish to change S3 parameters, then first set S3SyncActive to
False, then change the parameters and set S3SyncActive back to
True. Note that if the S3 parameters are changed, data is already stored
in S3 will continue to use the old parameters! If you wish to change the S3
parameters of existing S3 data, then you must use the tshs
update-s3-host command.
Running Maintenance Tasks
The following maintenance tasks must be run periodically:
- copy-shards
- If a Storage Node has been split, this task copies files from the old storage node to the new node, which contains the new shard.
- remove-deleted
This task removes files from the cluster that have been marked for deletion. This includes removing files from S3 storage.
In general, the TeamDrive Scalable Hosting Storage does not delete files in the cluster immediately, but rather marks them for deletion. This can also take the form of a DELETE job, if an entire space is deleted. DELETE jobs that have been scheduled are displayed using
tshs list-jobs. If a file is marked for deletion then this can been seen when you use thetshs list-filescommand.- perform-import
- This task imports existing file system based Hosting data into the TSHS cluster.
- move-to-s3
- This task moves files to S3 storage that have been scheduled for transfer.
The TeamDrive Hosting Apache module schedules files to be moved to S3
storage, as soon as the writing of the file is concluded. Files marked to be
transferred, and copied to S3 by the
move-to-s3and then removed from the cluster. - copy-to-s3
- This task performs a backup of files that need to remain in the TSHS
cluster. Currently this is all files called
last.log. Thelast.logfiles are constantly updated and may therefore never be moved to S3 permanently. Whenever alast.logfile is modified it is marked to be copied to S3. In order to reventlast.logfiles from being constantly copied to S3, thecopy-to-s3task should run less frequently than the other task (the default is once every 4 hours).
You can run each maintenance task as a separate command, or you can use the
tshs do-tasks command:
tshs do-tasks [all] [copy-shards] [remove-deleted] [perform-import]
[move-to-s3] [copy-to-s3] [all-not-s3-copy]
Generally it is recommended to use the tshs do-tasks all or tshs do-tasks
all-not-s3-copy commands which will start all maintenance tasks at once. Use
all-not-s3-copy , which omits the copy-to-s3 task, to avoid too frequent
backups. The advantage of using the do-tasks all is that new tasks that
may be added to future versions of TSHS will automatically be executed.
In order to run maintenance tasks regularly you can start tshs in the
daemon mode with the –start option, and use the repeat command to
execute a command or list of commands separated by and.
By default, tshs is setup as a service to run as follows:
tshs repeat 60 do-tasks all-not-s3-copy repeat 14400 tshs do-tasks all
Which means that maintenance tasks except copy will be run once a minute
(60 seconds), and the copy task which does a backup of the last.log
files will be run every 4 hours (14400 seconds).
A number of options allow you to control how maintenance tasks are run:
| --max-threads=<number> | |
Specifies the maximum number of threads to be started by a command. By
default, the maximum number of threads is 10. This is the maximum number of
threads that will run, no matter how many tasks are started. Note that this
does not include the threads used to upload files to S3 as specified using
the MaxUploadThreads parameter. | |
| --pause-on-error=<seconds> | |
Specifies the time in seconds to pause after an error occurs during a
maintenance task. The default is 2 minutes. When running in daemon mode,
tshs ignores this option. | |
| --retries=<number> | |
The number of times to retry if an error occurs during a maintenance task.
Set to ‘unlimited’ if you want tshs to retry indefinitely. The default is 0,
which means that the task quits immediately if an error occurs. When running
in daemon mode, tshs ignores this option. | |
| --time-limit=<seconds> | |
| Specifies the time limit in seconds for running maintenances tasks. tshs will stop running the tasks after the specified time, whether the tasks are finished or not. The default is 0, which means unlimited. When a task is restarted it will continue from where it left off so you do not loose anything by stopping a task and restarting it again later. Use this parameter to prevent tasks from running during high load times when it could disturb normal operation. | |
| --node-affinity=<node-id> | |
This options tells tshs to only transfer data from a specific storage
node. This optiona may be used if you have a tshs service running on
each storage node. Such a configuration reduces the amount of network
traffic when data is transfered between nodes, or to and from S3 storage. | |
These options may be specified on the command line, or placed in the tshs
options file: /etc/tshs.conf, which is consulted by the tshs
background service. When running in daemon mode, errors and other messages
are written to the tshs log file, which is /var/log/tshs.log by
default.