TeamDrive Hosting Service Administration
Host Servers (Hosts)
Overview
In the overview, you can display the Host Servers, the associated volumes, and some statistical values. The volumes change colour between green, yellow, and red depending on the percentage used.
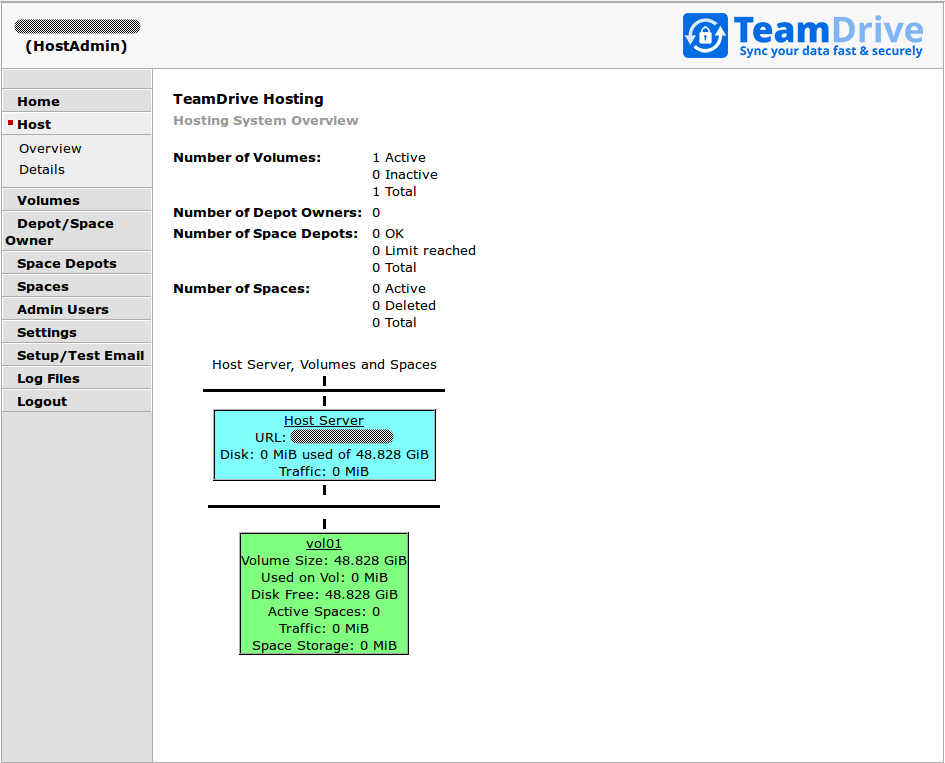
Host Server Admin Console: Server Overview
The values are updated at regular intervals with the “SumUsage” background task. In the process, the associated Depot is updated via the Spaces, as are the volumes and hosts.
Volumes first appear in the view when created as described in the following chapter.
Volumes
Adding more Volumes
By default, the first volume vol01 has already been created during the
initial installation.
If you want to extend the storage space or distribute the load across multiple volumes, you can you can add more Space Volumes to a Host Server instance.
Prepare the additional volume, e.g. by creating a block device and file system
as outlined in chapter Storage Requirements in the TeamDrive Host Server
Installation Guide. Next, create a new mount point in the /spacedata
directory, e.g. /spacedata/vol02 and mount the volume.
The ownership of the volume must be assigned to the user that runs the
Webserver (usually apache) using the chown command.
Also make sure the file system is properly mounted during system boot (e.g. by
adding an entry to the system’s /etc/fstab file).
To add the newly created Volume, log in to the Host Server Administration Console and click Volumes -> Add New Volume in the left navigation bar.
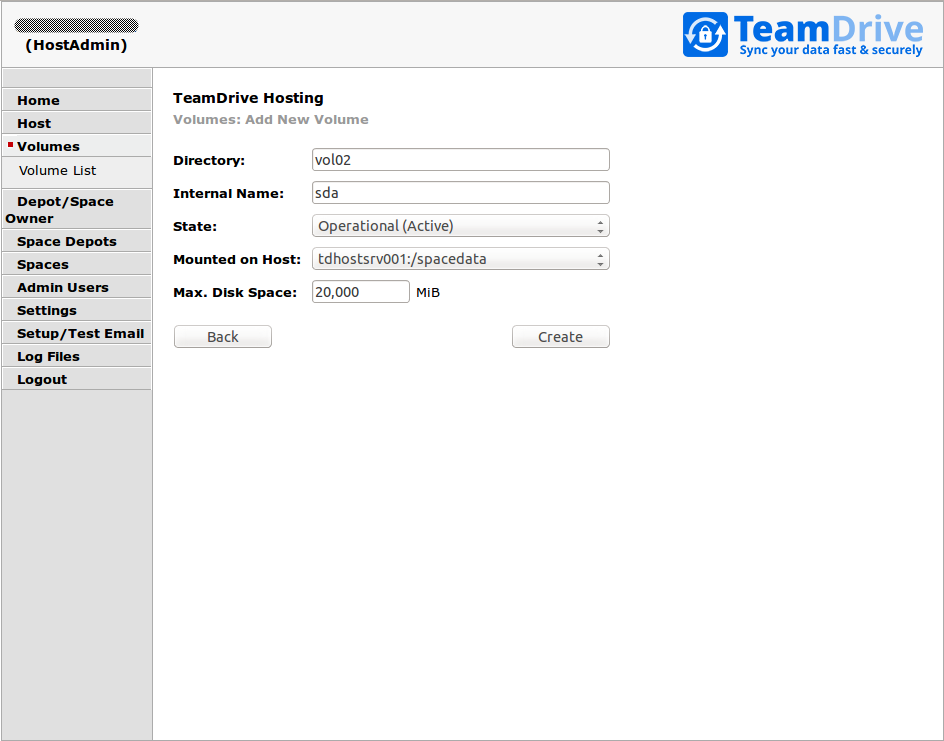
Host Server Administration Console: Add New Volume
Enter the values as shown in the following example. Make sure to adjust them to match your configuration/environment.
The field Directory defines both the Volume Name as well as the name of the
mount point in the filesystem below the /spacedata directory.
Note
Volume names must be of the form: volxx, e.g. vol01, vol02.
Please don’t use blanks in volume names.
The name of a volume cannot be changed later because it becomes part of the Space URL which the TeamDrive Clients use to access these spaces.
The field Internal Name is for your reference only, it could contain the name of the volume on your storage system or the local hard disk drive name or partition.
Click Create to create the new volume.
Configuring the Storage Upgrade URL
Storage upgrade: The server informs the TeamDrive Clients how much storage space and traffic is used per Space or account. The Space owner can reserve storage space via the TeamDrive Client and the TeamDrive Clients will generate an URL that opens in the browser. The URL always points to the Hosting Service. This request can be forwarded as required via a rewrite statement.
Open the file /etc/httpd/conf.d/td-hostserver.httpd.conf in an editor and
ensure the following configuration option matches your environment.
Please replace in the Rewrite-Rule “bestellung.hostserver.com” with the URL pointing to your own server that provides information about how to upgrade storage. If a user clicks on the “More Storage” button in the TeamDrive Client, the client will open the URL specified.
Using the Rewrite-Rule allows you to redirect these requests to a custom web page where you can offer storage upgrade options:
# This Rewrite is required for the storage-upgrade-buttons
# in the TD-Client (see storage-upgrade-note in the documentation)
RewriteRule ^/upgrade/([a-z][a-z])/order.html(.*) \
https://bestellung.hostserver.com/$1/order.php$2 [R,NE]
The URL called by the client is structured as follows:
http://<domain-name>/upgrade/<2-character-language-code>/order.html
Examples of language codes are: en (English), de (German) and fr
(French).
Additionally, the following values are provided by the TeamDrive Client as URL parameters:
- spaceid: The Space ID of the Space
- host: The host name (host name and Space ID together are always unique)
- user: The TeamDrive user name (BASE64-encoded)
- check: Checksum used to verify whether the request is valid
This allows you to create an order page according to your requirements and adapt it to your own needs (payment link). However, this page must always be present so that the user does not see an error message or an empty page.
Information about Spaces and Accounts can be retrieved from the Hosting Service via the Hosting Service API (an HTTP based interface which uses XML-formatted requests and replies). Please consult the TeamDrive Hosting Service Reference Guide for details.
Functions to delete Spaces and increase Storage limits after payment, for example, are also available. Please contact support@teamdrive.net if you need assistance in using this API.
Disabling the Apache Access Log
In view of the amount of requests issued by the TeamDrive Clients, there is no
point in keeping the normal access log activated. We therefore suggest to
deactivate it in a production environment. Only the error log should be left
enabled. To facilitate this, comment out the following line in the default
httpd.conf:
# CustomLog logs/access_log combined
If problems occur in a Space, logging can be activated for a specific Space (see http://httpd.apache.org/docs/2.2/mod/mod_log_config.html). e.g. all access to Space ID 3204 will be logged (the required Apache logging module needs to be enabled again):
SetEnvIf Request_URI 3204 spaceid-3204
CustomLog logs/spaceid-3204-requests.log common env=spaceid-3204
Restart the Apache instance and check the log files for errors.
Changing an Admin User’s Password
The Host Server Administration Console can be accessed by all Admin Users by entering the correct username and password.
An existing user with administrative privileges can change his password directly via the Administration Console’s login page or via the Admin Users page of the Administration Console.
On the login page, click on Change Password... to enable two input fields New Password and Repeat Password that allow you to enter the new password twice (to ensure you did not mistype it by accident). You also need to enter your username in the Username field and the current password in the Password: field above. Click Login and Change Password to apply the new password and log in.
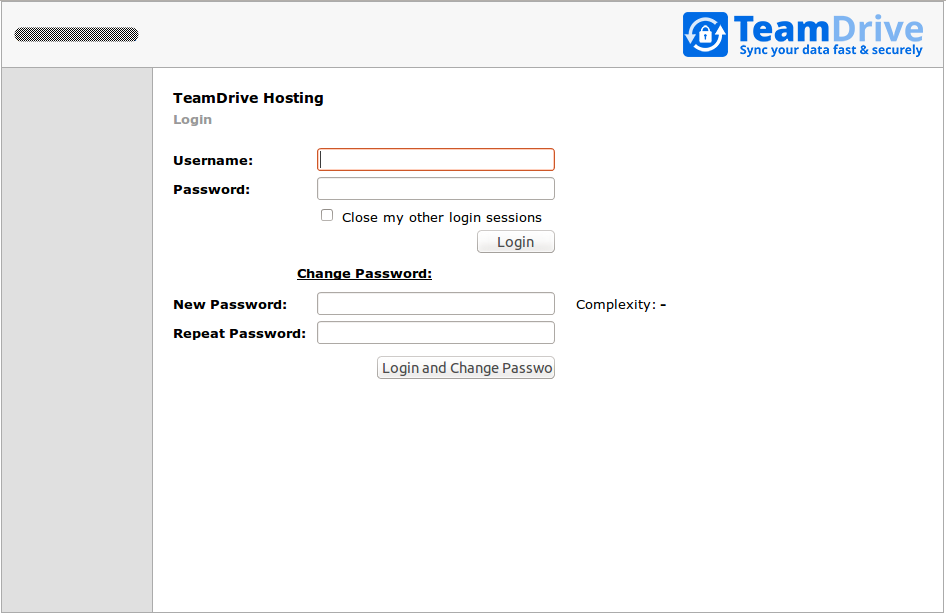
Host Server Administration Console: Change Password
You can also change your password while being logged into the Administration Console. If your user account has “Superuser” privileges, you can change the password of any admin user, not just your own one.
Click Admin Users to open the user administration page.
The page will list all existing user accounts and their details.
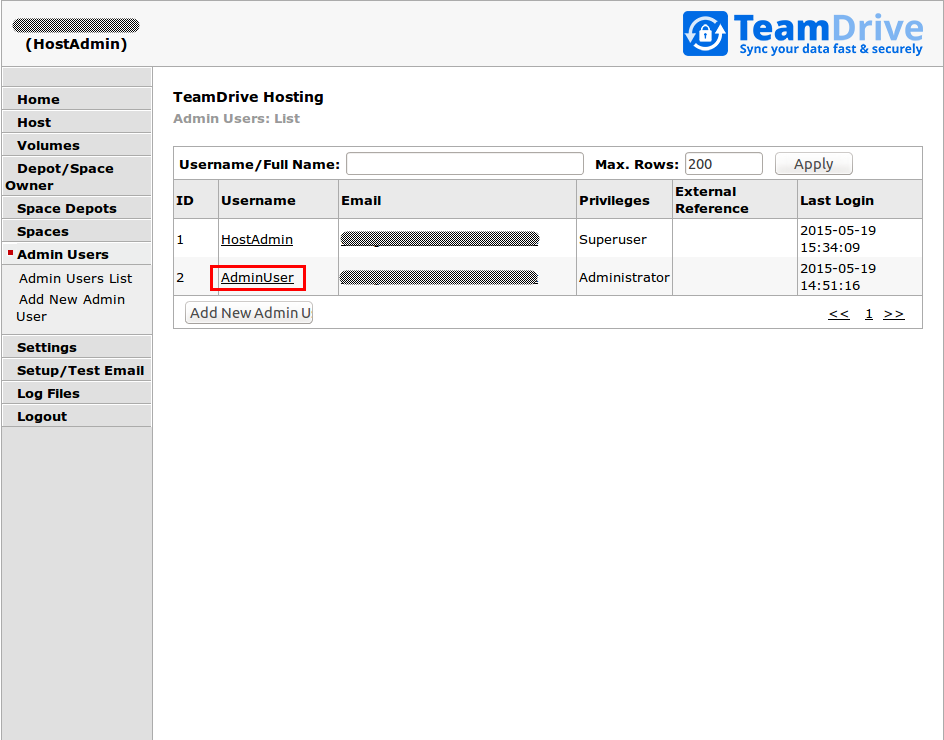
Host Server Administration Console: Admin Users List
Click the username of the account you want to modify. This will bring up the user’s details page.
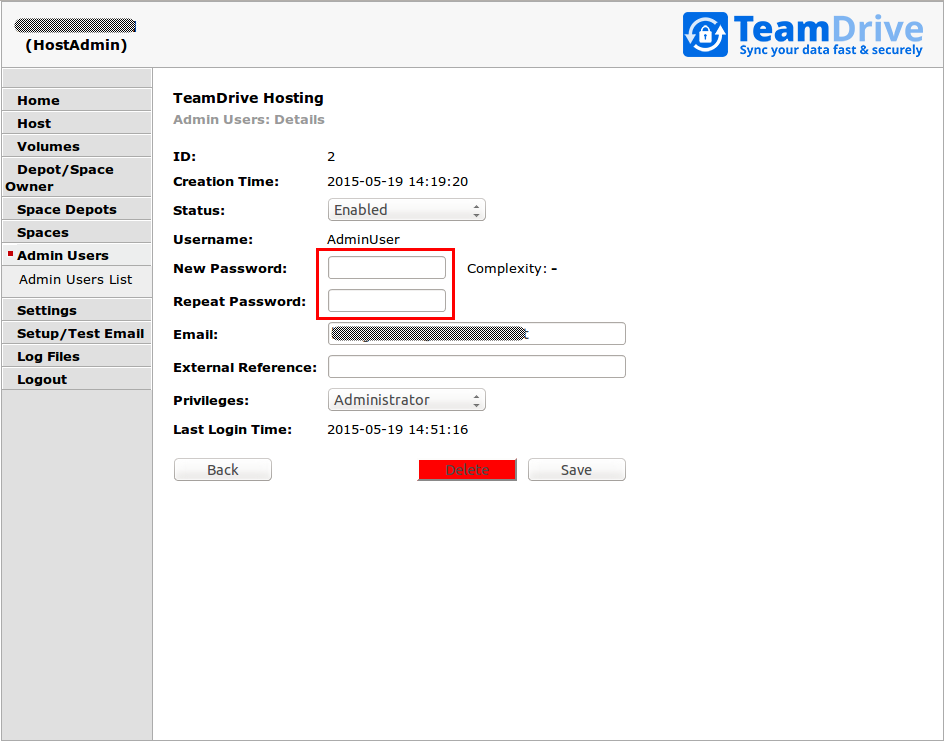
Host Server Administration Console: User Details
To change the password, enter the new password into the input fields New Password and Repeat Password and click Save to commit the change.
The new password will be required the next time this user logs into the Administration Console.
In case you lost or forgot the password for the last user with Superuser
privileges (e.g. the default HostAdmin user), you need to reset the
password by removing the current hashed password stored in the MySQL Database
(Column Password, located in Table pspace.LocalUser). This can be
performed using the following SQL query.
Log into the MySQL database using the teamdrive user and the corresponding
database password:
[root@hostserver ~]# mysql -u teamdrive -p
Enter password:

[...]

mysql> use pspace;
Database changed

mysql> SELECT * FROM LocalUser WHERE UserName='HostAdmin'\G
*************************** 1. row ***************************
           ID: 1
       Status: 0
     UserName: HostAdmin
        Email: your.name@yourdomain.net
     Password: $2y$10$s0mTNsotNx2Nq4sO13zjDOVnWO6Qx.Lbw1zwcu3efKSXJPB9HGpzO
 ExtReference: NULL
   Privileges: Superuser
 CreationTime: 2015-05-18 10:56:54
LastLoginTime: 2015-05-19 14:21:42
1 row in set (0.00 sec)

mysql> UPDATE LocalUser SET Password='' WHERE UserName='HostAdmin';
Query OK, 1 row affected (0.01 sec)
Rows matched: 1  Changed: 1  Warnings: 0

mysql> quit
Bye
Now you can enter a new password for the HostAdmin user via the login page
as outlined above, by clicking the Change Password link, but leaving the
Password field empty and only entering the new password twice, followed by
clicking the Login and Change Password button.
Enabling Two-Factor Authentication for Superusers
Starting with Host Server version 3.5, the Administration Console supports two-factor authentication via email. In this mode, an Admin User with “Superuser” privileges that wants to log in with his user name and password needs to provide an additional authentication code that will be sent to him via email during the login process. This feature is disabled by default.
The TeamDrive Host Server needs to be configured to send out these authentication email messages via SMTP. The Host Server is only capable of sending out email using plain SMTP via TCP port 25 to a local or remote MTA.
If your remote MTA requires some form of encryption or authentication, you need to set up a local MTA that acts as a relay. See chapter Installing the Postfix MTA in the TeamDrive Host Server Installation Guide for details.
Before you can enable two-factor authentication, you need to set up and verify the Host Server’s email configuration. This can be accomplished via the Host Server’s Administration Console. You need to log in with a user account having “Superuser” privileges in order to conclude this step.
Click Setup / Test Email to open the server’s email configuration page.
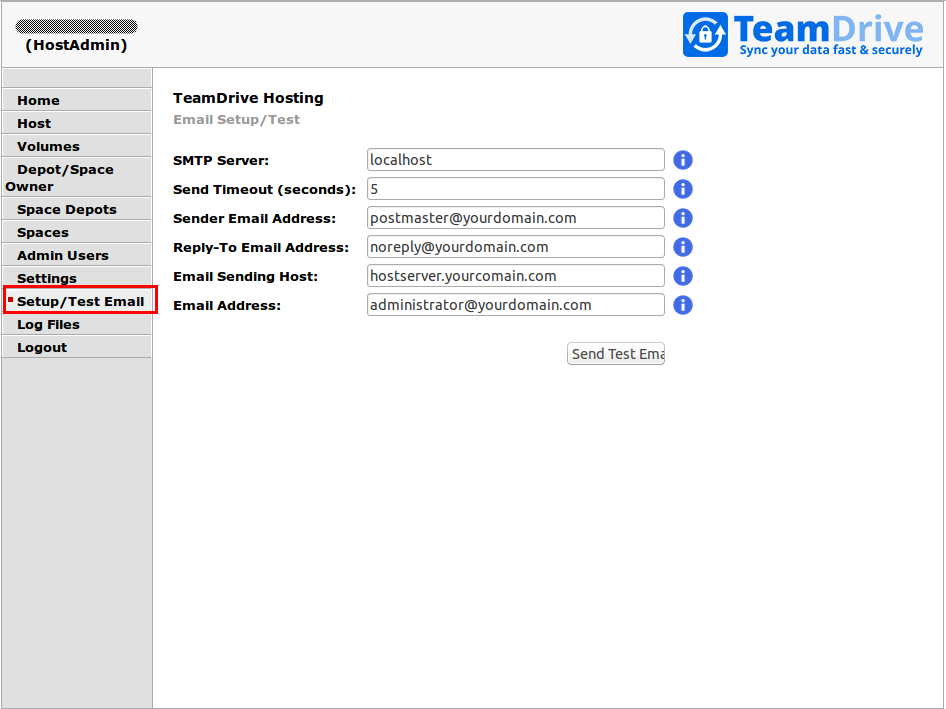
Host Server Admin Console: Email Setup / Test
Fill out the fields to match your local environment:
- SMTP Server:
- The host name of the SMTP server accepting outgoing email via plain SMTP.
Choose
localhostif you have set up a local relay server. - Send Timout:
- The timeout (in seconds) that the mail sending code should wait for a delivery confirmation from the remote MTA.
- Sender Email Address:
- The email address used as the Sender email address during the SMTP delivery,
e.g.
postmaster@yourdomain.com. This address is also known as the “envelope address” and must be a valid email address that can accept SMTP-related messages (e.g. bounce messages). - Reply-To Email Address:
- The email address used as the “From:” header in outgoing email messages.
Depending on your requirements, this can simply be a “noreply” address, or
an email address for your ticket system, e.g.
support@yourdomain.com. - Email Sending Host:
- The host name used in the HELO SMTP command, usually your Host Server’s fully qualified domain name.
- Email Address:
- The primary administrator’s email address. This address is the default recipient for all emails that don’t have an explicit receiving address. During the email setup process, a confirmation email will be sent to this address.
After you’ve entered the appropriate values, click Send Test Email to
verify the email setup. If there is any communication error with the
configured MTA, an error message will be printed. Check your configuration and
the MTA’s log files (e.g. /var/log/maillog of the local Postfix instance)
for hints.
If the configuration is correct and functional, a confirmation email will be delivered to the email address you provided. It contains an URL that you need to click in order to commit your configuration changes. After clicking the URL, you will see a web page that confirms your changes.
This concludes the basic email configuration of the Host Server. Now you can
enable the two-factor authentication by clicking Settings ->
UseTwoFactorAuth. Change the setting’s value from False to True
and click Save to apply the modification.
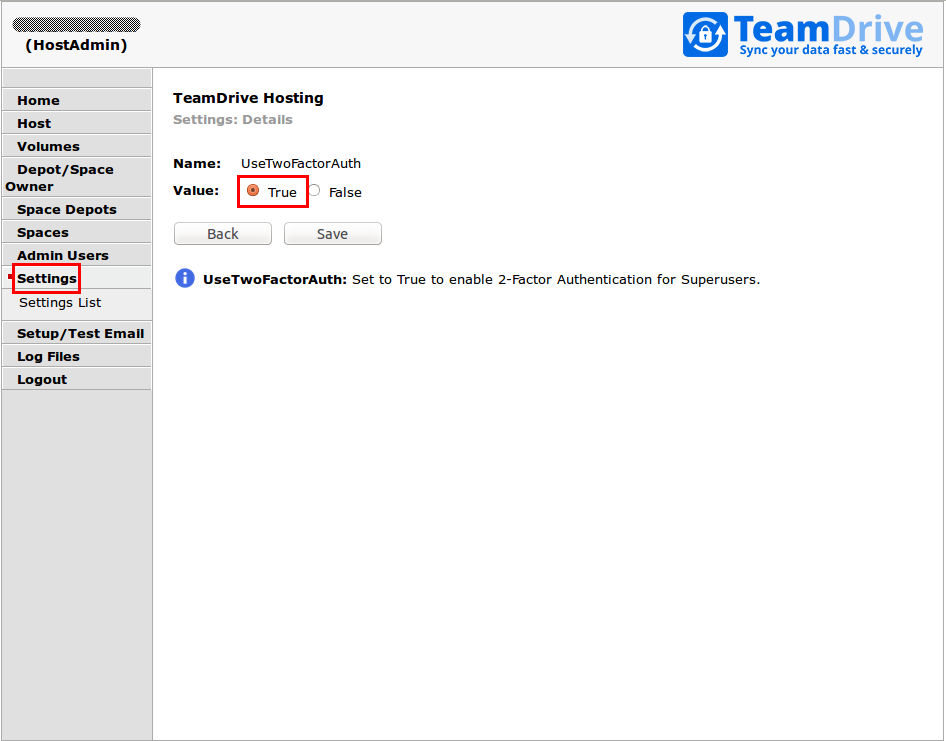
Host Server Admin Console: Use Two Factor Authentication
Now two-factor authentication for the Administration Console has been enabled.
The next time you log in as a user with “Superuser” privileges, entering the username and password will ask you to enter a random secret code, which will be sent to you via email to the email address associated with your administrator account. Enter the code provdided into the input field Authentication Code to conclude the login process.
Changing the MySQL Database Connection Information
The Host Server Apache modules mod_pspace and mod_yvva as well as the
yvvad daemon that performs the td-hostserver background tasks need to
be able to communicate with the MySQL management database of the Host Server.
If you want to change the password of the teamdrive user or move the MySQL
database to a different host, the following changes need to be performed.
To change the MySQL login credentials, edit the file
/etc/td-hostserver.my.cnf. The password for the teamdrive MySQL user
in the [p1db] option group must match the one you defined earlier:
[p1db]
database=pspace
user=teamdrive
password=<password>
host=127.0.0.1
If the MySQL database is located on a different host, make sure to modify the
host variable as well, providing the host name or IP address of the host
that provides the MySQL service. If required, the TCP port can be changed from
the default port (3306) to any other value by adding a port=<port> option.
Manually creating a Depot
The default Depot is always linked to a single user. Using the Host Server Admin Console, it is possible to create Depots that are not linked to a particular user. Each TeamDrive Client that has a Depot file can create Spaces within it. A Depot must always be assigned to a TeamDrive user when it is created via the Web Interface . This is the Depot owner, and only they can later expand the storage space from their TeamDrive Client by using the upgrade button.
The Depot files are encrypted using an external tool the tshs binary.
The name and path of the executable is stored in the setting TSHSExecutable.
This should be configured correctly during the TeamDrive software installation
process, and need not be altered.
To set up a new Depot, click Space Depots -> Add New Depot in the navigation bar.

Host Server Admin Console: Add New Depot
Fill out the fields based on the requirements for this Depot.
- Owner:
- Click Edit to select a user from the selection list to which the Depot will be assigned. Use the Selection Filter input field to search for a specific username after clicking the Apply button. Click the desired username and click OK to finish the selection.

Host Server Admin Console: New Depot Owner Selection
- Space Depot Name:
- Any name can be selected for the Space Depot name. The name appears in the TeamDrive Client in the list of available Depots.
- Contract:
- An account number used as a reference for other systems.
- Max. Disk Space and Traffic Limit:
- These values should be set up at a ratio of at least 1:10 because users invite each other to the Spaces and the traffic thus may always be higher than the storage space used.
Click Create to create the Depot.
By clicking the Depot Access File link in the Depot Details screen, you can download the respective Depot file, which can be imported into the TeamDrive Client.
Increasing Volume Storage Space
The first scaling strategy is to add additional volumes to increase the available storage capacity. You should consider adding more volumes (or increase the size of a volume), if any existing volume reaches 60% of utilization.
For additional scaling, we recommend to add an object store which will scale unlimited. We offer additional tools for moving local data to the object store. An extended apache module will redirect client requests to the data that was moved to the object store. The clients could read the data directly from the object store, if it supports the HTTP protocol.
Please contact sales@teamdrive.com for supported object stores.
Optional Configuration Settings
In the settings you can set up configurations, such as the IP address of the external server needed for the XML invocations referred to into access the account on the Hosting Service and automatically upgrade the storage space, if needed (after payment is received). Only requests from this IP are then accepted. The value in “UpgradeServerIP” is delivered empty so that no safety check is done.
Using HTTPS for publishing files
TeamDrive can publish files so that they can be accessed without using a TeamDrive Client.
The default protocol for uploading and downloading the data is HTTPS. This requires
Apache to be appropriately configured and a valid SSL certificate must be installed.
If security of published files in not an issue you can set the system parameter
HttpsUsedByPublish to False.
Enabling storing Space Names
Each created Space will be stored on the Hosting Service. This record has
different information such as: user, account, status and usage information and
also the original Space title. For security reasons, the storing the Space
names on the server is disabled by default . To enable storing the Space names:
look for a boolean setting named StoreSpaceNames and set the value to
true.
API return Space Names
By default, Space names will not be returned in the API for security reasons.
To enable returning Space names: add a boolean setting with the name
API_ReturnSpaceNames and set the value to true (this setting will have
no effect, if you disable StoreSpaceNames as described above).
Using HTTPS for the Admin Console
HTTPS is used by default to access the web-based Host Server Admin Console.
For this reason the Apache HTTP Server must be configured to support SSL
and a valid certificate installed. If the Admin Console is only accessed
behind the firewall, then you can allow HTTP access by setting the system
setting HttpsUsedByAdmin to False.
Reporting Usage Statistics
It’s possible to generate a monthly report that contains detailed statistics
about all existing Depots and Spaces within these depots, including the
monthly traffic and disk usage. The report is prepared in the form of an XML
file statistic_from_MM_DD_YYYY_to_MM_DD_YYYY.xml by td-hostserver-task
at the beginning of each month. To enable the generation of these statistics,
you need to change the Host Server setting SpaceStatisticEnabled from
False to True. By default, the resulting report files will be
written to /tmp/. If you prefer a different location, you can provide an
alternative directory name in the configuration setting
SpaceStatisticExportPath.
External Traffic
The Hosting Service can store data externally (e.g., Amazon S3 storage). Outsourcing and directly accessing the client on external storage also generates external traffic. This is recorded separately and added to the direct traffic for the Depot. For transparency, this is displayed separately in the Web Interface . However, the value is only visible if the required module is used. The summarized value of the external traffic and the traffic directly to the host is provided to the TeamDrive Client.
Customizing html templates for published files
The new functionality to restrict access to published files using a password, requires a HTML page where the user enters a password. A set of default pages are included in the Host Server distribution, and are located in:
/opt/teamdrive/hostserver/setup/templates/default
You may add additional folders with customised templates in various languages. Each set of templates must be placed in an appropriately named directory, for example “en” for English and “de” for German. The Host Server uses the HTTP header information of the browser to detect the which language template to return.
If the browser specifies an unknown language, the server will return The
template specified by the DefaultLanguage setting.
The following default templates are included:
- enter-password.html
- Template for entering a password to access a password proteced published file.
- exception.html
- A general error page.
- file-not-found.html
- Error page in case of the published file could not be found.
- invalid-url.html
- This page is returned if the user enters an invalid public file URL, or if the URL has expired.
- password-wrong.html
- Invalid password error page.
- public-redirect.html
- A redirect page for accessing published files. See the description in the Release Notes for Version 3.5 about this security enhancement.