TeamDrive Hosting Service Administration
Configuring the Storage Upgrade URL
Storage upgrade: The server informs the TeamDrive Clients how much storage space and traffic is used per Space or account. The Space owner can reserve storage space via the TeamDrive Client and the TeamDrive Clients will generate an URL that opens in the browser. The URL always points to the Hosting Service. This request can be forwarded as required via a rewrite statement.
Open the file /etc/httpd/conf.d/td-hostserver.httpd.conf in an editor and ensure the following configuration option matches your environment.
Please replace in the Rewrite-Rule “bestellung.hostserver.com” with the URL pointing to your own server that provides information about how to upgrade storage. If a user clicks on the “More Storage” button in the TeamDrive Client, the client will open the URL specified.
Using the Rewrite-Rule allows you to redirect these requests to a custom web page where you can offer storage upgrade options:
# This Rewrite is required for the storage-upgrade-buttons
# in the TD-Client (see storage-upgrade-note in the documentation)
RewriteRule ^/upgrade/([a-z][a-z])/order.html(.*) \
https://bestellung.hostserver.com/$1/order.php$2 [R,NE]
The URL called by the client is structured as follows:
http://<domain-name>/upgrade/<2-character-language-code>/order.html
Examples of language codes are: en (English), de (German) and fr (French).
Additionally, the following values are provided by the TeamDrive Client as URL parameters:
- spaceid: The Space ID of the Space
- host: The host name (host name and Space ID together are always unique)
- user: The TeamDrive user name (BASE64-encoded)
- check: Checksum used to verify whether the request is valid
This allows you to create an order page according to your requirements and adapt it to your own needs (payment link). However, this page must always be present so that the user does not see an error message or an empty page.
Information about Spaces and Accounts can be retrieved from the Hosting Service via the Hosting Service API (an HTTP based interface which uses XML-formatted requests and replies). Please consult the TeamDrive Hosting Service Reference Guide for details.
Functions to delete Spaces and increase Storage limits after payment, for example, are also available. Please contact support@teamdrive.net if you need assistance in using this API.
Disabling the Apache Access Log
In view of the amount of requests issued by the TeamDrive Clients, there is no point in keeping the normal access log activated. We therefore suggest to deactivate it in a production environment. Only the error log should be left enabled. To facilitate this, comment out the following line in the default httpd.conf:
# CustomLog logs/access_log combined
If problems occur in a Space, logging can be activated for a specific Space (see http://httpd.apache.org/docs/2.2/mod/mod_log_config.html). e.g. all access to Space ID 3204 will be logged (the required Apache logging module needs to be enabled again):
SetEnvIf Request_URI 3204 spaceid-3204
CustomLog logs/spaceid-3204-requests.log common env=spaceid-3204
Restart the Apache instance and check the log files for errors.
Changing the Admin Console Password
The Host Server Admin Console can only be accessed by the “HostAdmin” User, by entering the correct password that was defined during the initial installation.
If you want to change the password, you first need to log out from the Administration Console to return to the login page (click on Logout in the left navigation bar).
On the page, click on Change Password... to enable two input fields that allow you to enter the new password twice (to ensure you did not mistype it by accident). You also need to enter the current password in the Password: field above and click Login and Change Password to apply the new password.

Host Server Administration Console: Change Password
In case you lost or forgot the current password for the Administration Console, you need to remove the current hashed password stored in the MySQL Database (Setting AdminPassword, located in Table pspace.Setting). This can be performed using the following SQL query.
Log into the MySQL database using the teamdrive user and the corresponding database password:
[root@hostserver ~]# mysql -u teamdrive -p
Enter password:

[...]

mysql> use pspace;
Database changed

mysql> SELECT * FROM Setting WHERE Name='AdminPassword'\G
*************************** 1. row ***************************
          ID: 6
        Name: AdminPassword
       Value: $2y$10$wGWlkeMt6K9qToIy.SxH3ufrP8Zrivv26HnICtKYDucQbtVmzme3u
    ReadOnly: 1
     Visible: 0
        Type: VARCHAR
CreationTime: 2014-05-20 15:25:09
  ModifyTime: 2014-05-26 11:09:28
1 row in set (0.00 sec)

mysql> UPDATE Setting SET Value='' WHERE Name='AdminPassword';
Query OK, 1 row affected (0.01 sec)
Rows matched: 1  Changed: 1  Warnings: 0

mysql> quit
Bye
Now you can enter a new password on the login page as outlined above, by clicking the Change Password link, but leaving the Password field empty and only entering the new password twice, followed by clicking the Login and Change Password button.
Changing the MySQL Database Connection Information
The Host Server Apache modules mod_pspace and mod_yvva as well as the yvvad daemon that performs the td-hostserver background tasks need to be able to communicate with the MySQL management database of the Host Server.
If you want to change the password of the teamdrive user or move the MySQL database to a different host, the following changes need to be performed.
To change the MySQL login credentials, edit the file /etc/td-hostserver.my.cnf. The password for the teamdrive MySQL user in the [p1db] option group must match the one you defined earlier:
[p1db]
database=pspace
user=teamdrive
password=<password>
host=127.0.0.1
If the MySQL database is located on a different host, make sure to modify the host variable as well, providing the host name or IP address of the host that provides the MySQL service. If required, the TCP port can be changed from the default port (3306) to any other value by adding a port=<port> option.
Manually creating a Depot
The default Depot is always linked to a single user. Using the Host Server Admin Console, it is possible to create Depots that are not linked to a particular user. Each TeamDrive Client that has a Depot file can create Spaces within it. A Depot must always be assigned to a TeamDrive user when it is created via the Web Interface . This is the Depot owner, and only they can later expand the storage space from their TeamDrive Client by using the upgrade button.
The Depot files are encrypted using an external tool the tshs binary. The name and path of the executable is stored in the setting TSHSExecutable. This should be configured correctly during the TeamDrive software installation process, and need not be altered.
To set up a new Depot, click in the navigation on Space Depots -> Add New Depot.
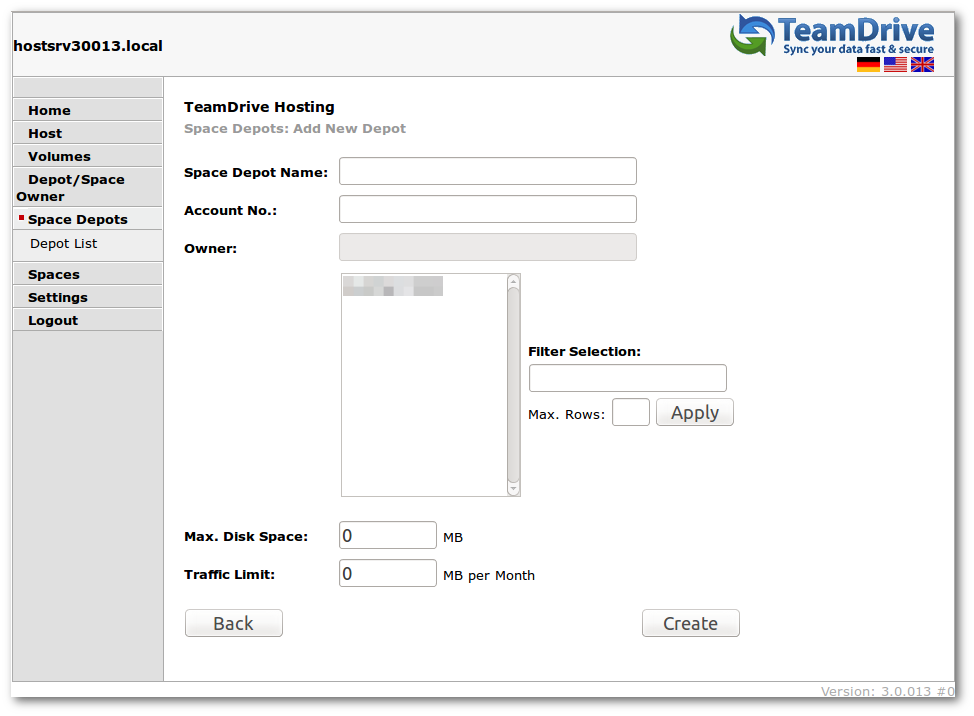
Host Server Admin Console: Add New Depot
First select a user from the selection list to which the Depot will be assigned. Use the Filter Selection input field to search for a specific username after clicking the Apply button.
Description:
Any name can be selected for the Space Depot name. The name appears in the TeamDrive Client in the list of available Depots.
Any account number can likewise be selected and can be used as a reference for other systems.
Disk space and traffic limit should be set up at a ratio of at least 1:10 because users invite each other to the Spaces and the traffic thus may always be higher than the storage space used.
Click on Create to create the Depot.
By clicking on the Depot Access File link in the Depot Details screen, you can download the respective Depot file, which can be imported into the TeamDrive Client.
Increasing Volume Storage Space
The first scaling strategy is to add additional volumes to increase the available storage capacity. You should consider adding more volumes (or increase the size of a volume), if any existing volume reaches 60% of utilization.
For additional scaling, we recommend to add an object store which will scale unlimited. We offer additional tools for moving local data to the object store. An extended apache module will redirect client requests to the data that was moved to the object store. The clients could read the data directly from the object store, if it supports the HTTP protocol.
Please contact sales@teamdrive.com for supported object stores.
Optional Configuration Settings
In the settings you can set up configurations, such as the IP address of the external server needed for the XML invocations referred to into access the account on the Hosting Service and automatically upgrade the storage space, if needed (after payment is received). Only requests from this IP are then accepted. The value in “UpgradeServerIP” is delivered empty so that no safety check is done.
Use HTTPS for publish files
The TeamDrive Professional client license enables TeamDrive Clients to publish files so that they can be accessed without using a TeamDrive Client. The default protocol for downloading the data is HTTP. You could add a boolean setting with the name UseHTTPsForPublishFiles and set the value to true to use HTTPS instead (additional changes in the Apache config and adding a valid SSL certificate are necessary by the admin of the Hosting Service). Please notice, that this value will only be used for new accounts. Existing accounts will not be changed to use HTTPS.
Enabling storing Space Names
Each created Space will be stored on the Hosting Service. This record has different information such as: user, account, status and usage information and also the original Space title. For security reasons, the storing the Space names on the server is disabled by default . To enable storing the Space names: look for a boolean setting named StoreSpaceNames and set the value to true.
API return Space Names
By default, Space names will not be returned in the API for security reasons. To enable returning Space names: add a boolean setting with the name API_ReturnSpaceNames and set the value to true (this setting will have no effect, if you disable StoreSpaceNames as described above).
Force HTTPS usage for Web Interface
By creating a boolean value ForceHTTPSUsage and set it to true, you could force using HTTPS in all host admin web pages to avoid transferring secure data without SSL encryption. To use HTTPS you have to configure the Apache http Server to support SSL and install a certificate for your server.
Reporting Usage Statistics
It’s possible to generate a monthly report that contains detailed statistics about all existing Depots and Spaces within these depots, including the monthly traffic and disk usage. The report is prepared in the form of an XML file statistic_from_MM_DD_YYYY_to_MM_DD_YYYY.xml by p1_autotask at the beginning of each month. To enable the generation of these statistics, you need to change the Host Server setting SpaceStatisticEnabled from False to True. By default, the resulting report files will be written to /tmp/. If you prefer a different location, you can provide an alternative directory name in the configuration setting SpaceStatisticExportPath.
External Traffic
The Hosting Service can store data externally (e.g., Amazon S3 storage). Custom modules are needed for the connection, which you can request from sales@teamdrive.net. Outsourcing and directly accessing the client on external storage also generates external traffic. This is recorded separately and added to the direct traffic for the Depot. For transparency, this is displayed separately in the Web Interface . However, the value is only visible if the required module is used. The summarized value of the external traffic and the traffic directly to the host is provided to the TeamDrive Client.