Introduction
This manual will guide you through the installation of your TeamDrive Agent. This document is intended for system administrators and users, who need to install and configure a TeamDrive Agent.
This Installation Guide outlines the deployment of a stand alone TeamDrive Agent, which is not part of a Web Portal.
Overview
The TeamDrive Agent is a full featured TeamDrive Client without a graphical user interface. An Agent provides:
- Synchronization of Spaces with the Cloud.
- Synchronization of Spaces with a local file system.
- Synchronization of Spaces with a remote file system.
- Management GUI using a Web App.
- API access using JSON calls.
This figure shows an overview of a TeamDrive Agent installation:
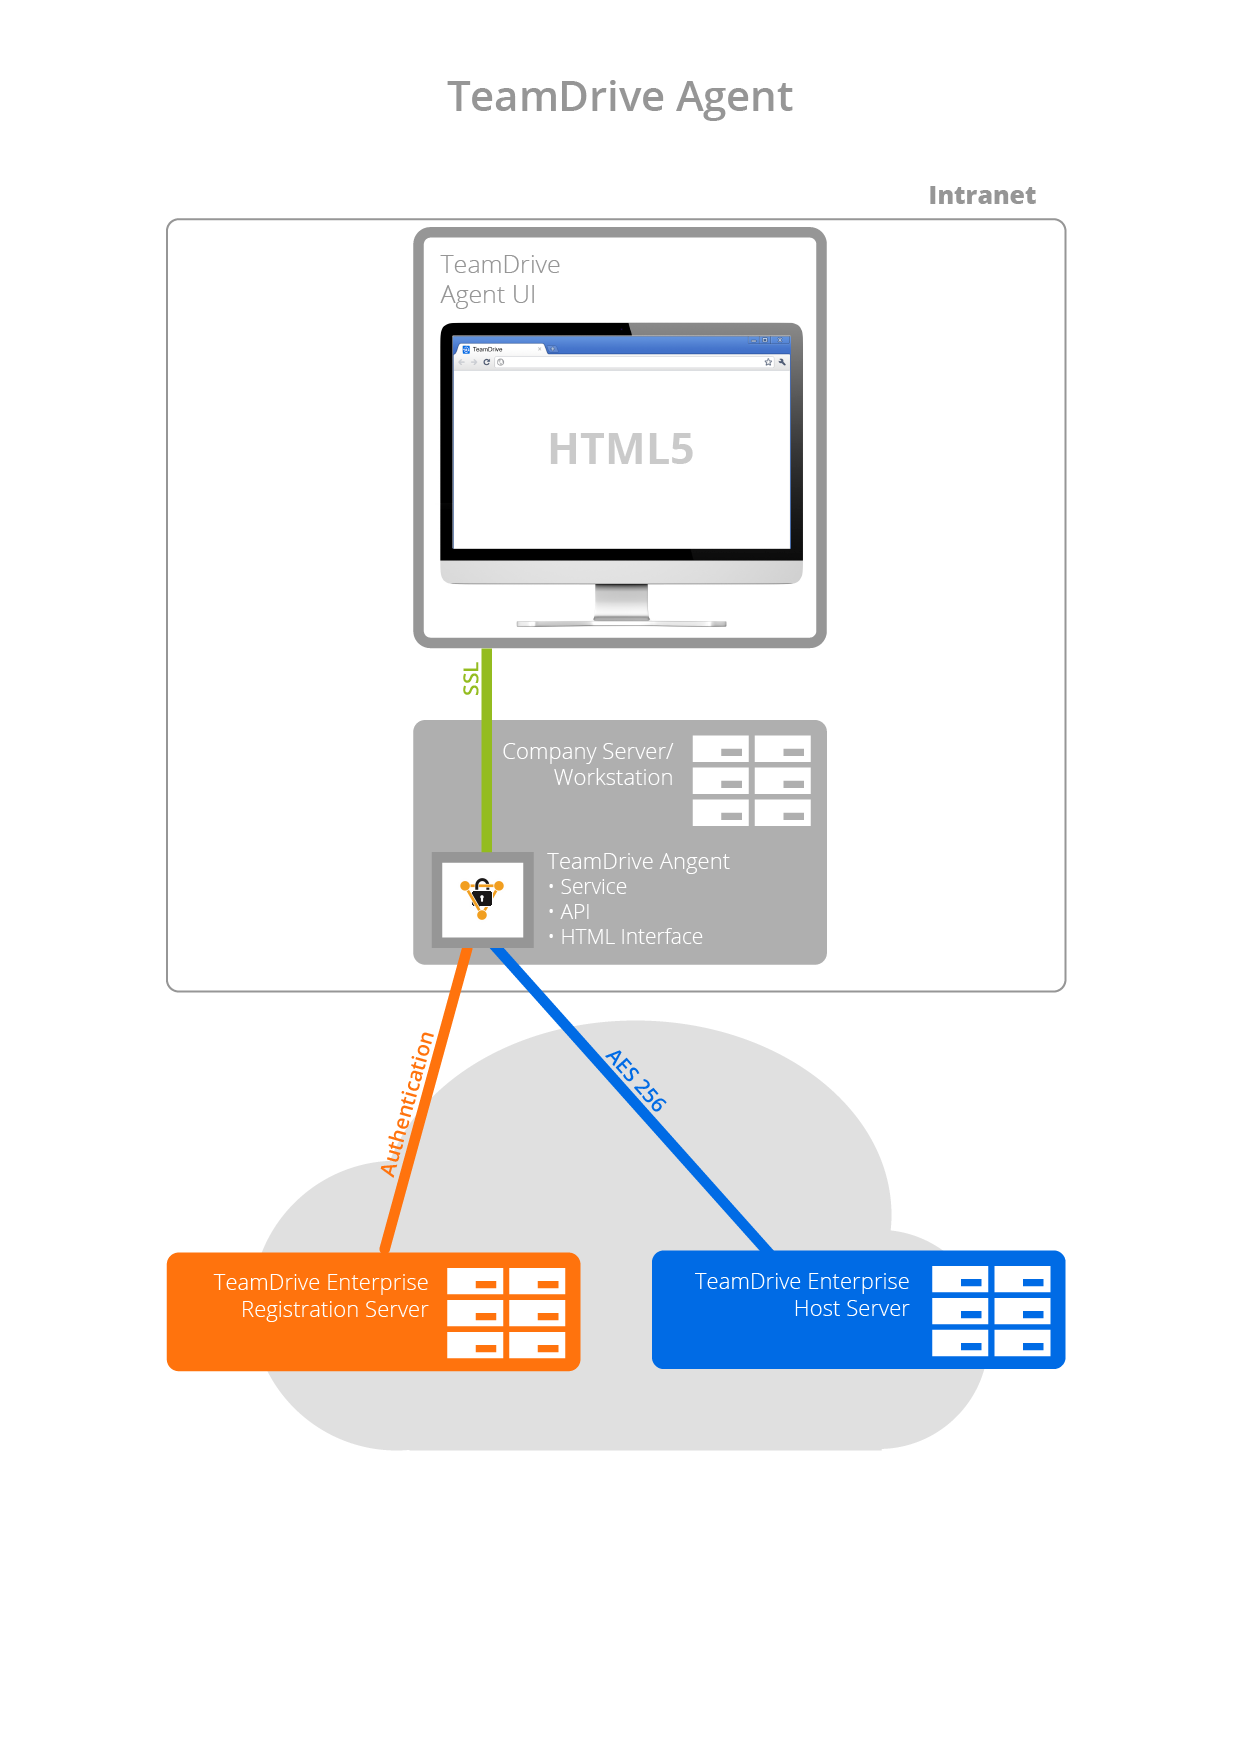
Typically, a TeamDrive Agent is installed on a server or network attached storage and communicates with the TeamDrive Cloud.
Windows Installation
Requirements
The TeamDrive Agent allows a TeamDrive Windows client to be installed and run as a Windows service. The TeamDrive Agent can be run without a GUI and allows data to be synchronized in the background, even when a Windows user is not currently logged in.
The support of older Windows versions has been dropped. The minimum supported Windows version is Windows 7, Windows 10 or Windows Server 2012, Windows Server 2016, Windows Server 2019.
In order to install the TeamDrive Agent, you will need at least 50 MB of free disk space, a valid email address and Internet access. In the end, the total amount of disk space used will depend on the size of your created and/or joined Spaces.
If it is your first time installing and using TeamDrive you will need to create a TeamDrive account before installing the TeamDrive Agent. TeamDrive cannot be used without an account.
Required Skills
When installing the TeamDrive Agent, we assume that you have basic knowledge of:
- Starting and stopping of Windows Services
- Configuration of a firewall
Installation
After you have successfully downloaded the TeamDrive Agent, double-click the installation file to start the installation.
Note
In order to install the TeamDrive Agent on a Windows terminal server, you need to put the server into a special installation mode by executing Change user /install at a command prompt.
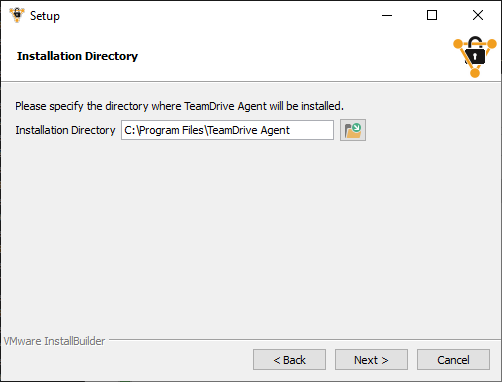
To install the TeamDrive Agent, please specify an installation directory as seen in the following screen shot. We recommend not changing the installation directory to another location, as using the default directory will help with future version upgrades.
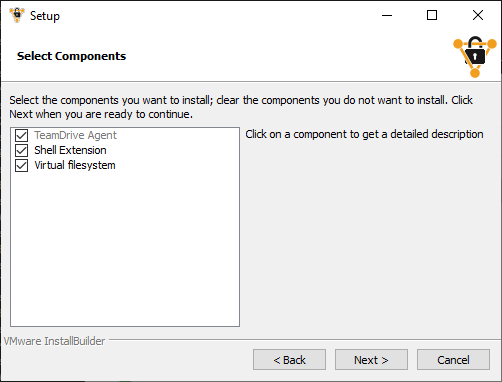
Afterwards, you can choose to install a Windows Explorer integration which provides some context menu entries and overlay icons that show the current synchronization status of Spaces, folders and files:
In order to administer the TeamDrive Agent, you will need to specify a TCP port. This port will be used to provide an administration interface using your web browser. You can choose another port number, but further examples in this document will use the port 45454:

During the installation, the TeamDrive Agent will be registered as a Windows service under the name “TeamDrive Agent Client”. Please be aware that the Windows user logged in at the time of the TeamDrive Agent Client’s installation is automatically associated with this Windows service. Only this Windows user will be able to access the settings file of the TeamDrive Agent.
Post-Installation Tasks
To be able to synchronize files with the TeamDrive Agent, some initial steps are required.
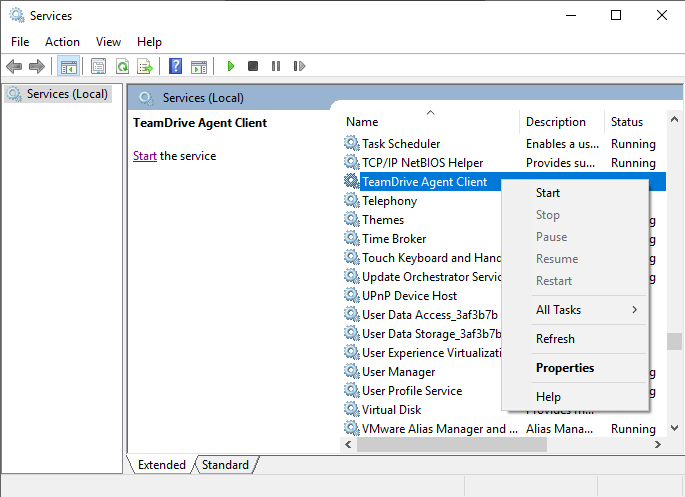
Open the Windows services overview (e.g. on Windows 8 “Control Panel” → “Administrative Tools” → “Services”).
Please choose the user account under which the “TeamDrive Agent Client” will run. Notice: The default LocalSystem account can not be used because of the limited privileges:

Please start the Windows service “TeamDrive Agent Client”:
Open your browser and go to http://localhost:45454. Please replace the port with the one that was used during installation:
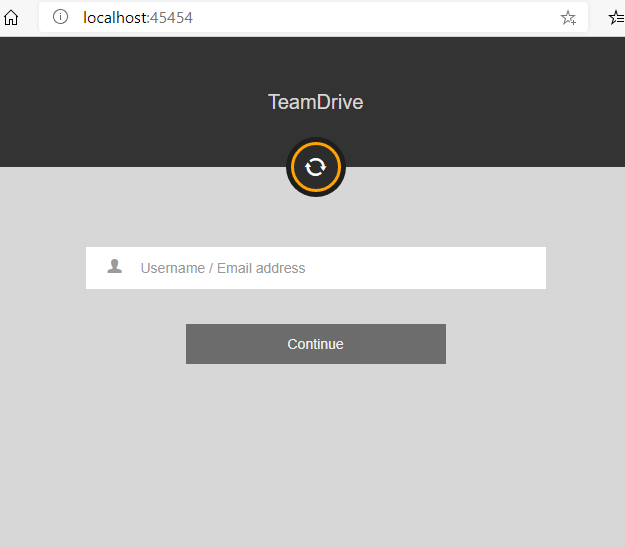
You can now activate Spaces in the administration interface. Your TeamDrive Spaces will now be synchronized in the background.
Changing the Windows User Account
If at some point you wish to change which Windows user you would like to use to manage the TeamDrive Agent, you simply need to edit the configuration file “teamdrive.ini”.
You can navigate to the file using “%ProgramData%” → “TeamDrive” → “teamdrive.ini” or simply C:\ProgramData\TeamDrive\teamdrive.ini. Open the file with a text editor, locate the entry “teamdrive-home-agent=” and replace the old Windows user account with the new desired Windows user account in the given file path. Here is an example of a typical teamdrive.ini that was created by the installer:
[Settings]
teamdrive-home-agent=C:/Users/teamdrive/AppData/Roaming/TeamDrive
http-api-port-agent=45454
shell-extension-user-agent=teamdrive
Please also look at the documentation of teamdrived --teamdrive-home,
teamdrived --http-api-port and Platform specific Settings.
The setting shell-extension-user-agent must be set to the same Windows username as in the teamdrive-home setting.
Afterwards, please continue with Post-Installation Tasks.
Uninstalling the TeamDrive Agent
To completely remove the TeamDrive Agent and all files from you System, follow these Steps:
Stop the TeamDrive Agent Client Windows Service
Execute the uninstall.exe executable and follow the wizard.
You may now delete the
teamdrived --teamdrive-homefolder containing the application data.If you have used a different TeamDrive Data path, please also delete this folder. See
teamdrived --data-pathfor details.You can now delete the Spaces path as configured in
teamdrived --spaces-path. Keep in mind that this folder may contain your Space key backups. Without the keys, you may no longer be able to access your Spaces.Open a Administrator console and execute this command to also remove the Windows Service:
Microsoft Windows [Version 6.1.7601]
Copyright (c) 2009 Microsoft Corporation. All rights reserved.

C:\Windows\system32>sc delete "TeamDrive Agent Client"
[SC] DeleteService SUCCESS
Linux Installation
At the moment, you can either use the 64 bit RPM package or the 64 bit .tar.gz file.
Requirements
The Library Dependencies are moderate and should be provided by all recent linux distributions:
| Library | Version |
|---|---|
| GLibc | 2.9 |
| GLibc++ | 3.4.11 |
| libz |
Under Linux, TeamDrive is using the inotify [1] API of the Linux kernel
to be
notified about file modifications. Under some Linux distributions, there is a
rather small limit regarding the number of files that can be watched. You can
find out the current watch handle limit by executing
cat /proc/sys/fs/inotify/max_user_watches in a terminal. If this
number
is lower than the number of files in your Spaces, please increase this value by
adding for example
fs.inotify.max_user_watches=100000 to your /etc/sysctl.conf file.
Please reboot your system afterwards.
| [1] | http://man7.org/linux/man-pages/man7/inotify.7.html |
Installation on RPM based Distributions
If you are on a RPM based distribution, please install the TeamDrive Agent by installing the rpm file.
The TeamDrive Agent is hosted on a dedicated yum repository. This makes the installation and applying of future updates very easy — you can simply run yum update to keep your TeamDrive Agent up to date.
To enable the repository, you need to download the td-agent.repo file and place it into the directory /etc/yum.repos.d/, e.g. by using wget:
[root@agent ~]# wget -O "/etc/yum.repos.d/td-agent.repo" \
"http://repo.teamdrive.net/td-agent.repo"
This will enable the “TeamDrive Agent Version 4” repository, which you can check by running yum repolist afterwards:
[root@agent ~]# yum repolist
Loaded plugins: security
repo id            repo name                                 status
td-agent-4         TeamDrive Agent Version 4                 4
base               CentOS-6 - Base                           6.367
extras             CentOS-6 - Extras                         14
updates            CentOS-6 - Updates                        1.094
repolist: 7.477
To install the TeamDrive Agent, install the following package via yum from the “TeamDrive Agent” repository:
[root@agent ~]# yum install teamdrive-Agent
Please continue with Starting and Stopping.
Installation on other Distributions
To install the TeamDrive Agent on a non-RPM based distribution, please download the Agent manually for example by using wget:
wget http://s3download.teamdrive.net/4.<version>/TMDR/linux-x86_64/TeamDrive_Agent_4.<version>_x86_64.tar.gz
Please replace <version> with the latest release. Now, please extract the TeamDrive Agent:
tar -xvzf TeamDrive_Agent_4.<version>_x86_64.tar.gz
This will extract the TeamDrive Agent into a subdirectory TeamDrive.
Note
The tar.gz file does not register a teamdrive-Agent command on your system.
Starting and Stopping
Before starting the TeamDrive Agent for the first time, please also read Initial Set-Up.
Please start TeamDrive by using the shortcut in your desktop menu or bar. Alternatively, you can execute the global command “teamdrive-Agent” or ”./TeamDrive” from the installation folder. TeamDrive requires some system settings that are not available by executing the teamdrived.bin executable directly.
Note
Running TeamDrive as root is not recommended. TeamDrive runs perfectly without privileges.
To stop the TeamDrive Agent, please execute:
/opt/teamdrive/TeamDriveApi.py '<agent-host>:<port>' quit False
Replace <agent-host> with the host where your TeamDrive Agent is installed and the port with the one you specified.
Initial Set-Up
To administrate your TeamDrive Agent, you need to enable the HTTP API by
setting the teamdrived --http-api-port option either as a command
line argument or as a setting in the file ~/.teamdrive/teamdrive.settings:
[Settings]
http-api-port=45454
http-api-type=tcp
Then start the TeamDrive Agent, open your favorite browser and go to http://<agent-host>:45454. Replace <agent-host> with the host where your TeamDrive Agent is installed and the port with the one you specified. Log-in to your TeamDrive account now.
To start the agent after a reboot on a CentOS 7 system, please follow the systemd reference guide:
Create a file /etc/systemd/system/teamdrive.service with the following content
(replace the User=teamdrive with your useraccount and also change Environment
and ExecStart to your setup):
[Unit]
Description=teamdrive Service
After=network.target

[Service]
Type=simple
User=teamdrive
Environment=LD_LIBRARY_PATH=/home/teamdrive/teamdrive
ExecStart=/home/teamdrive/teamdrive/teamdrived.bin
Restart=on-abort

[Install]
WantedBy=multi-user.target
Notify systemd that a new teamdrive.service file exists and start the service by
executing the following command as root:
systemctl daemon-reload
systemctl start teamdrive.service
Activate SSL communication for the Agent web-interface
There are 2 possibilities to active SSL communication:
1. Use the build-in SSL communication with the following settings in the
teamdrive.settings file (you can use your own port instead of the
default ssl port 443):
[Settings]
http-api-port=443
http-api-type=ssl
http-api-certificate=<path to your certificate in PEM format>
http-api-private-key=<path to your RSA private key file PEM format>
The certificate must contain the certificate itself and the intermediate certificates of your CA. A description how to bundle the certificates into one file can be found here: https://support.globalsign.com/ca-certificates/root-certificates/root-intermediate-certificate-bundles
2. Use a web-server, like the Apache, as a front-end for the ssl communication and forward the requests to the agent using the apache proxy module. This is the recommended configuration in case of using the inbox-functionality. Set http-api-type to tcp and start the agent using the standard port. This is an example apache configuration which must be added to the ssl / virtual host configuration an will forward requests to the agents standard port 45454:
<Location ~ ^/>
   RewriteEngine On
   # Replace <my-own-ip> with your static IP to disable
   # access to the agents login page for unknown users
   RewriteCond "%{REMOTE_ADDR}" "!<my-own-ip>"
   RewriteRule (/getLoginInformation|/views/login.html) - [L,R=403]
</Location>

# All requests will be forwarded to the standard port of the agent
# Replace the port number 45454 from your agent configuration
ProxyPass / http://127.0.0.1:45454/
ProxyPassReverse / http://127.0.0.1:45454/
Performance Consideration
The TeamDrive Agent is typically used to synchronize data on a central server. These are some guidelines to optimize the performance of the TeamDrive Agent in this situation:
- Do not mount the file system over the network, which contains the data that will be synchronized. Network shares are much slower than local file systems. Using a network share will limit the number of files and directories per Space.
- Use more than one TeamDrive Space. Using more than one Space can increase the performance. For example, you could have one Space per project or team.
Updating from the TeamDrive 3 Agent to the TeamDrive 4 Agent
The application data directory (specified by the
teamdrived --teamdrive-home parameter) is compatible to TeamDrive 3 and will be updated in this process.
- Perform a full system backup in order to be able to restore your system if you encounter unexpected errors. if you encounter unexpected errors. In case you decide to skip the full system backup, it is of particular importance that you backup the TeamDrive 3 Agent application data directory. The TeamDrive 3 Agent application data directory is located in the ‘AppData\Roaming’ folder of the Windows user used to install the Agent. You can navigate to the folder using “%ProgramData%” → “TeamDrive3” → “teamdrive.ini” or simply C:\ProgramData\TeamDrive3\teamdrive.ini. Open the file with a text editor, locate the entry “teamdrive-home-agent=”, copy and navigate to this path and simply backup the “TeamDrive3” folder.
- Shutdown the TeamDrive 3 Agent.
- Install the new TeamDrive 4 Agent as described, but do not start the TeamDrive Agent.
- Make sure that you have only one installation of the TeamDrive Agent. Manually delete older TeamDrive 3 installations in case they are not automatically deleted. Keep in mind that the application data directory will be used by TeamDrive 4 afterwards. Older TeamDrive 3 installations can be found in C:\Program Files(x86)\. Manually delete old TeamDrive 3 installations by simply deleting their folders.
- Start the TeamDrive 4 Agent. See Initial Set-Up.
Warning
On Windows, the uninstall.exe will delete the application data directory. Be careful when removing old installations.
Troubleshooting
TeamDrive stores log output to %APPDATA%\TeamDrive3\logs or ~/.teamdrive/logs. Please search for [Critical] messages that can be a hint to an error.
Administration interface is not available (Linux)
If you are not able to access the administration interface in you browser, please check that TeamDrive has opened a TCP port:
[root@agent ~] netstat -twaunp
Please edit the settings file and set TeamDrive to open the port 45454. This can be done by editing the file ~/.teamdrive/teamdrive.settings file. This is an example:
[root@agent ~] vim ~/.teamdrive/teamdrive.settings
Add the following entries:
[Settings]
http-api-type=tcp
http-api-port=45454
Restart TeamDrive with the following commands:
[root@agent ~] killall teamdrived.bin
# Wait 10 seconds
[root@agent ~] ./TeamDrive
TeamDrive stores log output to %APPDATA%\TeamDrive3\logs or ~/.teamdrive/logs. Please search for [Critical] messages that can be a hint to an error.
Installation error: Probelm running post-install step (Windows)
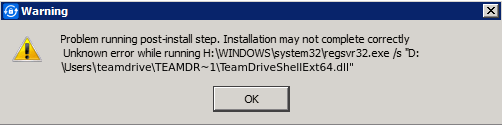
Error message shown by the installation process on a Windows Terminal Server.
This issue is related to how a Windows Terminal Server works. It is redirecting the CSIDL_WINDOWS path to user’s home
directory such as C:\Users\username\Windows. This can be solved by switching the machine to install mode before
running the installer, whoch can be done by running the Programs and Features from Control Panel and choosing to install
an application in terminal server. It can also be done by running change user /install command from command prompt
and change it back to execution mode by running change user /execute after the installer finishes.
Using a system proxy in Windows
Please notice, that services will start under the LOCAL SYSTEM user and have no access to the proxy settings of a standard windows user. You will find different solutions how to set a system proxy for services:
http://serverfault.com/questions/34940/how-do-i-configure-proxy-settings-for-local-system
If you want to copy the proxy settings from a TeamDrive Desktop client instance using a system proxy to a TeamDrive Agent instance, set the proxy type to 3 (for manual proxy):
Type=3
in case that you dont want to configure the system proxy as described in the above article. Otherwise the TeamDrive Agent will override the setting with the not configured empty system proxy values.