Using the Administration Console
The TeamDrive Registration Server Administration Console, also known as the “Admin Console”, is a web-based application for the administration of all aspects of the Registration Server.
You can login to the Admin Console either using “provider credentials” or by using your standard user credentials. Provider credentials are a username and password which are created when the provider is created.
Provider credentials can be changed by users with EDIT-PROVIDER rights (see
EDIT-PROVIDER).
In order to login as with standard user credentials you must have the LOGIN-RIGHT
privilege (see User Rights).
Note that login is also subject to the LOGIN_IP and PROVIDER_LOGIN_IP
provider settings (see ADMINCONSOLE Settings).
Access Levels
Admin Console functionality is divided into four access levels:
Superuser-Level:
This access level is reserved for the owner of the Registration Server. Superusers have all rights to the server and have access to all aspects of the server.
When a Registration Server is installed an initial provider is created, called the “Default Provider”. Users that login with the Default Provider credentials (provided during installation) have superuser access.
The Default Provider can be changed later by modifying the global
server setting DefaultProvider.
Users can be explicitly granted SUPER-USER rights (see User Rights).
In this case the user has the same privileges as a user that logs in
with the credentials of the user’s provider.
Provider-Level:
Providers are so-called because they provide a TeamDrive service to a (possible very large) number of TeamDrive users.
Certain aspects of the TeamDrive service can only be controlled at the provider level, for example: access to Hosting Services, and other services such as a Web Portal or External Authentication Services.
A user that logs in with the provider credentials has full control of all servers, settings, accounts and users of the provider.
Users can be granted provider level access by granting them the
PROVIDER-MANAGER right (see User Rights).
A provider can be configured to be managed by some other provider. This can be done by setting the Managed by field of the Provider details.
Note
New in this release: User’s that login with Provider-Level privileges have control of all providers that their provider manages. In this case there is a drop-down menu at the top of the Admin Console page which is used to select the provider. In addition, search filters provide an “Include all providers” option.
Account-Level:
Accounts are group of users and associated resources. Account level access (new in Registration Server 4.0) allows a user to manage a number of users, clients/devices licenses and depots.
To gain Account-Level privileges you must be added as a manager of one or
more accounts. The user is then automatically granted the LOGIN-RIGHT and
ACCOUNT-MANAGER rights.
User-Level:
If a user is granted the LOGIN-RIGHT privilege, then they will access
the Registration Server at the User-Level. This means that they only
have access to their own user details, and objects, such as client,
licenses and depots that belong to the user.
Security Considerations
We strongly recommend accessing the Admin Console via SSL/HTTPS only. Our preconfigured Virtual Appliance images provide a self signed SSL certificate and access is possible via HTTPS only. You should replace this certificate with an official one, if this server is publicly accessible.
You can also limit access to the Admin Console to individual IP
addresses, by using the built-in provider setting LOGIN/LOGIN_IP. This
setting defines the IP addresses (as a comma-separated list) that are allowed
to connect to the Admin Console as a given provider.
If you require more flexibility in restricing access, e.g. by restricting it to an IP address range or by host/domain names, we suggest using the Apache http Server’s built-in functionality:
https://httpd.apache.org/docs/2.4/mod/mod_authz_host.html
The safest strategy is separating the Admin Console from the Registration Server by installing it on a dedicated server, which is only accessible by you.
Logging in / Logging out
To log into the TeamDrive Registration Server Admin Console, open the Admin Console’s URL in your web browser, e.g.
https://regserver.yourdomain.com/adminconsole/
Enter your username or email address and password to log in.

You can login using either provider login credentials or the your standard TeamDrive user credentials.
If provider credentials happen to be identical to those of a TeamDrive user, then the provider login takes priority.
To login with standard user credentials you must have the LOGIN-RIGHT privilege
(see LOGIN-RIGHT). This right is granted automatically to users that
are account managers.
To log out, select the “Logout” option from the menu in the top right hand corner.
Lost Password
When you login using standard user credentials, you can click on the “Forgot password...” link if you have forgotten your password. Then click on the Send Temporary password button to have a temporary password sent to your email address. You can then login and set a new password using the temporary password in the email.
Note
The lost password feature is not available for login using provider credentials.
Changing the Login Password
To change your user password ater login, click on the “Change Password” option in the menu in the top right hand corner.
You will see a form prompting you to enter your current password and a new one. Since the password is hidden, you are required to enter it twice, to ensure you have entered it correctly.
Once you have entered the current and new password, click Change Password to save the change, or click Back at any time to go back to the previous page.
Changing the password of a TeamDrive user on the Admin Console will require all TeamDrive clients to re-login before synchronisation will continue.
Note
If you currently do not have a TeamDrive client installation, but you have previously created spaces using a TeamDrive installation that is now lost, changing your password will cause you to loose access to the space keys stored in the TeamDrive Key Repository managed by the Registration Server.
Main Menu


The sub menue entries are described in the following chapters. It depends on the access permissions if all entries are visible for the current user.
Admin
This section allows you to administrate various aspects of the Registration Server and view several log files.
Server Settings
Click Admin/Server Settings in the navigation bar to go to the Server Settings
page. Only users with the EDIT-SETTINGS privilege can view and edit server
settings.

Warning
Changes to the Registration Server settings will only be active after the
caching period defined in RegServer/CacheIntervall has passed (the
default is 1800 seconds or 30 minutes). If no cache interval was set, you
need to restart the Apache HTTP Server of the Registration Server to reload
these values.
To change a setting, select one of the top level categories (e.g. Client, RegServer, etc.), change the desired setting either by entering a new value or selecting one from the drop down menu, and click Save in that value’s row. Do not change more than one value at once — always save your change before modifiying another value. Note that not all settings are editable.
Each setting provides a short description about its meaning and a link to the documentation. All settings and possible values are explained in more detail in Registration Server Settings in the TeamDrive Registration Server Reference Guide.
Manage Servers
Click Admin/Manage Servers in the navigation bar to perform management tasks related to Host Servers and other Registration Servers.
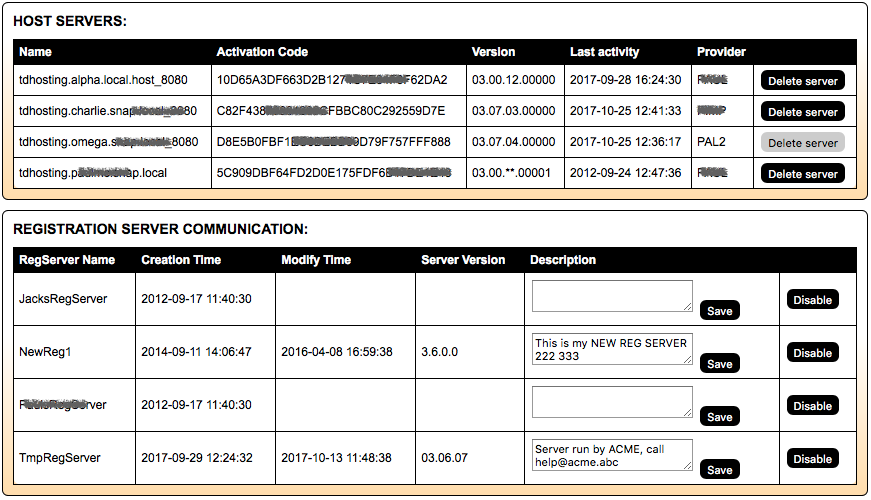
The Host Servers section lists all Host Servers that have been registered/associated with providers hosted on the Registration Server instance. From here you can also obtain the Activation Code that is required to finalize the Host Server installation and registration process (see the TeamDrive Host Server Installation Guide for details). It’s also possible to remove a Host Server by clicking Delete Server, which detaches it from the provider it has been registered with and deletes the corresponding user and device entry.
Note
Only a Host Server which is not already in use by clients can be deleted.
Important
Please enable HTTPS for the API communication between Registration Server
and Host Server in case that your Server is configured to allow HTTPS
communication (setting HostServer/API_USE_SSL_FOR_HOST).
If TDNS access is enabled (setting RegServer/TDNSEnabled), the Manage
Servers page also allows you to enable communication with other Registration
Servers.
Enabling a Registration Server allows your local users to directly invite users managed on that other Registration Server into their Spaces.
By default, communication with all other servers is disabled/enabled according
to the RegServer/TDNSAutoWhiteList setting. This setting can either be changed
directly on the Admin/Server Settings page, or on the
Manage Servers page by changing the default to enabled/disabled and clicking
“Save”.
Note
The communication to TeamDriveMaster must always be enabled in case your are
using the TeamDrive standard client.
You can set exceptions to the current default rule by entering a specific server name in the form field at the bottom of the page and clicking “Add”. The current list of exceptions is displayed along with the the chosen default rule.
Another exception to the default is the Master Registration Server, which is enabled/disabled separately via the selection field at the top of this section of the page.
If communication with other servers is enabled by default, your Registration Server obtains a list of all known Registration Servers from the Master Registration Server, “TeamDriveMaster”, every 12 hours via a background task (see Manage Auto Tasks).
View Mail Queue
Click View Mail Queue to get an overview of the current mail queue, which lists all emails that have not been delivered to the respective users yet.
Pending outgoing emails can be shown here due to the fact that the “Send Emails” auto task hasn’t procesed the mail queue recently (such messages have the status “created”), or there were issues with the email address or when submitting messages to the MTA (the status of these messages is “failed”).
Click Reset Status to enqueue a message for delivery again. Click Delete to remove a message from the queue.
View Server Logs
The Admin Console allows viewing selected server log files for troubleshooting
purposes. The View Server Logs page is only visible for users having the
VIEW-LOGS privilege.
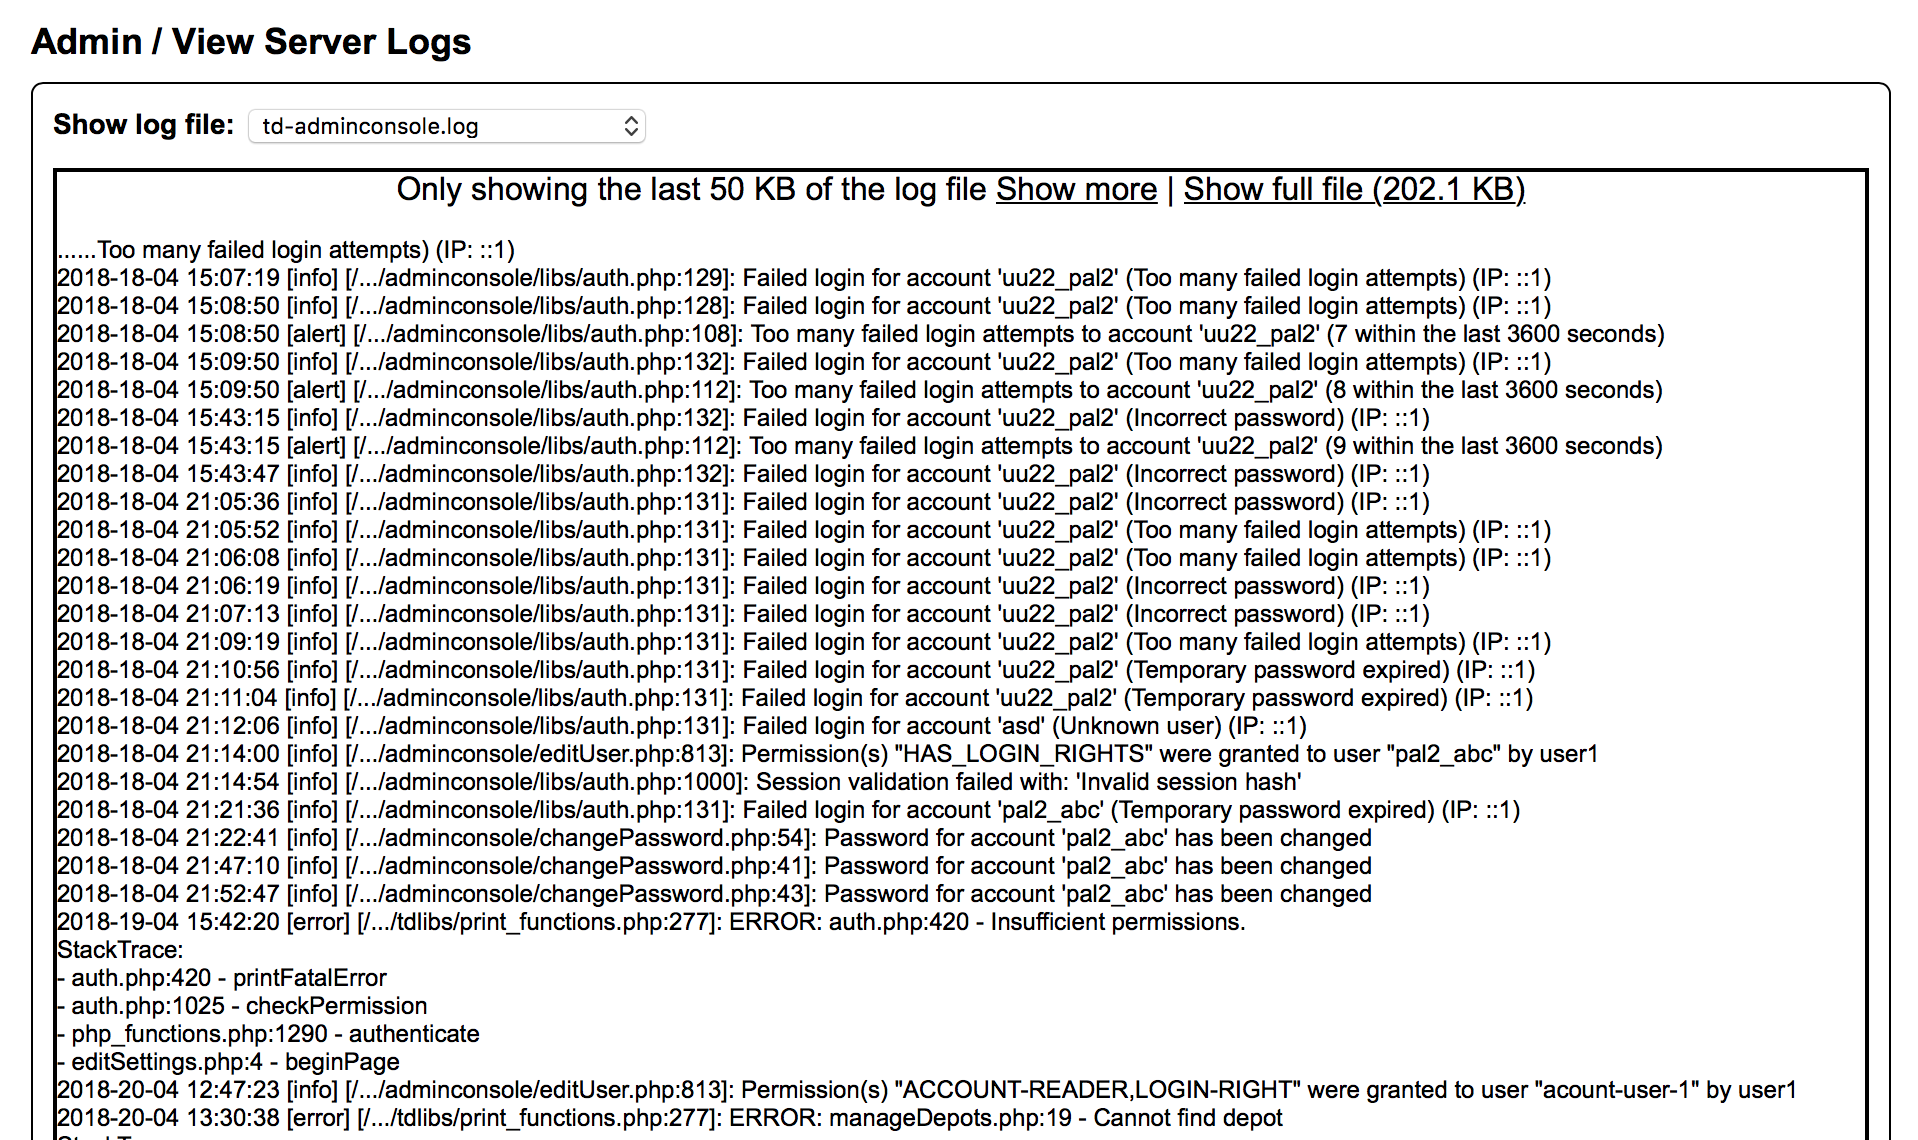
Depending on the availability and access permissions, the following log files can be viewed by selecting them fromm the Show log file:
/var/log/httpd/error_log/var/log/td-regserver.log/var/log/td-adminconsole-api.log/var/log/td-adminconsole-failedlogins.log
As it requires physical read access to these logs, this feature works best
when the Admin Console is installed on the same host where the
Registration Server instance is running on. Log files can only be viewed if
the user that the Apache HTTP Server is running under (usually apache) has
the required read access privileges to view these files.
The list of log files is defined in the (read-only) Registration Server setting
ServerLogFiles and can only be modified by updating the setting in the
database directly.
/var/log/httpd/error_log: The standard apache error log file (change the
access rights using the command chmod 755 /var/log/httpd to view this file).
/var/log/td-regserver.log: The yvva background task will log errors into
this file and also the errors which might occur from the client requests will
be logged to this file.
/var/log/td-adminconsole-api.log: The API requests from the Admin Console to
the Registration Server API and host server API will be logged to this file.
/var/log/td-adminconsole-failedlogins.log: Failed logins to the Admin Console
will be logged to this file.
View API Log
Most of the tasks performed via the Admin Console result in API calls being sent to the Registration Server. You can also utilize API calls in your own applications, if you need to interact with the Registration Server.
See the chapter Registration Server API Calls for an overview of the available API calls.
If you enabled the logging in your provider setting API/API_REQUEST_LOGGING
and you are either logged in as the Default Provider or with a provider/user
that has the VIEW-API-LOG privilege, you can view a log of
all incoming API requests and their results by clicking View API Log in
the menu bar.
The API request log is stored in the Registration Server’s MySQL database and can be filtered by various criteria, e.g. Date created, User, and Command.
Note
Enabling API logging by default will significantly contribute to
the growth of the Registration Server’s MySQL database. On a busy site, we
recommend to only enable API logging for debugging purposes or to enable the
CleanUp auto task that removes log entries older than 30 days from the
API log table. See Manage Auto Tasks for
details.
Manage Auto Tasks
There is a number of background jobs that are being performed by the
yvva-based td-regserver service. The individual tasks are explained in
more detail in chapter Auto Tasks.
To review and configure these automatic tasks, click Admin ->
Manage Auto Tasks in the top menu bar. Note that this option is only
available to the Default Provider and users having the
MANAGE-TASKS privilege. In general it’s not necessary to
change the default values.
You will see a list of currently available tasks, their status and description as well as some run time information.

To edit a task, click Edit next to the desired task. You will see a form that allows you to enable or disable the task and modify some of the task’s parameters, e.g. the frequency in which this task will be called.
If no frequency is provided, the task is scheduled to run every time the
td-regserver background service wakes up (10 seconds by default, as
defined in file /etc/td-regserver.conf).
We do not recommend to change any other settings of existing tasks or to remove or disable the system’s default tasks.
After you are finished, click Save Task to save any changes you have made, or Back to return to the list of tasks.
To create a new task, click Create New Task on top of the page. Creating new tasks can be necessary to add custom functionality which requires server side processing. New background tasks need to be implemented in yvva code and must be integrated into to Registration Server’s code base.
Fill in the form fields with the required values and click Create Task.
License Report
License reports are a summary of license usage on a particular day. The Registration Server automatically creates a license reports on twice a month: on the 15th and on the last day of the month.
Select the License Report menu item from the Admin menu to go the
License Report page. You must have the MANAGE-REPORTS privilege
for this option to be available.
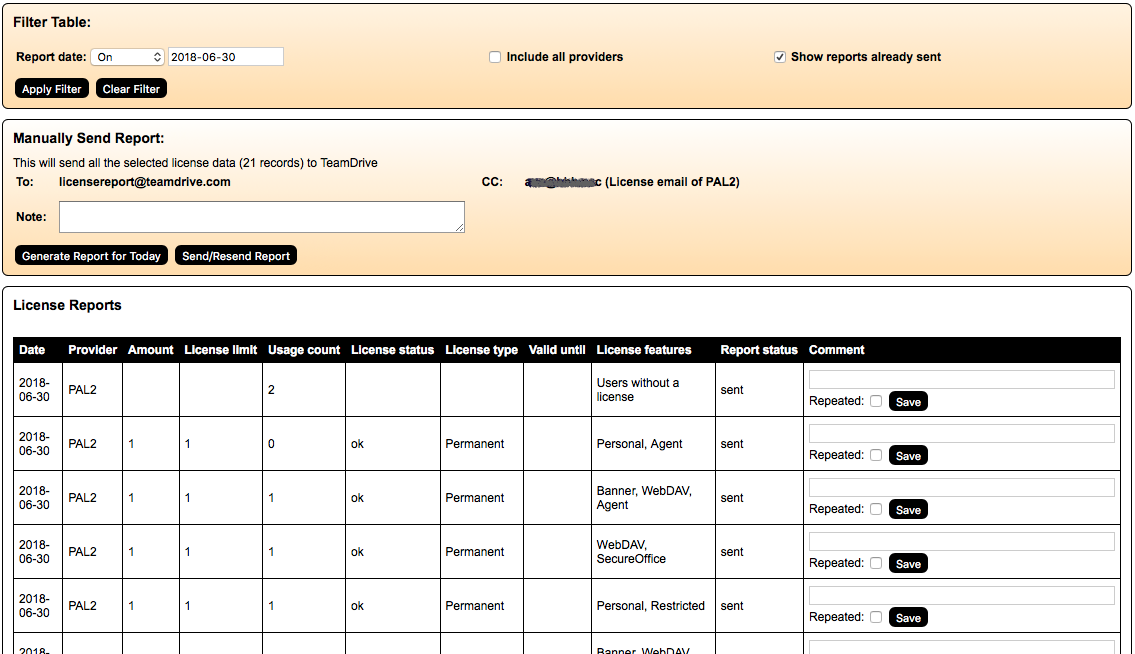
The reports are created by the “License Report” Task. The reports are created before 4:00 in the morning, on the day of the report. After 20:00 any reports not yet sent, are automatically emailed to “licensereport@teamdrive.com” and a CC is sent to the provider License email address.
Using the Filter Table allows you to select reports by the time created, and whether to include reports that have already been sent. By default you will see all reports that have not been sent.
Manually Send Report
License reports can be sent and/or resent manually. It is also possible to generate an ad-hoc report if one has not already been generated for the current day. Use the Generate Report for Today to manually report.
Click the Send/Resend Report button to send all the report records that are select in the License Reports table below.
You can add a note to be included in the email. In addition, you can add a comment to each line of the report, if the report is a monthly report. Check the Repeated checkbox to have a comment repeated automatically in future reports. Click Save to save you comment on repeated option for a line.
Providers
The provider specific data is divided into two parts: the Provider Record with the basic provider informations and the individual settings for the provider to control the features and functionality of the Registration Server.
User’s that login with Provider-Level privileges have control of all providers that their provider manages. In this case there is a drop-down menu at the top of the Admin Console page which is used to select the provider. In addition, search filters provide an “Include all providers” option.
Provider Record
At the top of the Provider Settings is the Provider Record section which display the details of the provider in a number of editable fields.
If you have the EDIT-PROVIDER privilege, the you can change these values
and click Save Changes to make changes.
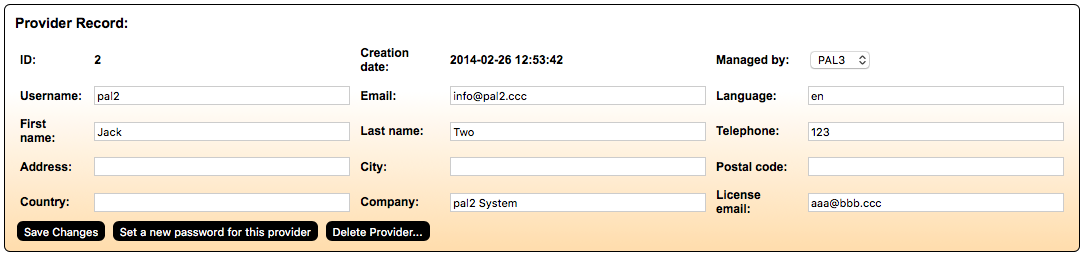
If you have access to multiple provider then select the provider you wish to manage in the drop-down menu at the top of the page:

Delete Provider
Deleting a provider will remove all users, licenses and depots belonging to the provider. If you proceed, the selected provider will be scheduled for deletion. The deletion process will start after approximately 30 minutes.
In case your Registration Server is connected to the TDNS (TeamDrive Name Server), contact TeamDrive and request the removal of the selected provider from TDNS. Deletion of the provider will only be completed once the reference to the provider has been removed from TDNS. Once in progress, deletion cannot be undone, i.e. the result is permanent.
Provider Settings
There are a number of provider specific configuration options that can be customized based on your requiremements. To edit provider settings, click Providers/Provider Settings in the top menu bar.
Warning
Changes to the Provider settings will only be active after the caching
period defined in RegServer/CacheIntervall has passed (the default is
1800 seconds or 30 minutes). If no cache interval was set, you need to
restart the Apache HTTP Server of the Registration Server to reload these
values.
The lower section of the page shows list of customizable settings for the selected provider, grouped in categories.
The available settings and their function are described in the Reference Guide (see Provider Settings).
To change a setting, select one of the categories (e.g. AUTHSERVICE, CLIENT, EMAIL, HOSTSERVER, etc.). The settings in each group are divided in two blocks:
The upper white marked area with the settings which have been added to the provider. Change the desired setting either by entering a new value or selecting one from the drop down menu, and click Save in that value’s row. Do not change more than one value at once — always save your change before modifiying another value. Note that not all settings are editable. To remove a setting click Unset. The entry will disappear from the upper list and can be found in the lower list now and the pre-defined default value will be used. Note that not all settings can be removed.

The lower grey marked area has additional settings which are currently not set for the provider. These settings use the pre-defined default values.
To change the default value, click on Set to add this setting to the provider and change the value as described above in the upper list. If you added all available settings, the grey marked box will disappear.
Manage Email Templates
The Registration Server is shipped with the default set of email templates
located in /opt/teamdrive/regserver/setup/templates/email.
A new created provider will use the default templates from the file system.
The templates are combined into groups for a better overview. A few groups
will be hidden by default if they are not required due to the current provider
settings. For example: The mail templates in the group
USER-INVITE-USER are only necessary, if you define a value for the
provider setting INVITATION/PROMOTION_UPGRADE. Using the button Show
you could make the templates visible even you are not using them.
The templates are combined into the following groups:
- CLIENT-INTERACTION: This is the default set of templates which are necessary in all cases. They are important for the client interaction like recieving the activation mail, sending invitation mails to other users and for password and email changes.
- TRIAL-LICENSE: Only necessary if you offer trial licenses to your users.
- USER-INVITE-USER: Only necessary if you offer a referral program for your users.
- SERVER-ADMINISTRATION: These templates will only be used for the server setup and two-factor authentication in the Admin Console.
- API: Only necessary if you will offer an own web interface for your
users and you will use the Registration Server API to allow users to
register and manage their accounts. Will also be used by the adminconsole
in case of changing the email address or password. You have to allow
sending mails from the API using the provider setting
API/API_SEND_EMAIL - API-LICENSE-CHANGES: Only necessary if you use the API and you want to send confirmation mails for license creation and changes.
- GROUPS: Emails for inviting users to groups.
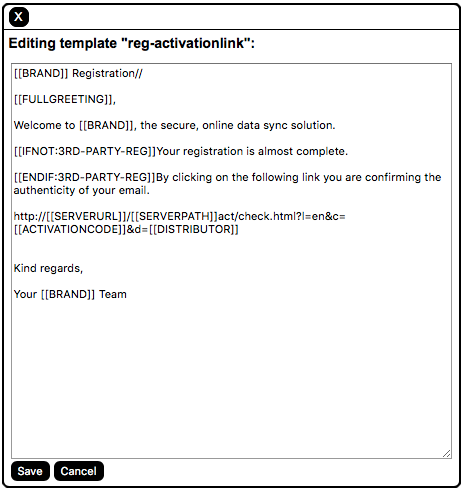
The provider can edit the default templates by clicking Edit next to
each template to open it in an editor window. The templates use placeholders
which have the form: [[ ... ]]. The placeholders are replaces by appropriate
values when the template is processed before being sent.
You will find a list of all macros in the chapter Templates for Client Actions.
By saving the changes, the modified template will be stored in the database for this provider and the default template in the file system will no longer be used.
The templates are language specific. For each language you wish to support
you have to create a set of email templates. The supported languages for the
mail templates will be defined in the provider setting EMAIL/EMAIL_ALLOWED_LANG.
Manage HTML Templates
The Registration Server is shipped with the default set of HTML templates
located in /opt/teamdrive/regserver/setup/templates/html.
For the HTML templates the Registration Server is using the same logic as for the email templates. A newly created provider will use the default template from the file system as long as the provider has not modified the template. Modified templates are stored in the database.
HTML templates are language specific. The supported languages for them
will be defined in the provider setting LOGIN/ACTIVATION_ALLOWED_LANG.
There are three main template groups:
- activated-*: HTML templates to activate a client installation
- newemail-*: HTML templates to confirm email changes in the client
- portal-*: HTML templates for the web- and 2-factor-authentication (see How to Setup Two-Factor Authentication)
CSV User Imports
In addition to adding users manually, you can automatically create multiple users by importing them via CSV files (which can be created by extracting the user data from another directory service or user information source).
This requires that CSV import is enabled and configured correctly in the provider settings. See chapter Importing Users via CSV Files for more details on the configuration of the CSV import functionality and the structure of the CSV file.
Since users can only imported directly to a provider, you require Provider-Level privileges in order to have access to this feature.
Upload CSV File
To upload a CSV user list via the Admin Console, go to the Providers menu and select the CSV User Imports item, or click the button after selecting the Providers menu item. Make sure that you have selected the correct provider in the provider drop-down at the top of the page (if you have the right to manager multiple providers).
Clicke the “Choose File” button in the Upload CSV File section. A file selection dialogue will pop up, allowing you to select a local CSV file to upload (only files with .txt and .csv extensions will be selectable). Choose a file and click Open. To upload the file, click the Upload File button. After the upload has finished, you will see confirmation as to whether the upload was successful or if any errors occurred.
The uploaded file will appear in the CSV Logs section with the “wait for processing” status. The file will be processed the next time the import autotask runs. See “CSV Import” Task for details.
CSV Logs
When data is imported from a CSV file, an import log is created. This log contains information about the success/failure of the import.
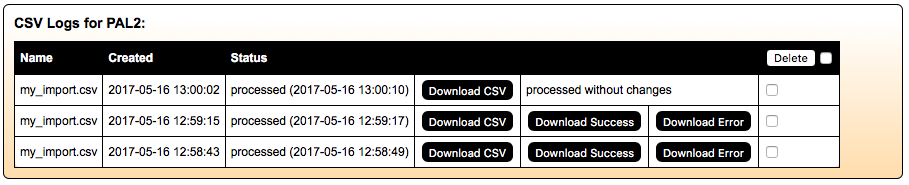
Navigate to the Providers / CSV User imports section to view a list of all uploaded CSV files, their status and the log output of the previous import run.
A page will come up that lists available logs. Each uploaded file can be downloaded again by clicking Download CSV. The status of each log indicates whether the import was successful, and at what time the log was created and processed. Click Download Success or Download Error to download a log of the successful or failed import. Click Delete to remove CSV files.
Create Provider
A new provider can be added by clicking Create Provider. You must have
CREATE-PROVIDER privileges for this function.
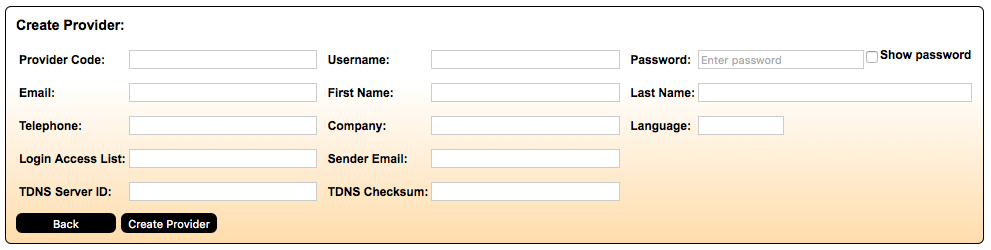
In order to add a provider you need a valid and provider code. Provider codes must be registered on the TDNS (TeamDrive Name Server) before they can be used to create a new provider. Contact TeamDrive in this regard if you need to create a provider. You will then be supplied with the TDNS Server ID and TDNS Checksum values.
Please provide values for the following required fields: Username, Password, Language, first and last name, Company and Sender email.
Telephone and Login Access List are optional.
Accounts
Accounts are a collection of users, licenses and depots that can be managed as a unit. An account is owned by a provider and has one or more managers that need not be members of the account. Accounts are solving the problem, that users cant be deleted without deleting their depot and license (or moving them to an other user before). Managers of an account can be added or deleted without any effects to the depot and license of the account.
The owner of the resources is automatically manager of the account and is
granted LOGIN-RIGHT and MANAGE-ACCOUNT privileges
(see User Rights) which includes several account
managing rights. Account managers are allowed to login at the admin
console and manage their account users, licenses and depots. But they are
only able to see their own account users and have no possibility to see
other users.
Manage Accounts
Selecting the Account menu item will take you to the Manage Accounts page. Here you find a list of all accounts to which you have access.
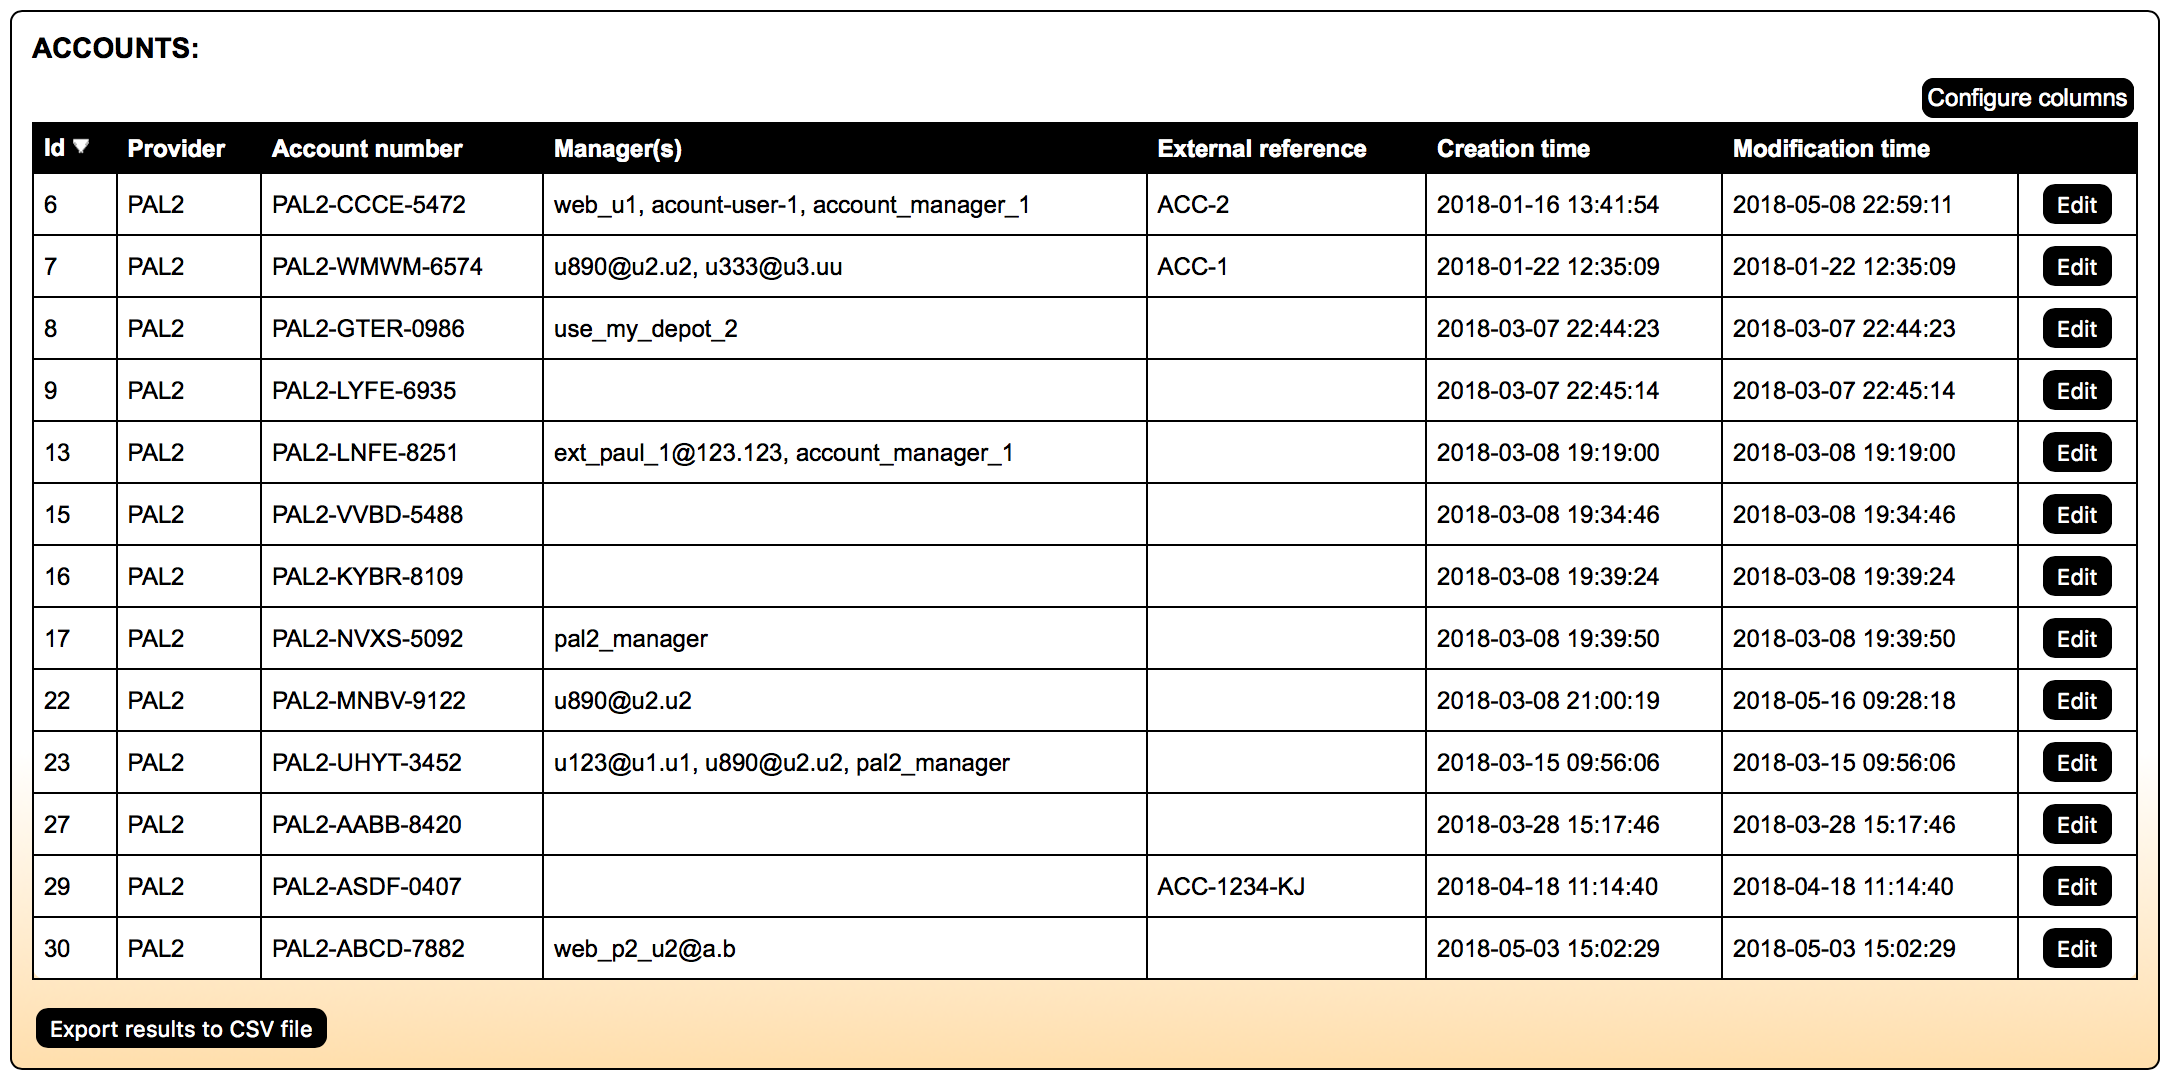
Use the Filter Table section to narrow the selection down to the accounts you are interested in if necessary. A “contains”, case-insensitive search us done for the values entered in the Account number, External reference, Account manager and Department fields.
If you have access to multiple providers, then the Include all providers checkbox allows you to search and list accounts from all providers under your control.
Click the Edit button in order to view details, and edit an account. This will take to the Edit Account page.
Edit Account
On the Edit Account page you can view and change all aspects an account.

Account Record
In this section you can set a number of account level options:
Master user: A master user is a user that is automatically invited to all spaces created or joined by the user’s of an account. If the master user is run by a TeamDrive agent, then you should set Enabled auto-accept invitations for the user (see User Record).
Disable network volumes: This option prevents users from creating spaces on network volumes.
Disable the Key Repository: Use this option to disable the Registration Server key repository for all users in the account. Note that users that are not using the key repository need to explicitly invite themselves to spaces when they install a new device. They also have to manually backup their space keys backup file which is located in the SpacesBackups folder. Without this file the user cannot rejoin his spaces.
Account depot: Here you can specify a depot belonging to the account as the “account depot”. The account depot is automatically distributed to the all devices of all users in the account. It is also set to be the “selected depot” (see below).
Disable setting default depot on the client: Check this option if you want to prevent users from permanently changing the default depot on client devices. The client-side default depot, is the depot that is used to create spaces if no other depot is explicitly selected.
If the user has not changed the default in the client, then the “selected depot” which is specified by the Registration Server will be set to the default depot on client devices.
Disable import of hosting services: The prevents users from importing TeamDrive Hosting Service access credentials for a particular depot on client devices. This ensures that the only depots that users have access to (for space creation) are those distributor by the Registration Server.
Disable TeamDrive Hosting Services: This disables the creation of spaces on TeamDrive Hosting Services which includes all depots managed by the Registration Server. If Hosting Services are disabled, users must use alternative storage such as a WebDAV server, or the TeamDrive Personal Server (TDPS). This does not prevent users from joining existing spaces that are hosted by TeamDrive services.
Disable TeamDrive Personal Server usage: This option prevents users from adding TeamDrive Personal Server (TDPS) access credentials to a client device, and from creating spaces on a TDPS.
Disable WebDAV Server usage: This option prevents users from adding WebDAV server access credentials to a client device, and from creating spaces on a WebDAV server.
Inbox user: An “inbox” is a published page which accepts anonymous uploads into a space folder. The inbox can be used hosting a stand alone TeamDrive Agent or using the Inbox Service hosted by the WebPortal (version 2.0.1 requiered). Inboth cases create you need to create an “inbox user” and assign the user a license with the inbox feature flag. The name of the inbox user must be specified here which must be a memeber of the account. For the stand alone version deploy a TeamDrive agent with a login as this user and the agent will then publish the page. For the Inbox Service login with the user credentials and the Admin Console will setup the inbox on the WebPortal server.
Inbox Agent URL: This is the URL that references the TeamDrive agent that published inbox pages. The TeamDrive agent must be running as the user specified as the Inbox user. Once you have set this value, users of the account are able to create inbox pages for any folder after inviting the inbox user to the space.
Inbox banner An optional banner image which is displayed when opening the Inbox URL. To remove an existing image, upload an empty file with a size of 0 byte.
Inbox footer An optional footer text or html which will be displayed at the bottom of the Inbox.
Public page banner An optional banner image which will be displayed for published files in the spaces. The banner image will be set on the Hosting Server for all Depots of the account. To remove an existing image, upload an empty file with a size of 0 byte.
Public page footer An optional footer text or html which will be displayed at the bottom of the Inbox.
Account Members
This section contains a list of account members and managers. Users may only be a member of one account. Click the Edit button in each line to go to the Edit User page of a user. The Remove button removes the user from the account, but does not delete the user.
Note
If you are an account manager, you may not have the privileges to add the user to the account again. Contact your provider which can add the user to your account again. The More Info button will reveal the licenses and devices belonging to the users.
If the user is a member and a manager, then you have the option to either remove the user completely, or just as a manager of the account.
Click the Add Member to add an existing user as a member to the account. In general, adding existing users to an account requires Provider-Level privileges. Users that are already a member of another account cannot be added to an account before they are removed from their current account.
Click the Add Manager to add a user as manager to the account. Users that are already members of the account may also be added as manager.
Account Licenses
This is a complete list of all licenses that belong to the account. Licenses can either belong to an account (as well as a provider). If you add a license to an account that belongs to a user, the ownership of the license is transfered from the user to the account.
Click the Edit button in each line to go to the Edit License page to view all details of the license, and to modify the license parameters if you have the require privileges.
The Remove button in each line removes the license from the account, without deleting it. This will leave the license without an owner besides the provider.
Note
If you and are account manager you may not have the privileges to add a license again, after you have removed.
The Add License button brings up a list of licenses that you have access to that may be added to the account. “Default licenses” that are single user licenses, may not be added to an account, because they are created exclusively for a particular user. When you add a license to the account, user ownership of the license is removed. Provider ownership of the license is never removed.
If you have the CREATE-LICENSE privilege then the Create License button
takes you to the Create License page where you are able create a new license
for the account, with the features and attributes you require.
If you have the PURCHASE-LICENSE privilege and your provider has an
associated shop, then a Purchase License button is made available which will
take you to the appropriate shop page for purchasing licenses for the account.
Account Depots
This is a complete list of all depots that belong to the account. Unlike licenses, depots may also have a user that is owner of the depot. This user always has access to the depot, even when the depot is not explicitly in-use by the user.
Click the Edit button in each line to go to the Edit Depot page to view all details of the depot, and to modify the depot parameters if you have the require privileges.
The Remove button in each line removes the depot from the account, without deleting it. If the depot still belong to a user of the account, then account managers still have the required privileges to add the depot back to the account.
The Add Depot button brings up a list of depots that you have access to that may be added to the account. Unlike “default licenses” you may add depots created by default to the account. Any depots added to an account will not remove the user level ownership, which remains as is.
If you have the CREATE-DEPOT privilege then the Create Depot button
takes you to the Create Depot page where you are able create a new depot
for the account, with the parameters you require. Note that this requires at
least one TeamDrive Hosting Service to be registered with the provider.
If you have the PURCHASE-DEPOT privilege and your provider has an
associated shop, then a Purchase Depot button is made available which will
take you to the appropriate shop page for purchasing depots for the account.
Create Account
If you have the CREATE-ACCOUNT privilege then Create Account page
is available to you.

To create an account you have to specify an Acccount code, which is must consist of 4 characters. One leading capital letter (the letters from ‘A’ to ‘Z’) and 3 additional letters or numbers from 0 to 9. Optionally you can add a manager and a number or members when creating the account.
Users
Your login credentials determine the level at which you manage users. Superuser-Level allows you to manage all users registered on the server. At Provider-Level you manage the users of one or more providers. At the Account-Level you manage the users of one or more accounts, and at the User-Level you only manage yourself.
Click on the Users menu item to bring up the Manage Users page.
Manage Users
By default, all users are listed. You can narrow down the search by typing in search criteria in the Filter Table section at the top of the page, and then clicking Apply Filter.
Click Clear Filter at any time to go back to displaying all available users.
When filtering results, you can use the percent character (‘%’) as a
wildcard: for example, entering ‘john%smith‘ into the email field
will match users with an email like john.smith@td.net,
johnsmith@shaw.net, johnDoeSmith@gmail.com, etc.
Depending on the number of results, there may be more than one page of output. Click the numbers and arrows above the table to browse through results. To sort the table by a column value, click the column’s name in the title row.
Click on Force All to Re-login in order to force all users selected by the current filter to re-login. This means that users will be promoted on all installed client devices to enter their password. Since this can cause some disruption of the service as user’s forget there passwords, you are asked to confirm this action.
Click Configure Columns to bring up a dialogue that allows you to customize the table output. Select the columns that should be displayed and click Update to update the table view.
Click Export results to CSV file at the bottom of the result list if you want to save the resulting table output into a comma-separated text file. Your web browser will prompt you for a file name under which the file will be stored locally.
Click the More Info button at the end of a user’s row of information to view the user’s licenses and device details. Click Less Info to hide this information again.
Click the Edit button next to a user’s email address to open up the user details page, which displays all of the user’s information, including licenses and the user’s devices in more detail.
Edit User
The Edit User page is divided into several blocks and will show user information about:
- User Record
- User Devices
- User Licenses
- User Depots
- User Rights
- Change Provider
User Record

If a newly registered user has not been activated yet (Status is set to not activated in the user’s record details), you can activate the user manually by clicking Activate User. If the user was already activated, this option will not be displayed.
You can view and change the user’s details like email address, external reference, department or the preferred language. Click Save Changes to commit any changes you made to these fields.
You can move the user to a different provider (only possible for the default provider) by clicking Set New Provider. You can define if the user will get a new depot and license based on the new provider default settings.
You can temporarily disable a user by clicking Disable User. If you disable a user, the user’s client devices will receive a notification from the Registration Server and will inform the user about the deactivation. At this point the client disables all functionality and activity and the user can no longer use the TeamDrive service (e.g. creating spaces, inviting users, etc.) until the user has been enabled again (access to the spaces in the filesystem is still possible).
Clicking Wipe User will wipe all of the user’s devices, delete the user’s key repositories, and disable the user. The devices of the user will delete all local data (space directories in the filesystem, caches, registration information) and will delete itself in the Registration Server’ database. Licenses and depots will be preserved.
Clicking Delete User will delete the user record and all of the user’s devices. Additionally, you can choose to delete the user’s depots and licenses by selecting the appropriate checkboxes in the confirmation dialogue.
You can reset a user’s password by clicking Invalidate Password in the bottom right-hand corner. The user’s client devices will then automatically logout and ask the user to request a new temporary password which must be used to login and specify a new password.
If the provider of the user is using an external authentication service, then Invalidate Password will just force the user to re-login.
Return to the main user list at any time by clicking Back in the bottom left-hand corner.
User Devices
The device list shows information about all of the user’s installed TeamDrive clients with details including: status, creation and last active times, IP address during installation, the client software version, platform and number of pending messages from other users. Clicking the message number (if the value is greater than zero) displays a list of users that sent messages to this device.
Please note that it is normal for inactive devices to have pending messages,
these messages will be picked up when the device becomes active again or will
be automatically deleted if InvitationStoragePeriod is reached.
Devices will not longer be sent messages if the are inactive for the time
specified by the global InviteOldDevicesPeriodActive server setting.
In addition, messages posted to devices are automatically deleted once the message
store reaches the value specified by the InvitationStoragePeriod server
setting.
You can delete one or multiple devices by checking the Delete checklist item for the device(s) in the User Devices section and clicking the Delete button on top of the column.
Note
A deleted device can be re-activated by the user. If you don’t want the user to re-activate his installation, you have to deactivate the user.
The Wipe Device functionality deletes the device’s entry in the Registration Server database after the client software has confirmed that all local data were deleted successfully (space directories, caches, registration information).
User Licenses
This section shows all licenses that are either owned and/or in use by the user. This is indicated in the Usage column. If the user has a “default license”, then this is shown in the Status column.
Users are given a default license, if no other license is assigned to the user when the user is registered. The features of the default license are determined by provider settings (see DEFAULT_FREE_FEATURE and DEFAULT_ACCOUNT_FEATURE).
A license that is in use by the user may also be in use by other users as indicated by the Used/Limit column.
Clicking the Edit button will take you license details page (see Licenses for more details).
Clicking the Remove button removes ownership of the license from the user. In order to change the license the user has in use, click the Change License button in the User Record section. A license that is no longer in use, can be assigned a different user.
If you have the CREATE-LICENSE privilege then the button
Create new license for ... will open the license creation page.
See Creating License for details.
User Depots
If the user has depots on a TeamDrive Hosting Sevice then the information is displayed here. The Usage column indicates whether the user is owner of the depot and whether it is in use, or is the user’s “default depot”.
A user may have a number of depots in use. One of the depots may be “selected”. The selected depot is the selected by default on the client devices. As a result, unless a user specifically selects a different default on the client device, this depot will be used when creating spaces. However, a user is also free to select any other depot that is “in-use”.
The “default depot” is the depot that is created automatically when the user is registered. Whether this is done, depends on a provider setting (see HAS_DEFAULT_DEPOT and API_CREATE_DEFAULT_DEPOT). If there is no “selected” depot, then the default depot is considered to be selected.
Depot information for the user is retrieved from the Host Server via an API call. This information is stored by the Registration Server, but will be “refreshed” if it has not been retrieved for a while. The last retrieval time is indicated in the Last update column, where it is possible to manual refresh the depot information.
In order to see all information pertaining to a depot, click in the Edit button. This will take you to the depot details page which display all details of the depot including the change history and space list retrieved from the Host Server.
On this page you can also delete or deactivate a depot if you have the required privileges.
The button Deactivate Depot allows you to temporarily disable a the depot on the Host Server. The client devices will no longer be able to synchronize the spaces contained in this depot (the spaces will be marked as “Disabled”), until you click Activate Depot again.
Clicking Create new depot for ... brings up the depot creation page. See Create Depot for more details.
Clicking Open Host Admin (only available if you have provider level privileges) opens the respective TeamDrive Host Server’s administration console in a new browser window/tab. You will be required tologon with valid Host Server credentials. Please refer to the Host Server documentation for more information.
User Rights
Depending on what user you log in as, you have different rights and privileges.
When you log in using provider credentials, you are automatically
granted rights depending on whether you are the Default Provider or not.
The Default Provider is granted the SUPER-USER privilege, which includes
all rights. Other providers are granted the PROVIDER-MANAGER privilege,
which includes all rights except: SUPER-USER, SUPER-READER,
EDIT-SETTINGS, MANAGE-SERVERS, MANAGE-TASKS, VIEW-LOGS and
CREATE-PROVIDER
By default, standard users cannot login to the Admin Console unless they
are an account manager. When an account manager logs in he/she is automatically
granted the MANAGE-ACCOUNT privilege.
Other users must be explicitly granted the LOGIN-RIGHT privilege in order
to access the Admin Console.
You grant the LOGIN-RIGHT privilege by clicking on the checkbox with
the title: User has permission to log in to this console. The privilege
details of the user are then displayed.

After the box is checked, a list of additional available rights are displayed. The rights that are enabled depend on your own privileges — you can only grant/revoke rights that you possess yourself.
In order to grant or revoke privileges, check or uncheck the desired privileges
you want to assign to or remove from the user and click Save Changes to apply
the changes. Note that it is not possible to remove privileges that are
automatically granted. For example, the SUPER-READER grants all read privileges
for the entire server. Removing one aspect, such as VIEW-LICENSE is not
possible.
Whether you are able to view or manipulate an object (provider, account, user license or depot) depends on two things:
- whether you have access to the object, and
- whether you have the required privilege.
What objects you have access to depends firstly on your privilege leve. Superuser-Level grants access to all objects. At Provider-Level you have access to objects belonging to the providers you control. At Account-Level you may access the users, devices, licenses and depots that belong to the account. Finally, at the User-Level you only have access to objects belonging directly to the user.
However, as noted above, access is not sufficient to either view, create or manipulate
an object. For this, you must also have the required privilege. All users are
automatically granted the VIEW-USER privilege. This means that, at the very
least, if a user has login privileges, then the user is able to view his/her own user
record.
All available privileges are described in the sections below.
Superuser-Level Privileges:
SUPER-USERThis is the privilege level of the Default Provider. In other words, users that login as the Default Provider are automatically granted
SUPER-USERrights. Users with this right have all other rights (explicit grants are not required. This means the user can view/edit/delete and create records that are associated with all providers, and also has the Server-Level privileges.SUPER-READERThis is similar to
SUPER-USERrights, but not include the right to change anything.
The following are Server-Level privileges:
These privileges are must be granted explicitly to any user that does not have
SUPER-USERprivileges.EDIT-SETTINGSThis means that the user can edit server-wide settings (the Edit Settings menu). By default, only the Default Provider has this privilege. See Server Settings for details.
MANAGE-SERVERSThe user has access to the Manage Servers page where he can en-/disable communication between the own Registration Server and all other servers available in the TDNS network. See Manage Servers for details.
MANAGE-TASKSUser can access the Manage Auto Tasks page. See Manage Auto Tasks for details.
VIEW-LOGSUser can access the View Server Logs page. See View Server Logs for details.
Provider/Account-Level Privileges:
PROVIDER-MANAGERUsers that login as a provider are automatically granted this right. A user with this privilege has all rights accept the Superuser-Level privileges, the Server-Level privileges and the
CREATE-PROVIDERright.PROVIDER-READERThis right is similar to
PROVIDER-MANAGERbut the user does not have the right to modify or create any objects.ACCOUNT-MANAGERThis privilege is granted automatically to all managers of an account. It includes the following:
VIEW, EDIT` andADDprivileges for accounts, users, licenses and depots.DELETEprivilege for users, licenses and depots.PURCHASEandUPGRADEprivileges for licenses and depots.CREATE-USERandGRANT-RIGHTSprivileges.- All Provider-Level privileges (see below).
ACCOUNT-READERThis right is similar to
ACCOUNT-MANAGERbut prevents any changes from being made to the account or its associated objects. An account manager that is grantedACCOUNT-READER, loses the automatically grantedLOGIN-RIGHTandACCOUNT-MANAGERprivileges.
Provider-Level Privileges:
These privileges are included as part of the
PROVIDER-MANAGERprivilege. Users with thePROVIDER-READERprivilege can view the associated pages, but may not make changes.MANAGE-EMAILSUser can access the Manage Emails page to administer the email out queue. See View Mail Queue for details.
MANAGE-REPORTSUser can access the Admin / License Reports page. See License Report for details.
MANAGE-TEMPLATESUser can access the Providers / Manage Templates page. See Manage Email Templates and Manage HTML Templates for details.
VIEW-API-LOGUser can access the View API Log page. See View API Log for details.
Object-Level privileges:
ADD-ACCOUNTThis right is required to add users, licenses and depots to the account.
The
ADD-ACCOUNTright is also required to remove users, licenses and depots from an account. Note that, to remove a user from an account you also need theADD-USERright, to remove a license you need theADD-LICENSEright and to remove a depot you need theADD-DEPOTright.ADD-DEPOTThis is the right to add the depot to the “in-use depot list” of a user, and to add the depot to an account.
Adding a depot to a user also requires the
EDIT-USERprivilege, and adding a depot to an account requires theADD-ACCOUNTprivilege.ADD-DEPOTis also required to remove a depot from a user and from an account.ADD-LICENSEThis right is required to set a license as in-use by a user and to add a license to an account.
Adding a license to a user also requires the
EDIT-USERprivilege, and adding a license to an account requires theADD-ACCOUNTprivilege.ADD-LICENSEis also required to remove a license from a user and from an account.ADD-PROVIDERThis right is required to add users, licenses and depots to a provider.
The
ADD-PROVIDERright is also required when creating an account.ADD-USERThis right is required to set the user as an owner of an existing license or depot, and to add a user a provider or an account.
CREATE-ACCOUNTRight to create new accounts.
CREATE-DEPOTThe right to create new depots.
You must also have ADD-USER` rights and access to the user that is assigned as owner of the account.
To create a depot for an account you also need
ADD-ACCOUNTprivilege and an account level access privilege such asACCOUNT-READER(and you must be manager or member of the account).See Create Depot for details.
CREATE-LICENSEThe right to create new licenses.
To create a license for a provider (i.e. not for a specific user or account) you need the
ADD-PROVIDERright, and a provider level privilege, such asPROVIDER-READER.To create a license for an account you also need
ADD-ACCOUNTprivilege and an account level access privilege such asACCOUNT-READER(and you must be manager or member of the account).If a user is assigned as owner of the license (which is required if the license is not created for a provider or an account) you must also have ADD-USER` rights and access to the user.
Creating license must be enabled (see ALLOW_CREATE_LICENSE) for the provider. See Licenses for further details.
CREATE-PROVIDERRight to create a new provider.
CREATE-USERThis is the right to create new users.
To create a user for a provider you also need the
ADD-PROVIDERright, and a provider level privilege, such asPROVIDER-READER.To create a user for an account you also need the
ADD-ACCOUNTprivilege and an account level privilege such as ACCOUNT-READER` (and you must be manager or member of the account).These rights are also required in order to upload CSV files.
DELETE-ACCOUNTRight to remove an account.
DELETE-DEPOTRight to delete a depot.
DELETE-LICENSERight to delete a license.
DELETE-USERRight to remove a user and associated data.
EDIT-ACCOUNTRight to edit accounts data, including adding existing objects to the account.
EDIT-DEPOTRight to edit depots and to set the depot owner and add users to the depot. Setting the owner and adding users additionally requires the
ADD-USERright.This does not include the rights to change the fields covered by the
EDIT-DEPOT-COSTright.EDIT-DEPOT-COSTRight to edit cost sensitive depot fields, including: storage limit, traffic limit and external reference.
EDIT-LICENSERight to edit license details, and set the owner of the license. In order to set an owner you also need
ADD-USERrights.This does not include the rights to change the fields covered by the
EDIT-LICENSE-COSTright.Managing license must be enabled (see ALLOW_MANAGE_LICENSE) for the provider. See Licenses for further details.
EDIT-LICENSE-COSTRight to edit cost sensitive license fields, this includes: license type, features, user limit and external reference.
EDIT-PROVIDERWith this right, a user can edit the details and settings associated with the selected provider (the Providers / Provider Settings menu item). See Provider Settings for details.
EDIT-USERThis is the right to edit a user, and to assign licenses and depots for usage by the user.
EDIT-USERis also required to remove license and depots used by a user.The right is also required in order to upload CSV files as well as the
CREATE-USERright (to import user records). See Manage Users for details.EXPORT-USERUser can export the user table to CSV fromat.
PURCHASE-DEPOTRight to purchase a depot in the associated shop.
PURCHASE-LICENSERight to purchase a license in the associated shop.
UPGRADE-LICENSERight to purchase an upgrade to the license user limit.
UPGRADE-DEPOTRight to purchase an upgrade to the depot storage limit.
VIEW-ACCOUNTRight to view the records an the account page.
VIEW-DEPOTRight to view all records on the Depots page.
VIEW-PROVIDERRight to view the records on the provider page.
VIEW-USERRight to view all records on the Users page.
VIEW-LICENSERight to view all records on the license page.
All-Level Privileges:
GRANT-RIGHTSThe user is able to modify the permissions of other users. Note that even with this right, users can only grant/revoke rights that they have themselves.
Users can revoke there own rights, but note that there is no way to regain these privileges once they have been removed.
LOGIN-RIGHTThis right is required in order to login to the Admin Console. This right is automatically granted to account managers and users that login with provider credentials.
Change Provider
If you control more than one provider, you can move a user to a different provider selecting the provider and clicking Set New Provider. You can define if the user will get a new depot and license based on the new provider default settings.
Create User
To add a new user, click Create User at the top of the Manage Users page, or select the item from the Users menu.
This brings up a form where you can enter the new user’s details. Click Create User when you are done, or Back to cancel the operation and return to previous page.
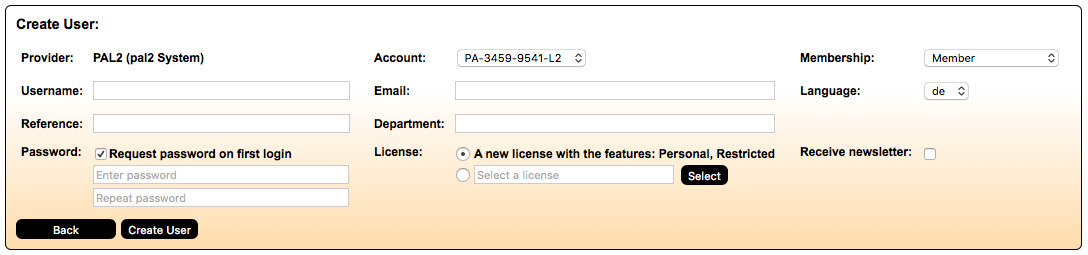
In you control a number of providers, you can select the provider of th user from the drop-down menu at the top of the page. If you manage a number of accounts, a drop-down menu in the form allows you to select one of the accounts. When adding a user to an account you must also specify the membership type.
Note
Note that usernames need to be unique, not just locally, but across the TDNS if your Registration Server is connected to the TDNS. If you enter a username that is already registered on another Registration Server, the Administration Console will return an error.
You can either specify a password by deactivating Request password on first login, or have the user request a temporary password upon first log in (the default).
Note that the user will still not be able to login on a client device, or the Admin Console until the user has been activated. This can be done using the Admin Console, or it can be done by the user who may require an activation email when installing the TeamDrive client.
Clients
This section allows administrate all client and device related tasks, including: client Updates, banners and client log files.
Managing Devices
Select the Manage Devices item from the Clients to see a view of all client device installations. Different filters can be defined to limit the results, e.g. by client version, OS platform or last active date. If you have access to multiple providers you can click the checkbox Include all providers to list the devices of all your users.
You can wipe or delete multiple devices by checking the respective devices and clicking the Wipe or Delete button on top of the column.
The result set can also be exported as a CSV file by clicking Export results to CSV file on the bottom of the table.
Download Client Log Files
The Admin Console allows downloading client log files for troubleshooting purposes.

Licenses
The Licenses menu is only visible if the provider setting
LICENSE/ALLOW_MANAGE_LICENSE is set to True. In addition, users may
only access this manage licenses page if they have the VIEW-LICENSE privilege.
If no other license is specified, then a user receives a default license on
creation. The features enabled for the default license is specified
by the CLIENT/DEFAULT_ACCOUNT_FEATURE provider setting if the user is
created as a member of an account, and by LICENSE/DEFAULT_FREE_FEATURE otherwise.
Instead of defining a default feature, it’s also possible to define a default
license using the LICENSE/DEFAULT_LICENSEKEY provider setting. This license
is automatically assigned to users of the provider on creation.
Manage Licenses
To manage licenses, click Licenses in the top menu bar. A list of licenses is displayed on the Manage Licenses page.
Enter your search criteria in the Filter Table form at the top of the page in order to find specific licenses. Click Apply Filter to apply the selected criteria. Click Clear Filter to return to the full table view.
To customize the columns displayed, click Configure columns on the top right of the table. Select the desired columns and click Update to refresh the table view.
As with the user page, the search results may be displayed over several pages. To export the result set in a CSV file, click Export results to CSV file at the bottom of the table. This will bring up your browser’s file saving dialogue.
To display additional details about a license, click More Info on the right side of the row. This will list all users of the license, as well as the change history of the license. Click Less Info to hide these details again.
Editing Licenses
To edit a license, find the license in the Licenses table and click Edit. This takes you to the Edit License page.

On this page, you can change various features of a license, e.g. the Client features, number of users, owner, user as well as an expiry date.
If you have the EDIT-LICENSE-COST privilege you will be able to change
the license limit, valid until date, features and external reference of the
license. Changing the external reference should be done with due care, since
this may disrupt the operation of external systems that are connected
to the Registration Server.
Once you have finished making changes, click Save Changes to apply them. Delete a license by clicking Delete License.
Each modification creates an entry in the license’s Change History, which is displayed below the editing dialogue.
If a shop is associated with the provider (see SHOP Settings
for more details) of the license, and you have the UPGRADE_LICENSE
privilege, then a button titled Upgrade License will be made available
which will take you to a page in the shop where the license can be upgraded.
Creating License
For creating new licenses the provider setting
LICENSE/ALLOW_CREATE_LICENSE must be set to True.
To create a new license, click the Create License button on the Manage Licenses page, or select this item from the License menu.
Customize terms and features of the license according to your requirements.
If you are not creating a license for an account, you specify an owner of the license by clicking on the Select button next to the Owner field.
Click Create License to create it. Clicking Back will return you the previous page.
Depots
Manage Depots
Select the Depot menu item to go to the Manage Depots page.
Depots are provided by a TeamDrive Host Server which must be registered with a particular provider on the Registration Server. Once registered, the Registration Server makes functions available for the creation and modification of depots.
Depots access information is distributed automatically the TeamDrive client software of users that have the depots in use.
If the HOSTSERVER/HAS_DEFAULT_DEPOT setting is set to True, or if this
is specified on the account level, then new users receive a default depot
created automatically by the Registration Server.
On the Manage Depots page you can use the filter table to search for depots under you control, using various criteria.
Create Depot
Click Create Depot to create new Space depots on a Host Server and assign it to selected users.
If there is more than one Host Server associated with your provider, you can choose the location of the depot by selecting the Host Server from a dropdown list all registered servers.
Type in a letter in the Depot owner field to get a list of available user names. A select list below the field will show all matching user names.
You can define a Storage size by entering the desired amount in the input field. Also enter a Traffic limit value which should be about 10 times the storage siye.
If required, you can modify these limits later on Edit Depot page.
It is possible to assign a depot to multiple users. Type in a letter the field next to Add depot users:. Users with match usernames and emails will appear in a list for you to select. Click on the ‘+’-sign to add more users of the depot.
Click Create Depot to finalize the depot creation.
The user’s client devices will automatically be notified about the additional depot.