Initial Host Server Configuration
Mount the Space Storage Volume
The toplevel directory /spacedata contains the mount points for all space volumes. By default, the mount point vol01 has already been created by the td-hostserver RPM package. Note that it must be owned by the user that the Apache httpd Server runs under (usually apache).
You need to create a dedicated file system that provides the requirements outlined in chapter Storage Requirements.
Mount the file system and create the respective mount entry in /etc/fstab to enable automatic mounting of the file system at bootup. Please consult your Operating System documentation for details on how to perform this step.
Starting the Host Server Instance
After all configuration steps have been performed, we can start the TeamDrive Services to conclude the initial installation/configuration.
Starting td-hostserver
To activate the yvvad-based td-hostserver background task you have to start the service using the provided init script.
The configuration file /etc/td-hosting.conf defines how this process is run.
To start the td-hostserver program, use the service command as user root:
[root@hostserver ~]# service td-hostserver start
Starting TeamDrive Hosting Services:                       [  OK  ]
Use the status option to the service command to verify that the service has started:
[root@hostserver ~]# service td-hostserver status
yvvad (pid  2506) is running...
You can verify the startup by looking at the log file /var/log/td-hostserver.log:
[root@hostserver ~]# tail -3 /var/log/td-hostserver.log
140603 10:51:47 [Note] yvvad startup
140603 10:51:47 [Note] Using config file: /etc/td-hosting.conf
140603 10:51:47 [Note] yvvad running in repeat 60 (seconds) mode
If td-hostserver does not start, check the log file for errors. See chapter Troubleshooting for details.
Starting the Apache http Server
Now the Apache http Server can be started, which provides the TeamDrive Host Server functionality (via mod_pspace) as well as access to the TeamDrive Hosting Service Administration Console and API (via mod_yvva).
You can start the service manually using the following command:
[root@hostserver ~]# service httpd start
Check the log files /var/log/httpd/error_log and /var/log/mod_yvva.log for startup messages and possible errors:
[root@hostserver ~]# cat /var/log/httpd/error_log
[notice] Apache/2.2.15 (Unix) mod_ssl/2.2.15 OpenSSL/1.0.1e-fips configured
-- resuming normal operations
[notice] mod_pspace 1.2.83 (118) Loaded; Admin 1.0.0; TSHS 1.0.0; S3 1.0.0;
Build Jun  2 2014 15:09:55
[notice] mod_yvva 1.0.0 (Jun  2 2014 09:36:29) loaded
[notice] Logging (=error) to: /var/log/mod_yvva.log
[notice] [notice] mod_pspace 1.5.03 Loaded; Build Jun  6 2014
12:42:24;Crash-Reporting-Disabled
[notice] Admin API booted: TSHS n/a; S3 n/a; Path: /spacedata
[root@hostserver ~]# cat /var/log/mod_yvva.log
140603 11:06:31 [Note] mod_yvva 1.0.0 (Jun  2 2014 09:36:29) startup OK
Please consult chapter Troubleshooting if there is an error when starting the service.
Note
You may observe Admin API Errors like the following ones:
[notice] Admin API, WARNING: Host Server Volume Path has not been specified
or:
[notice] Admin API, WARNING: Host Server setup has not been completed
or:
[error] Failed to boot Admin API 1.2.77: System parameter ServiceHostURL
setting required
or:
[error] [client xxx.xxx.xx.xx] (500)Unknown error 500: Admin API Error
-14000: System parameter ServiceHostURL setting required
These errors can be ignored at this stage, they are caused by the fact that the Host Server has not been configured and registered with a Registration Server yet. This step will be described in the following chapter.
Registering and Activating the Host Server
Once the Apache http Server is up and running, open a web browser and point it to the Host Server’s Admin Console:
https://hostserver.yourdomain.com/admin/
If you have not installed a proper SSL certificate yet, your browser might issue a warning about an untrusted certificate.
Alternatively, you can open the Admin Console via an unencrypted HTTP connection. In this case, you will be prompted to proceed using an insecure connection.
When everything is configured correctly, you will see the TeamDrive Host Server Setup page that will guide you through the initial configuration:
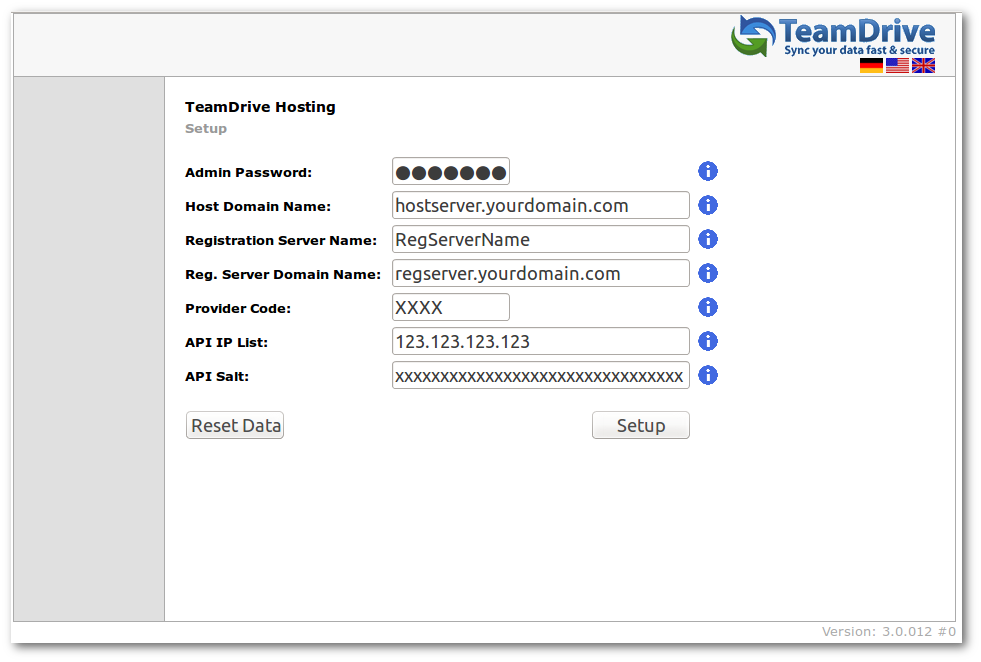
Host Server Setup Page
Fill out the fields according to your environment and requirements:
- Admin Password:
- The adminstrator password that you need to provide to login to the Host Server Administration Console. The adminstrator’s default user name is “HostAdmin”.
- Host Domain Name:
- The domain name of this Host Server. This is the domain name that TeamDrive clients will use to create and access Spaces. The setup tool will try to determine and fill in this name automatically, please ensure that it is a fully-qualified and resolvable domain name.
- Registration Server Name:
- All Host Servers must be registered with a Registration Server. Enter the name of your Registration Server here. Please contact TeamDrive Systems for the correct value if you don’t manage your own Registration Server.
- Reg. Server Domain Name:
- Enter the fully qualified domain name of the Registration Server. Setup will ping this domain to ensure that the Registration Server is running and reachable. Please contact TeamDrive Systems for the correct value if you don’t manage your own Registration Server.
- Provider Code:
- The Host Server will be assigned to a Provider on the specified Registration Server. The Provider Code (aka Distributor Code) is a 4 character code, consisting of letters A-Z and 0-9. If you don’t have a Provider Code yet, please contact TeamDrive Systems for obtaining you individual Provider Code. This code can not be changed later on.
- API IP List:
- Enter a comma separated list of IP addresses of systems that are permitted to access the Host Server API. This list must include the IP address of the Registration Server’s Admin Console. Please contact TeamDrive Systems for the correct value if you don’t manage your own Registration Server.
- API Salt:
- The API Salt is a code that allows the Host Server to validate calls to the Host Server’s API. This value must match the value of the APIChecksumSalt setting on the Registration Server to avoid “man in the middle”-attacks. Please consult the Registration Server Documentation on how to obtain it or contact TeamDrive Systems for the correct value if you don’t manage your own registration server.
Click on Setup to initiate the Host Server configuration and registration process with the Registration Server.
Communication within the TeamDrive network is encrypted with a public-private encryption key pair. During registration, this key pair is generated by the Host Server and the public key is sent to the Registration Server. This will result in the creation of a new user account on the Registration Server, named tdhosting.<host domain name>, e.g. tdhosting.hostserver.yourdomain.com, and a device associated with that user.
After server registration, you are required to enter an Activation Code. Due to security reasons, you will not receive this code automatically. If you don’t run your own Registration Server, you need to request this code from TeamDrive Systems.
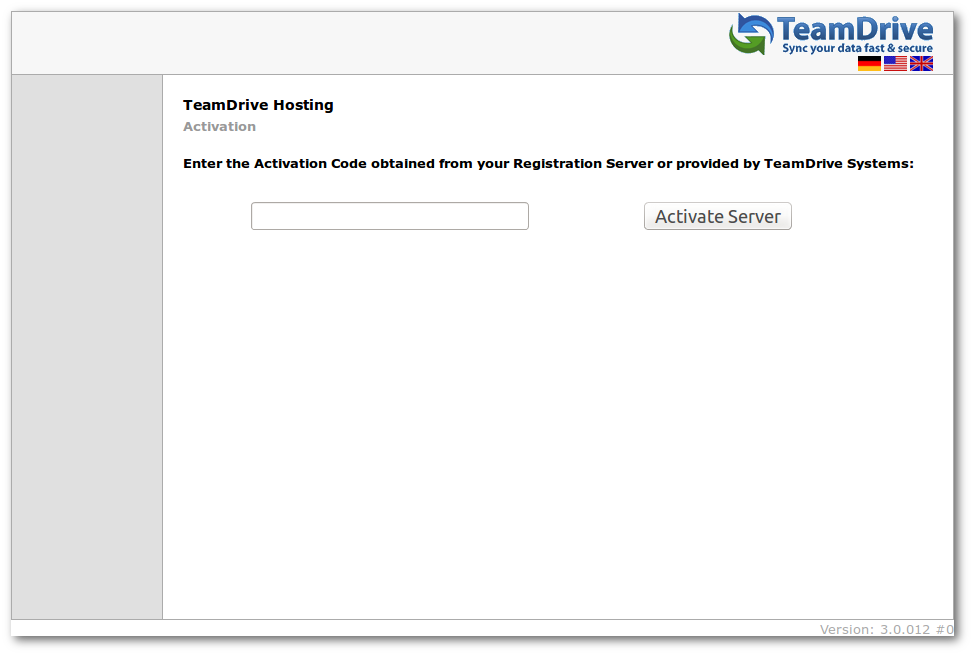
Host Server Activation Window
If you manage your own Registration Server, you need to query the Registration Server’s MySQL database for the host server’s activation code by running the following SQL statement. Starting with version 3.0.018 of the Registration Server Admin Console, the activation code can also be obtained from the “Manage Devices” page.
[root@regserver ~]# mysql -u root -p
mysql> SELECT activationcode, name FROM td2reg.TD2Device \
WHERE Name LIKE "tdhosting.hostserver.yourdomain.com";
+----------------------------------+-------------------------------------+
| activationcode                   | name                                |
+----------------------------------+-------------------------------------+
| XXXXXXXXXXXXXXXXXXXXXXXXXXXXXXXX | tdhosting.hostserver.yourdomain.com |
+----------------------------------+-------------------------------------+
1 row in set (0.00 sec)
Take note of this activation code, enter it into the host server’s activation page and click on “Activate server.”
Warning
If you had to restart the Registration/Activation process because of incorrectly entered values, it’s absolutely necessary to restart the Apache http Server to roll back some internal changes:
[root@hostserver ~]# service httpd restart
Setup and Administration
Upon successful activation, you will be presented with the Host Server Administration Console Home Screen.
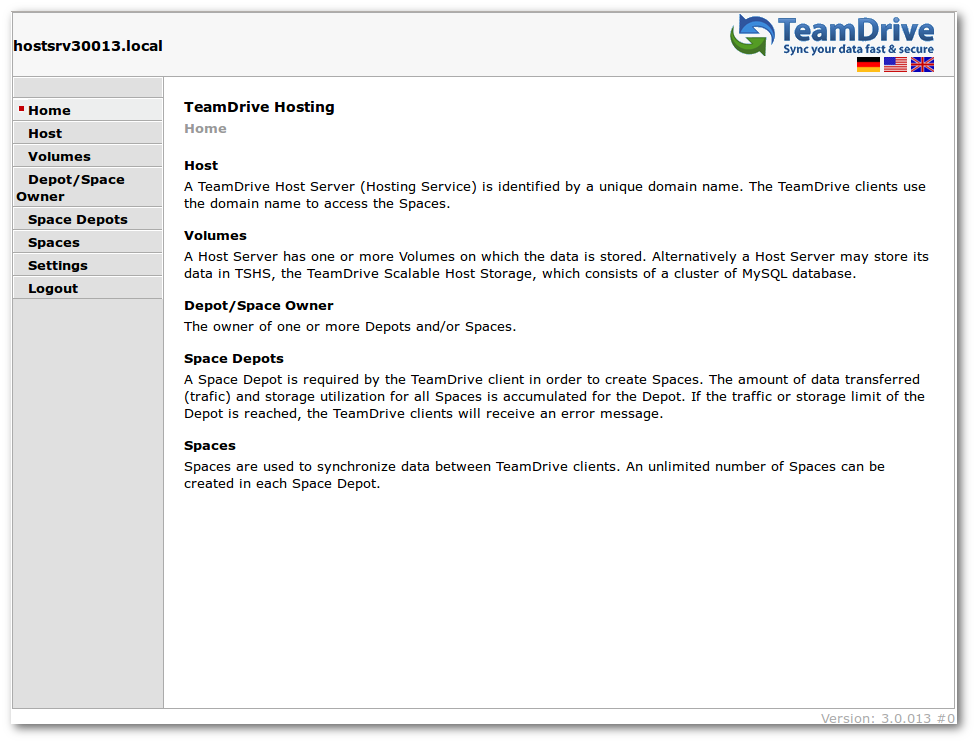
Host Server Admin Console: Home Screen
Host Servers (Hosts)
Overview
In the overview, you can display the Host Servers, the associated volumes, and some statistical values. The volumes change colour between green, yellow, and red depending on the percentage used.
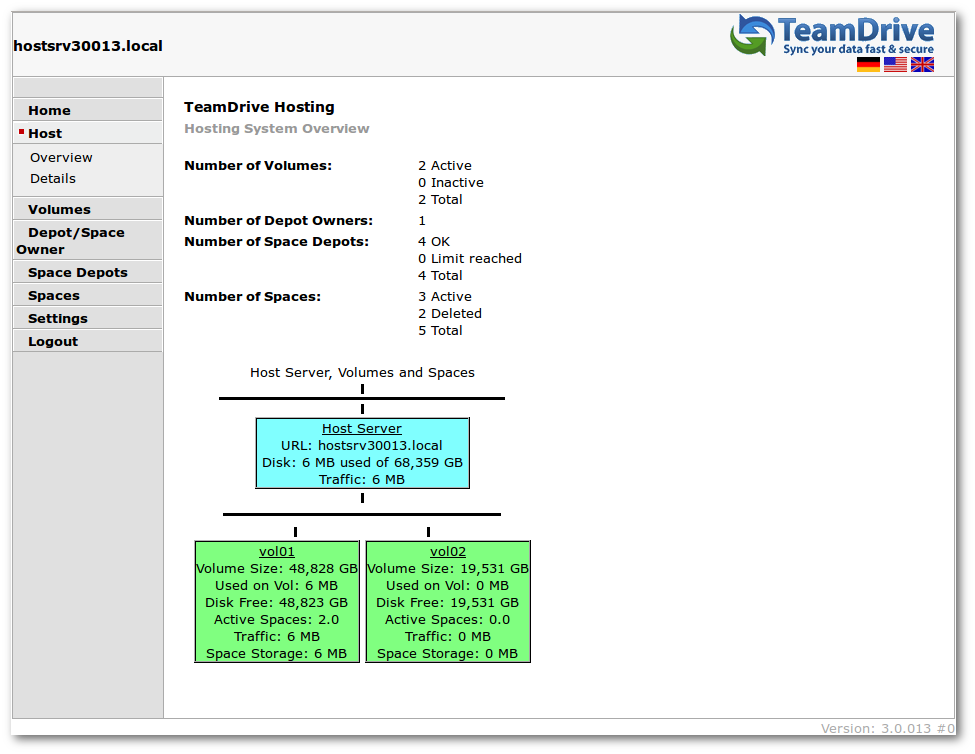
Host Server Admin Console: Server Overview
The values are updated at regular intervals with the “SumUsage” background task. In the process, the associated Depot is updated via the Spaces, as are the volumes and hosts.
Volumes first appear in the view when created as described in the following chapter.
Volumes
Adding more Volumes
By default, the first volume vol01 has already been created during the initial installation.
If required, you can add more Volumes using this screen.
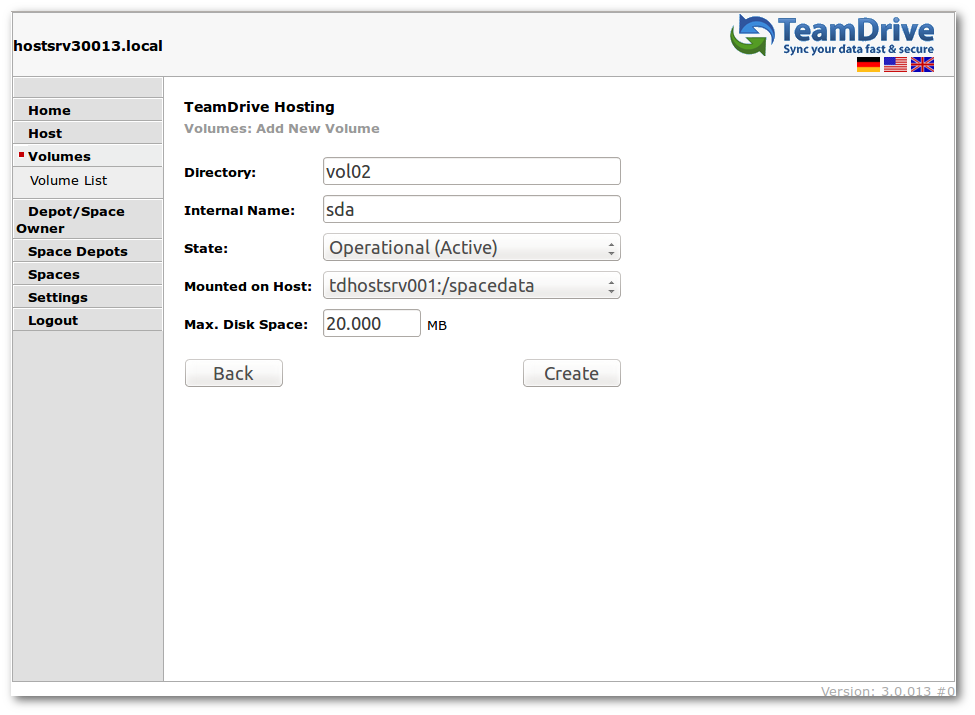
Host Server Admin Console: Add New Volume
Click on Volumes -> Add New Volume in the navigation bar and enter the values as shown in the following example. Make sure to adjust them to match your configuration/environment.
The field Directory defines both the Volume Name as well as the name of the mount point in the filesystem below the /spacedata directory.
Note
Volume names must be of the form: volxx, e.g. vol01, vol02.
Please don’t use blanks in volume names.
The name of a volume cannot be changed later because it becomes part of the Space URL which the TeamDrive Clients use to access these spaces.
The field Internal Name is for your reference only, it could contain the name of the volume on your storage system or the local hard disk drive name or partition.
The volume mount point must be created with the corresponding name in the path to the volumes as indicated in the Host Server configuration, e.g. /spacedata/vol02. The ownership of the volume must be assigned to the user that runs the Webserver (usually apache) using the chown command.
Click on “Create” to create the new volume.
Note
When unmounting the volume, the mount point must be removed in the operating system as well.
Associating the Host Server with a Provider
As a final step, you need to associate your host server with your provider account on the Registration Server. This can be performed via the Registration Server’s Admin Console, which you can usually access via the following URL:
https://regserver.yourdomain.com/adminconsole/
Please see the Registration Server Manual for details.
Log in with your provider login and click the tab “Edit Distributor Settings” (Registration Server version 3.0.017 and older) or “Edit Provider Settings” (Registration Server version 3.0.018 and newer).
In the section “Distributor Settings”, click on the Button labelled “HOSTSERVER”.
Change the configuration setting HAS_DEFAULT_DEPOT from False to True and click “Save”.
The HOST_SERVER_NAME and related settings should now appear in the list of HOSTSERVER settings. Select your host server from the selection list and click “Save” to apply this change.
If required, adjust the other settings from the HOSTSERVER category to match your requirements, e.g. HOST_SERVER_URL, HOST_DEPOT_SIZE and HOST_TRAFFIC_SIZE.
Testing Client Access
The Host Server has now been set up. To test its functionality, start a TeamDrive Client and create or log into a user account belonging to the Provider Code this Host Server has been associated with.
When creating a new space, the Host Server should now be available in the “Server” selection list of the Client’s “Create a Space” dialogue.
After the space has been created, take note of the Server URL and Space ID in the Client’s Space Information panel. The URL should point to the host name of your Host Server.
On the Host Server, a directory with that Space ID as the directory name should have been created in /spacedata/vol01/. If you add files to this Space via the TeamDrive Client, the encrypted versions should appear in the respective Space’s data directory shortly afterwards.
Also try publishing a file (requires a Professional Client License), the file should be uploaded to the Host Server in unencrypted form and placed into a subdirectory below the public directory of that space. Try downloading the file using the URL provided. Again, the URL should point to your new Host Server.